Basic Concepts
Buttons and Pages
One of the most important features of the Mastermind is the ability to redefine buttons. Each button can be configured for function, color and name, as well as quite a few other settings.
There are many button types available, but they can be broken down into a few categories:
Preset and Bank Buttons
When you're selecting banks, the bank number will be displayed in the main display, and it will cycle through the names of all presets in the current bank, lighting the appropriate preset button. (On the Mastermind GT, the preset names will be displayed over each preset button and the LCDs over the preset buttons will flash). This allows you to preview the presets in the bank without needing to select a preset. The Mastermind will wait for you to select a preset before continuing. You can either stay in bank selection and continue to use the Bank Up and Bank Down buttons to move through the banks, or you can press a preset button to load that preset.
Example: A Mastermind PBC/10 has five preset buttons. When you power it up, the preset buttons select presets 1-5. Pressing Bank Up will shift the preset buttons to access presets 6-10. Pressing Bank Up again will shift the preset buttons to access presets 11-15. Pressing the second preset button at this time will select preset 12.
Instant Access ("IA") buttons are multi-purpose buttons that perform a list of actions when pressed. These actions can send MIDI messages, turn on audio loops in the PBC, and many other functions. Typically, these buttons are used to perform small changes in a system. For example, turning on a loop on a switcher, or turning on an individual effect on a multi-effect processor.
For more information on preset, bank and IA buttons, see Mastering the Mastermind Episode 3, MIDI Controller Basics
The Mastermind is not limited to the number of physical buttons the device actually has. Buttons are arranged in 16 button pages, and each page can have completely different settings for each button. There are Page Up and Page Down button types that allow you to switch between these button pages. On the Mastermind GT, there is also a Page Menu button type that lets you choose a button page from a list.
Each preset can be programmed to automatically recall a specific button page. You can, for example, use this feature to switch between a button page that controls your effects and another page that has controls for your looper, depending on which controls you need in each preset.
For more information on button pages, see Mastering the Mastermind Episode 4, Using Button Pages
Local Button Pages
Also, each preset can have a local button page. This is an additional button page that's only available when you're using a specific preset. When using a local page, the local page takes the place of button page 16. Each preset can have its own local button page if desired. This allows you to have up to 768 additional pages, one per preset.
For more information on local button pages, see Mastering the Mastermind Episode 18, Local Button Pages
In the Globals Tab, there are some settings that affect how each group works:
Send Off Messages - When this is checked, a button that is turned off as a result of pressing another button will send its messages. When this is not checked, only the button that's actually being pressed will send its messages.
Group Actions - You can assign up to 20 actions to a group. If one button in the group is on, and you press it again to turn that button off, that's considered an "off" event, and it will run the actions. Conversely, if no buttons in the group are on and you press a button to turn it on, that's considered an "on" event, and it will run the actions. Using Group Actions requires that Allow All Buttons Off is turned on for the group.
For more information on button groups, see Mastering the Mastermind Episode 9, Groups
Actions
Actions are instructions given to the Mastermind to tell it to perform certain tasks. This can be sending MIDI messages, engaging the tuner display, changing button pages or presets, turning on audio loops and many other functions. By using action lists, you can configure your buttons and presets to perform complex tasks that go way beyond the capabilities of most MIDI controllers.
Actions are arranged into ordered lists, and these action lists can be used in a number of places:
Editing Actions
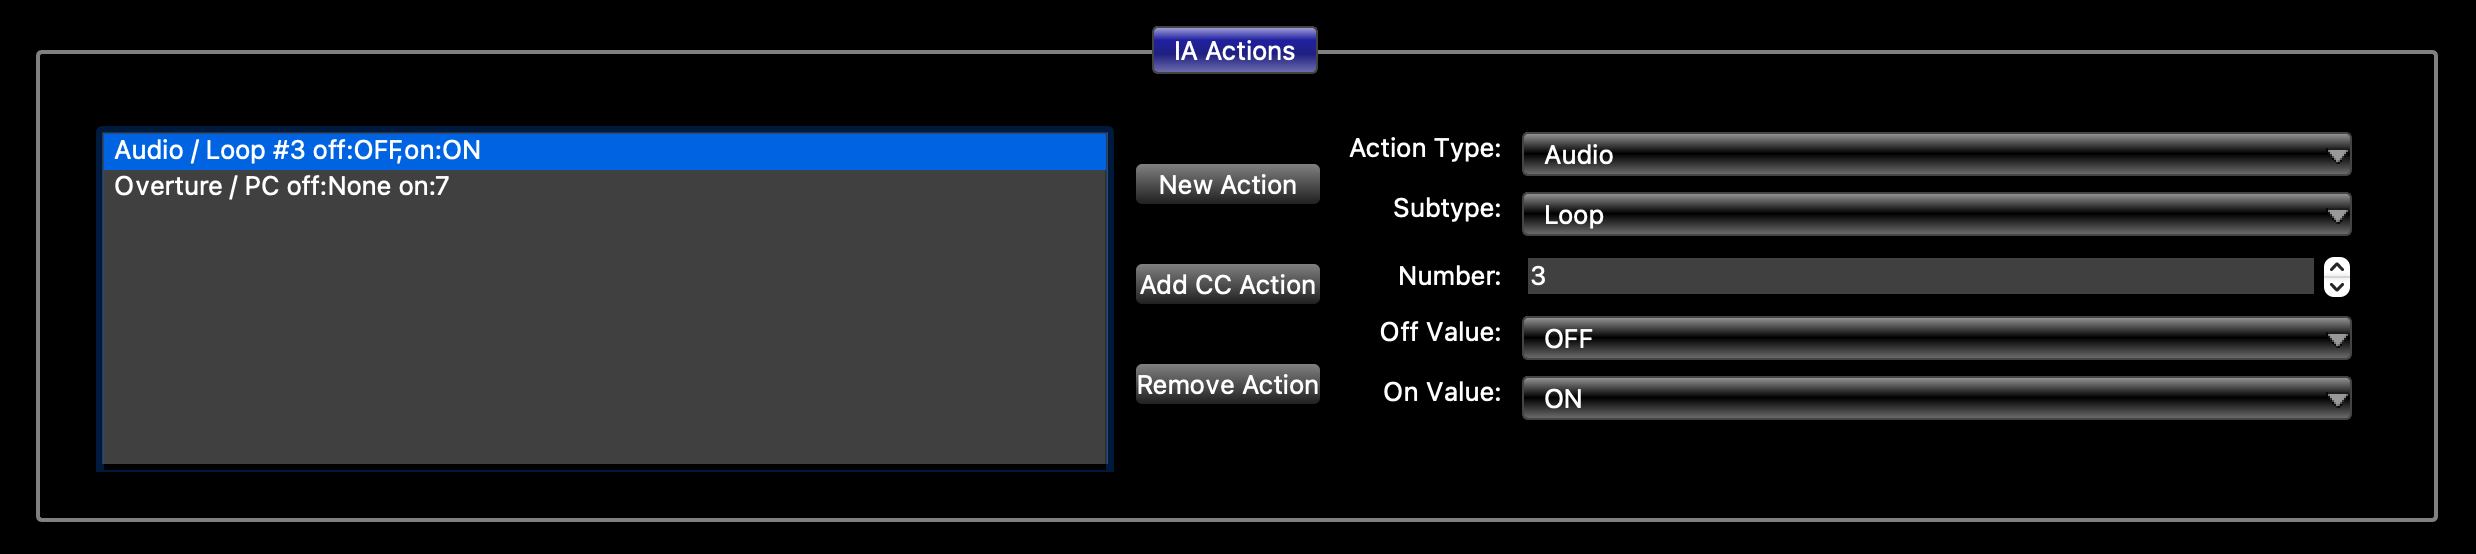
The action editor looks the same wherever it is displayed. The list of actions is displayed in the left column. Selecting an action in the left column displays its parameters in the rightmost column, where you can view and edit them.
The action list is executed when a button is pressed, preset is selected, or expression pedal is moved. When this happens, the actions in the list will be executed from top to bottom. You can change this order by clicking on an action and dragging it to its new position in the list. When dragging, a line is displayed showing where the action will be inserted.
The middle column contains buttons that allow you to create and delete actions:
New Action - Creates a new action and adds it to the end of the action list.
Add CC Action - Pops up a requester, showing a list of your devices and the CCs that are available for the currently selected device. Select a device, then select a CC and press Done. This is the quickest way to add an action to control your devices. This option is not available for Generic MIDI devices.
Add Step - Adds a Step action to an IA Cycle button to the bottom of the action list. This button is only visible when editing a button and the IA Cycle checkbox is checked.
Remove Action - Removes the currently selected action from the list.
Action Parameters
The rightmost column is where you can edit each action's parameters.
Many actions have an On Value and an Off Value. These actions can do something different when the action is turned on and when it is turned off. When using an action with a button, external switch or expression pedal position switch, turning on a button or switch turns the action on and turning off the button or switch turns the action off. When using actions in a preset, the action is turned on when the preset is loaded. A preset action is never turned off, and for that reason doesn't have an Off Value.
In certain places, you can specify special values. Where special values are supported, there is an ellipsis (...) button next to the value field. Clicking this button lets you choose a special value instead of a number. For example, on the System / Page action, you could specify Previous instead of a specific page number. This switches to the previously selected page.
Action Type - Selects the action's type
- None - disables the action
- CC Toggle - sends a MIDI CC (Continuous Controller) message. You can set different CC values for On and Off states. When assigned to an IA button, each press of the button will toggle between sending the Off Value and the On Value
- CC Momentary - sends a MIDI CC message. This differs from the CC Toggle type in that the On Value is sent each time an IA button is pressed and the Off Value is sent each time the button is released. When using this action in a preset or expression pedal's action list, it works the same way as CC Toggle
- PC - sends a MIDI PC (Program Change) message to a device. You can set different PC numbers for On and Off states
- Note - sends a MIDI Note On message to a device. You can set a note number and velocity. These will be sent when the action is turned on. When the action is turned off, the same note number will be sent with a velocity of 0, indicating Note Off. (Note: in the Globals tab, there is a setting that configures the Mastermind to send "true" Note Off messages instead)
- Sysex - sends a MIDI Sysex message. These are predefined MIDI messages that can be of any type. You can select different Sysex messages for both On and Off states. Both the On and Off messages are chosen from a list of messages that are defined in the Sysex Tab
- System - indicates a System action. System actions don't send a MIDI message, but perform other actions such as changing button pages, presets, etc. There is a Subtype parameter, which determines what the System action does:
- BPM - sets the current system tempo in BPM. The parameter is a number (with one decimal place) indicating BPM, or one of several special values:
- Off - Turns off tempo, shuts off MIDI clock if it was active
- Preset - Selects the tempo specified in the current preset
- Same - Leaves the current tempo unchanged
- Song - Selects the tempo specified in the current song
- Add 1 - Adds 1 BPM to the current tempo value
- Minus 1 - Subtracts 1 BPM to the current tempo value
- Add 0.1 - Adds 0.1 BPM to the current tempo value
- Minus 0.1 - Subtracts 0.1 BPM to the current tempo value
- ExpPedal - Loads one of the specified expression pedal settings blocks for a specific expression pedal. This allows you to change the expression pedal settings at any time. The parameters are pedal number and settings block number. The Settings block number can also have special values:
- None - Disable expression pedal
- Global - Select the global setting for this pedal
- Preset - Select the preset override setting for this pedal
- Same - leave the expression pedal settings unchanged
- Send - force the expression pedal to send its current value again. Doesn't load new settings
- IA Mode - Turns IA mode on or off when the action is turned on or off
- IA Store - Stores the current state of IA buttons and PC numbers for each device to the current preset
- Macro - starts executing a macro. All of the actions in the macro are executed, then the next action in this action list is executed. You can define a different macro for the On state and Off state. Macros are defined in the Macros Tab
- Page - displays one of the 16 available button pages when the action is turned on. The parameter can be a page number, or one of several special values. Please note that page 16 loads the current preset's local button page, if the preset has one.
- Down - Moves down one page
- Up - Moves up one page
- Previous - Goes to the previously selected page
- Preset - loads one of the 768 available presets when the action is turned on. The parameter can be a preset number, or one of several special values:
- Alternate
- Down - Moves down one preset
- Up - Moves up one preset
- Previous - Goes to the previously selected preset
- Global - Goes to the Global Preset
- Same - Stays on the same preset
- Set IA - Turns other IA buttons on or off, triggering their actions. See the Set IA section for more details.
- Setlist - Switches to one of the 64 available setlists, or one of these special values:
- Down - Moves down one setlist
- Up - Moves up one setlist
- All Songs - Switches to the All Songs setlist, which contains all songs in numerical order.
- Same - Stays on the same setlist
- Reload - Go back to the first preset in the first song of this setlist
- None - Switches to normal bank/preset mode, disabling song and setlist mode.
- Song - Switches to a specific song, or one of these special values:
- Down - Moves down one song in the current setlist
- Up - Moves up one song in the current setlist
- Same - Stays on the same song
- Step - indicates where one step ends and another begins in an IA Cycle button
- Tuner - turns on tuner mode when the action is turned on and turns off tuner mode when the action is turned off. On the Mastermind PBC, this activates the internal tuner function as well. On other Mastermind models, this activates the tuner display, which will display incoming tuner data from a device like Axe-Fx or Kemper Profiler.
- Wait - Makes the system wait for the specified number of milliseconds, up to 4095 (4.095 seconds). Please note that the system pauses for this time and won't process any other commands or register keypresses until the time has elapsed. However, tempo related functions will continue to operate.
- BPM - sets the current system tempo in BPM. The parameter is a number (with one decimal place) indicating BPM, or one of several special values:
- Audio (PBC Only, LT has Audio/Fn Switch action only) - controls one of the audio functions on the Mastermind PBC. The Audio type has a Subtype parameter indicating what you wish to control, and a Number parameter which indicates which loop, buffer, etc. you wish to control. The subtypes are:
- Loop - turns an audio loop on or off
- Buffer - turns an audio buffer on or off
- Parallel - turns a loop parallel switch on or off. When turned off, the loop is in series. Available on PBC/10 only
- Fn Switch - turns a function switch on or off
- Input - turns an audio input on or off
- Invert - turns the output invert switch on or off. Available on PBC/10 only
- Signal - turns an audio signal mute on or off. This is how you control the dry signal feed to the internal mixer. Available on PBC/10 only
- Output - turns one of the two audio outputs on or off. On the PBC/6X, output #3 is the tuner output which can be activated on the IN 2 jack.
Device - when using an action type that sends a MIDI message, this is where you specify the destination device for the message.
The remaining parameters displayed will depend on the action type selected. These will indicate the MIDI parameters of the message to send, the number of the audio loop to select, etc. Many action types have an On value and an Off value, indicating a value to use when the action is turned on and a different value to use when it is turned off.
For more information on actions, see Mastering the Mastermind Episode 10, Actions
Songs And Setlists
For live performances, your presets can be arranged into Songs and Setlists. Using this feature allows you to group presets by song and makes it easy to rearrange those songs for each performance.
A Song is a group of presets – up to 16 of them – that are selected for use in a particular song. Each preset is typically chosen for the sounds needed in different parts of a song: intro, verse, chorus, bridge, solo, etc. Each preset in a song can be chosen from any of the 768 presets defined in the system, and presets can be used in more than one song.
A Setlist is an ordered list that represents the songs you’re going to play in a particular performance. You press a button to move to the next song in your setlist as you finish each song. You can have multiple setlists defined for different performances - up to 64 of them, or you can choose the "All Songs" setlist, which contains all 1008 songs in numerical order.
When Song and Setlist mode is active, the Bank Up and Bank Down buttons move from song to song instead of moving from bank to bank. When a song is selected, the preset buttons on the current button page display the presets assigned to the song.
If there are more presets in the song than there are visible preset buttons, the remaining presets will not be displayed. On devices like the Mastermind LT, PBC and GT/10, you can't have 16 preset buttons, but you can use Preset + and Preset - buttons to cycle through all presets without needing to have a preset button for each song.
Song and Setlist mode is enabled using the Setlist parameter in the Globals Tab. If Setlist is set to None, the normal bank and preset mode is active. If Setlist is set to All Songs or any of your 64 setlists, then Song and Setlist mode is active.
You can also select setlists using a System / Setlist action. This allows you to switch setlists - or switch in and out of song/setlist mode - with a button press or other event.
For more information, see Mastering the Mastermind Episode 11, Songs and Setlists
IA Mode
As discussed in the Buttons and Pages section, there are many button types, including IA (Instant Access). IA buttons are the most general purpose type - they execute a list of Actions that can send MIDI messages and perform many other functions.
Note 1: This feature was introduced in earlier MIDI controllers, where it was often referred to as IA Reveal.
Note 2: The default Mastermind GT configuration is set up to use IA Mode and has an IA Mode button defined. The Mastermind LT and PBC are not set up to use IA Mode by default, but can be programmed to use it if desired.
Note 5: If you have Actions defined on a button, and Send on Preset Change is turned on for that button, the button's actions will be run every time you change presets. This will happen whether IA Mode is active or not.
More information about IA Mode can be found in Mastering the Mastermind Episode 3, MIDI Controller Basics (towards the end of the video) and Episode 7, Advanced Button Editing
Presets
Presets are the primary way to get many things to happen with a single button press. Each preset can do the following:
- Send a MIDI program change (PC) message to any of your connected MIDI devices
- Perform up to 10 actions, each of which can send any MIDI message or activate another function on the Mastermind.
- Change the state of each of the IA buttons and force those buttons to send their MIDI messages
- Change the currently visible button page, and load a local button page if requested
- Adjust the current system tempo
- Load new settings for expression pedals and external switches (if requested)
These steps are performed in the order shown above – PC messages are sent first, preset actions are executed next, etc.
You can load a preset by pressing a Preset button, or by executing a System / Preset Action. On the Mastermind GT, you can also choose a preset using a Preset Number or Preset Menu button.
Alternate Preset
Each preset can have a Alternate Preset defined. This is a second preset that you want to associate with your preset. Perhaps your preset is used in a solo, but at a certain point of the solo, you need to kick in an additional effect as an accent for a few bars. You can edit another preset and set it as an alternate for the first preset and switch over to the alternate preset for the accent part.
There are two ways you can recall an alternate preset:
- You can set the Preset 2nd Press parameter to Alternate. When you press the active preset button a second time, it will switch you to the preset's alternate preset (if it has one). Pressing the preset button again switches you back to the main preset.
- You can execute a System / Preset action with the special value Alternate. This action can be assigned to an IA button, or used in any other action list.
When an alternate preset is active, the associated preset button (if any) is changed to the Alt Preset Color specified in the Globals Tab. If the alternate preset has its Button Color parameter set to something other than None, that color will be used instead of the global Alt Preset Color setting.
Global Preset
The Global Preset is an additional preset intended to be your 'go-to' sound - a standard sound that you would like to be able to access at any time. Like Alternate Presets, there are two ways to access the Global Preset:
- You can set the Preset 2nd Press parameter to Global. When you press the active preset button a second time, it will switch you to the Global Preset. Pressing any preset button switches you away from the Global Preset back to the selected preset in your current bank or song.
- You can execute a System / Preset action with the special value Global. This action can be assigned to an IA button, or used in any other action list.
More information about presets can be found in Mastering the Mastermind, Episode 3, MIDI Controller Basics and Episode 5, Basic Preset Editing