# Initial Setup
# Creating Devices
[](https://docs.rjmmusic.com/uploads/images/gallery/2022-05/screen-shot-2022-05-23-at-10-10-59-am.png)
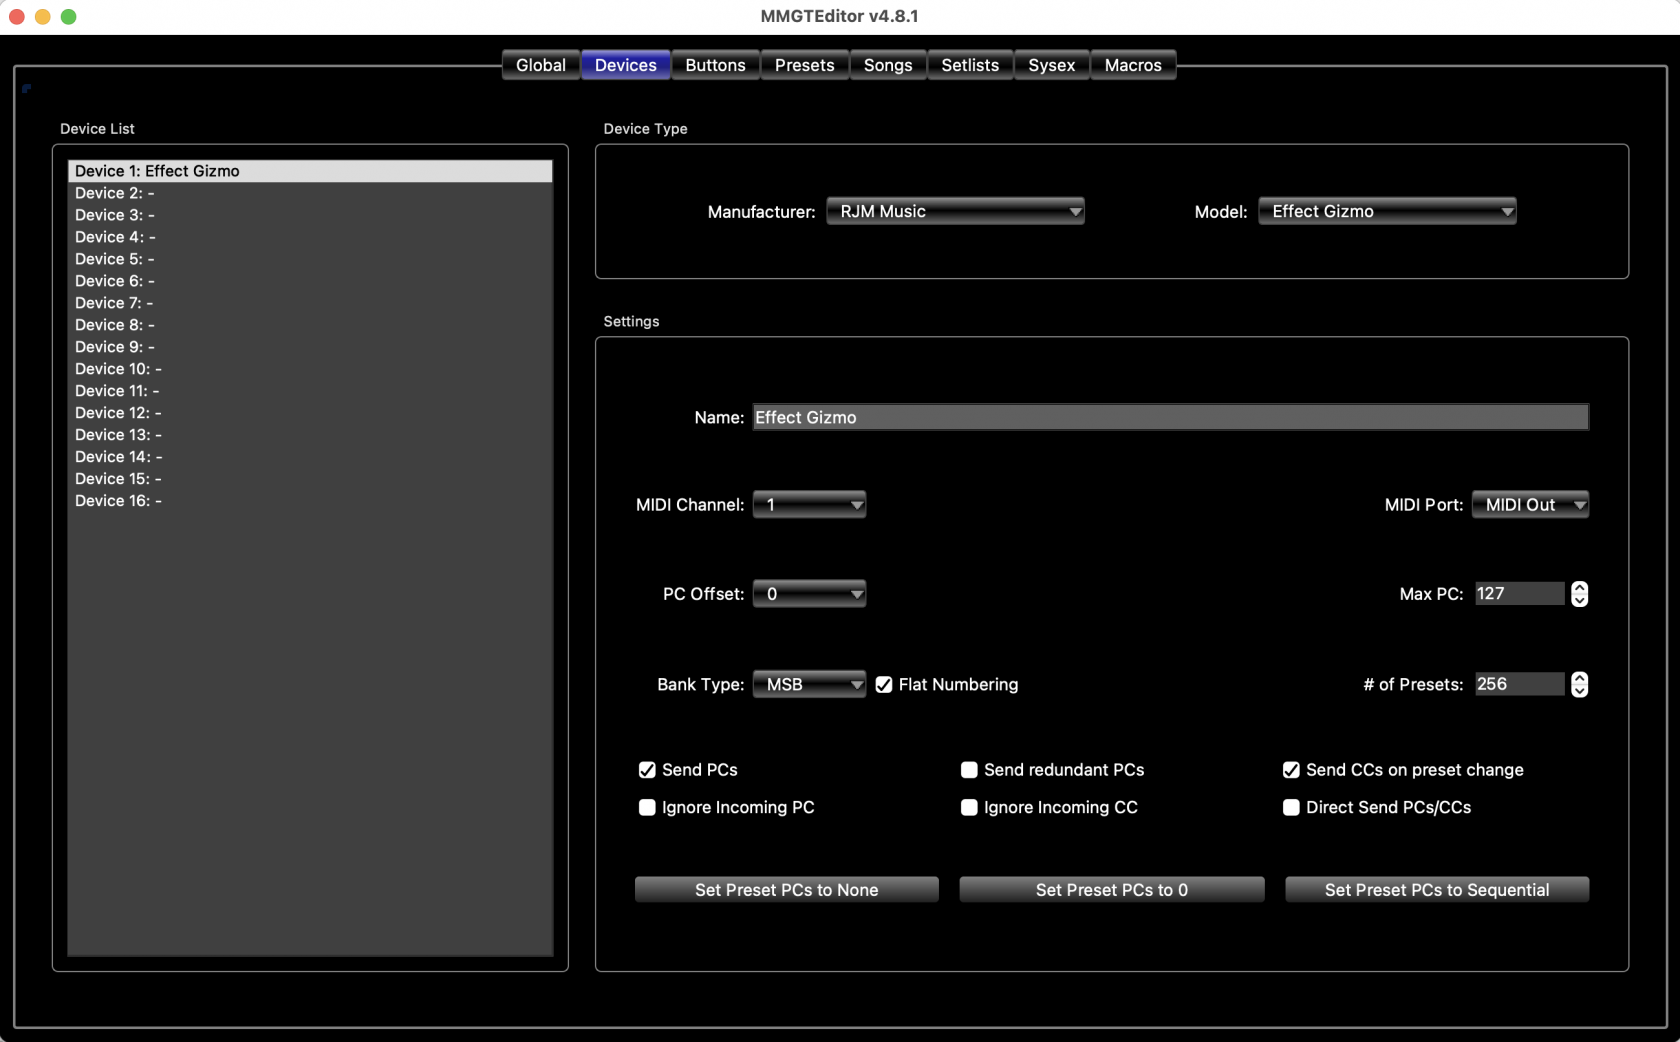
The first thing you'll need to do for a new setup is define one or more devices. The **Devices** page in the editor allows you to set up an entry for each MIDI device you wish to control. These device entries contain information about what the device's capabilities are and how it needs to be controlled. The editor contains a database of settings for popular MIDI devices, and in many cases, you'll only need to select the device by manufacturer and model, then set the device's MIDI channel and everything else is set up for you.
In the **Devices** tab, you will see a list of 16 device slots on the left, and a lot of parameters on the right:
Select one of the device slots on the the left, and its parameters are displayed. There will be one device defined by default (a Mini Effect Gizmo on the Mastermind PBC and an Effect Gizmo in the Mastermind GT). If you have one of these devices in your system, you can leave the default device as it is. Otherwise, you can change the device to something else.
First, click the **Manufacturer** dropdown menu and choose your device's manufacturer. Then, click the **Model** dropdown menu, and select your device model. If your device is not listed, you can use the **Generic** manufacturer and **Generic PC/CC Device** model.
If you found an entry for your manufacturer and model, the settings in the lower half of the screen should be pre-configured for you. The only thing that you will likely have to change is the **MIDI Channel** parameter. More information about these settings can be found on the [Devices Tab](https://docs.rjmmusic.com/books/mastermind-editor-manual-46/page/devices-tab "V4:Devices Tab") page.
It's very important that each MIDI device is set to its own MIDI channel number. Which number you choose for each device doesn't matter, except that the channel number in the editor, and the channel number on the actual MIDI device should agree, and each device should have a different MIDI channel number. Each MIDI device has some method of choosing its MIDI channel - consult its user manual for instructions.
# Editing Buttons
[](https://docs.rjmmusic.com/uploads/images/gallery/2022-02/image.png)
[](https://docs.rjmmusic.com/uploads/images/gallery/2022-02/b6Iimage.png)
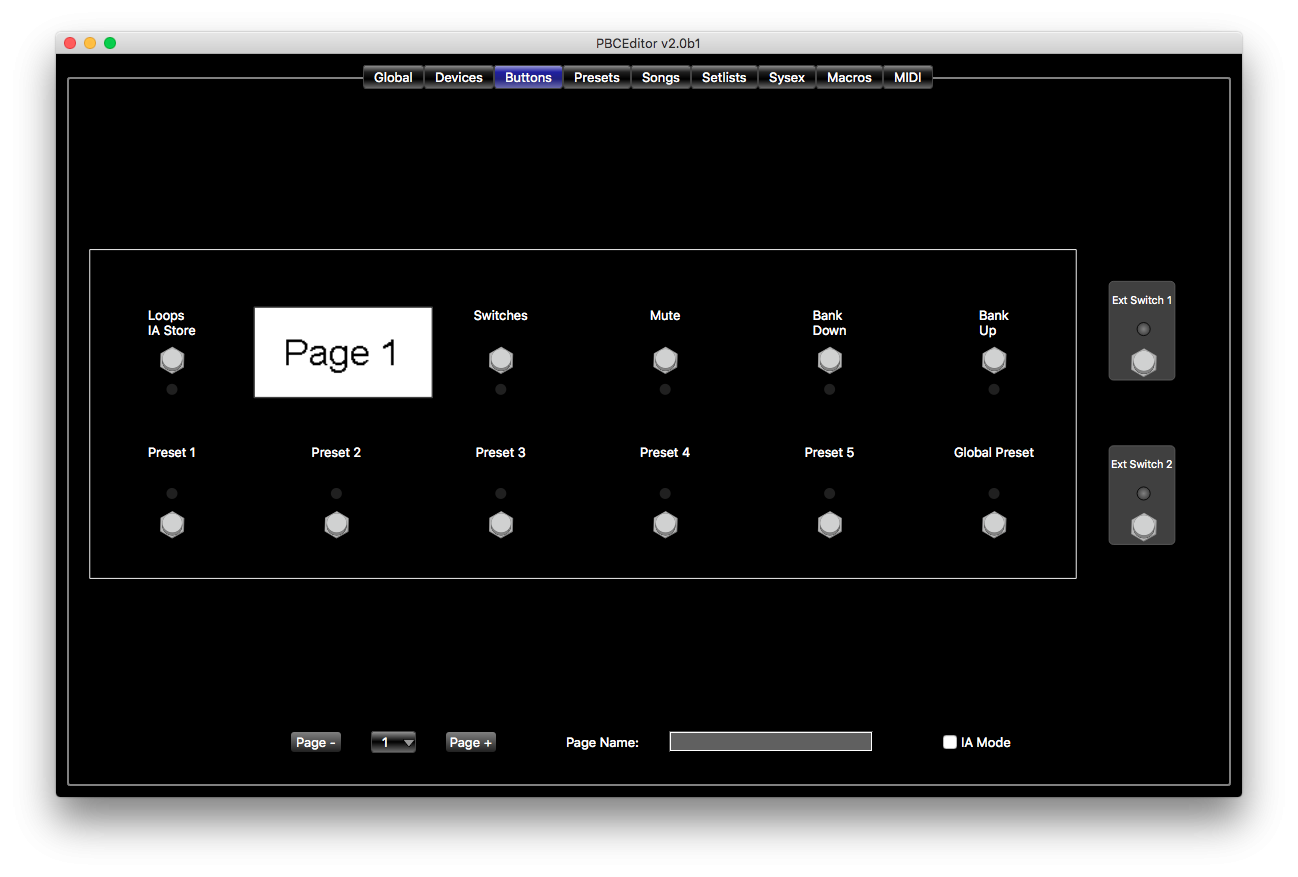
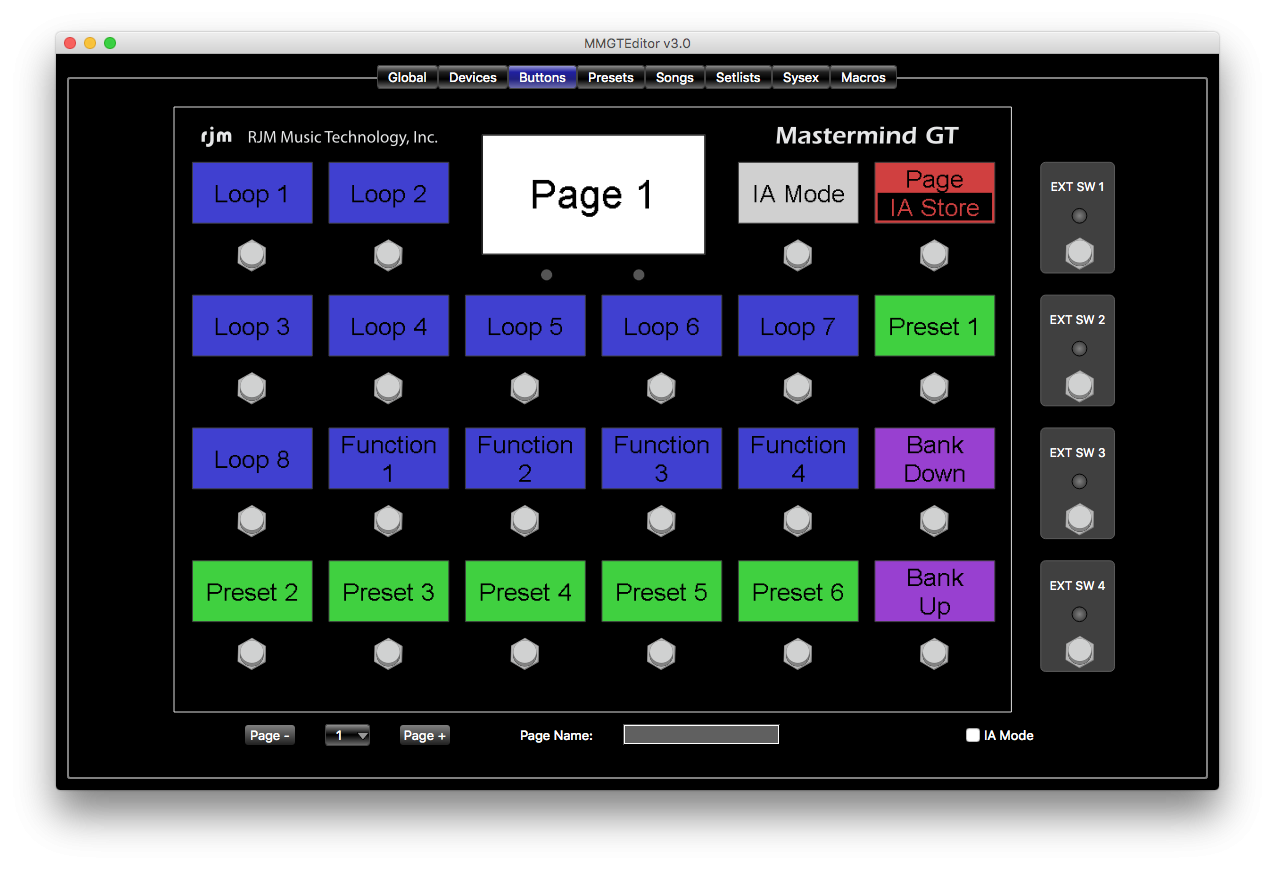
One of the most important features of the Mastermind GT, LT and PBC is the ability to redefine buttons. Any button can be changed to perform any function, and you can have multiple pages of buttons with different button configurations.
Your device will have a default button configuration right out of the box, so you may wish to skip this step at first and get right to [editing presets](https://docs.rjmmusic.com/books/mastermind-editor-manual-46/page/editing-presets "V4:Editing Presets"). However, if you're ready to start changing your buttons, this is what you need to do:
In the editor, switch to the **Buttons** tab to begin working with your button configuration. You'll see a virtual display of your device, showing its current configuration. At the bottom of the screen are controls that allow you to select which of the 16 button pages is currently visible. You can also name the button page here.
## Swapping Buttons
The most basic operation is swapping the position of two buttons. Simply click and drag a button to a new position, and the source and destination buttons will switch locations. (*Note: in the Mastermind GT editor, you drag the LCD display over another display instead of the button itself*).
##
When you right-click on a button (or Ctrl-click on a Mac), a menu pops up. This menu allows you to perform basic operations on the button, including copy and paste, and also assigning the button to control a particular function on a device.
### Copy and Paste a Button
To copy and paste buttons, simply right-click on a button and select **Copy**. Then right-click on the button position where you wish to move the button to, and select **Paste**. You can copy buttons from one page to another using this method.
### Assign CCs
If you're using devices that were selected by manufacturer and model on the **Devices** page, then you can easily assign buttons to control functions on those devices. Right-click on the button (or Ctrl-click on a Mac) , then go to **Assign CC**. A submenu will pop up, showing your devices. Under those device entries, you'll see a list of functions. These could be loops on a device like an Effect Gizmo, an effect block on a multi-effect processor, or anything else that can be controlled by a MIDI continuous controller message. Select the desired function and the button will now be set to control that function.
** In the Mastermind GT editor, you can also assign an entire page of buttons to control a device. Right click anywhere on the virtual GT display, then select **Assign Default Buttons**, and in the submenu under that, select your device. Your current button page will be overwritten with buttons specific to your device. Please note that some buttons like preset and bank buttons will not be overwritten, but will have functions placed *underneath* them in [IA Mode](https://docs.rjmmusic.com/books/mastermind-editor-manual-46/page/ia-mode "V4:IA Mode").
### Other Options
The rest of the right-click menu options are described in the [Buttons Tab](https://docs.rjmmusic.com/books/mastermind-editor-manual-46/page/buttons-tab "V4:Buttons Tab") section.
## Full Button Edit
Double-clicking on a button opens up the full button edit page. This page allows you to edit all of a button' s parameters in detail. You can find more information in the [Button Edit Page](https://docs.rjmmusic.com/books/mastermind-editor-manual-46/page/button-edit-page "V4:Button Edit Page") section.
## External Switches
You can connect two external switches to a Mastermind LT or PBC and four to the Mastermind GT. These additional switches can perform any function the internal switches can, except that they're limited to having a single color LED indicator.
You can edit the external switch settings by double clicking on them in the [Buttons Tab](https://docs.rjmmusic.com/books/mastermind-editor-manual-46/page/buttons-tab "V4:Buttons Tab"). They're positioned on the right side of the virtual Mastermind display. As of the 4.0 firmware, external switches can have different settings on each page just like internal buttons can, although the external switches are set to be global by default. If you'd like to have different external switch settings on different pages, edit the external switch and turn off the **Global** checkbox.
You can also override these global settings in any preset by editing the external switch settings in the [Presets Tab](https://docs.rjmmusic.com/books/mastermind-editor-manual-46/page/presets-tab "V4:Presets Tab").
***More information can be found in [Mastering the Mastermind Episode 6, Button Editing part 1](https://youtu.be/y9Nlyw9J6NM) and [Episode 7, Advanced Button Editing](https://youtu.be/VrBMGov5eB8)***
# Editing Presets
[](http://www.rjmmusic.com/wiki/index.php?title=File:PresetsTab.png)
Presets Tab (PBC Version)
- 1 Editing
- 1.1 Preset List
- 1.2 Function Switches *(LT and PBC only)*
- 1.3 General Settings
- 1.4 PC Messages
- 1.5 IA Buttons
- 1.6 Local Button Page Edit
- 1.7 Preset Actions
- 2 More Details
## Editing
To edit presets, go to the **Presets** tab. You'll see a list of your presets on the left, three sections underneath the preset list, and three sections on the right. The typical process for editing a preset has several steps:
1. Select a preset in the **Preset List** section on the left side of the screen.
2. In the **General Settings** section, edit the preset name. There are many other parameters you can edit in this section. These are described in the [Presets Tab](https://docs.rjmmusic.com/books/mastermind-editor-manual-46/page/presets-tab "V4:Presets Tab") section.
3. In the **PC Messages** section, each device that accepts PC messages will have a box where you can specify the program number that should be sent to each device. This is how you select which preset is recalled in each one of your MIDI-capable devices. There's also a checkbox in each box - when the checkbox is not checked, no PC message will be sent to that device for the selected preset.
4. If desired, you can create specific expression pedal and external switch settings for the current preset. To override the global settings and make a preset-specific override, check the checkbox next to the pedal or switch shown in the lower left corner of the screen. Then, click the Edit button to edit the settings. Refer to the [Button Edit](https://docs.rjmmusic.com/books/mastermind-editor-manual-46/page/button-edit-page "V4:Button Edit Page") and [Expression Pedal Edit](https://docs.rjmmusic.com/books/mastermind-editor-manual-46/page/expression-pedal-edit-page "V4:Expression Pedal Edit Page") sections for details on these pages. Any changes you make on this page will apply only to the current page.
5. *(LT and PBC only)* Set the function switches to turn on or off, if desired. The function switches will start in the default state you specified in the \[\[V4::Globals Tab|Globals Tab\]\]. To change the state, go to the **Function Switches** section in the left column. Click the override button (**>**) to override the state for this preset, then click the **On / Off** button to change the function switch state.
6. *(PBC Only)* You can also set overrides for the audio features of the Mastermind PBC. To do this, select the **Audio** tab near the center of the screen. Each audio feature will have a box where you can override each feature's settings for this preset. More details can be found in the [Audio Tab](https://docs.rjmmusic.com/books/mastermind-editor-manual-46/page/audio-tab "V4:Audio Tab") section.
The other options are described in the [Presets Tab](https://docs.rjmmusic.com/books/mastermind-editor-manual-46/page/presets-tab "V4:Presets Tab") section.
### Preset List
Here, you can select which preset you wish to edit. You also can right-click (ctrl-click on a Mac) on a preset. This will pop up a menu with two options: *Copy From Preset* and *Copy To Preset*. As the names suggest, you can use these options to copy presets from one location to another.
### Function Switches *(LT and PBC only)*
This area allows you to set the state of function switches for this preset. Each switch has an override indicator ('*>**) and a state (**On* or **Off**). The state will be the same as
### General Settings
Here, you can assign a name to the preset and set a few preset-level parameters. These other parameters are discussed in more detail in the [Presets Tab](https://docs.rjmmusic.com/books/mastermind-editor-manual-46/page/presets-tab "V4:PresetsTab (page does not exist)") section.
### PC Messages
This section lets you set PC and/or bank messages that should be sent to each device when this preset is selected. PC and bank messages are used to select presets on effect processors and other MIDI devices.
Each device is listed here, with a checkbox to the left of the name. If the checkbox is not checked, no PC message will be sent to that device. Each checked device will have a PC number field and, depending on the device, possibly a bank number field. Set these to call up your desired preset on your device.
Devices that support MIDI banks can have more than 128 presets. On these devices, preset numbers can be specified in two ways - as a single number, or as a bank number and a PC number. In the [Devices Tab](https://docs.rjmmusic.com/books/mastermind-editor-manual-46/page/devices-tab "V4:Devices Tab"), you can use the **Flat Numbering** setting to control how a device's presets are displayed. When **Flat Numbering** is turned on, the bank and PC numbers are combined and displayed as a single preset number. Either setting can be used for any device, but you should choose the setting that best matches how the device operates. For example, if your device shows both bank and preset numbers, you probably should turn flat numbering off to match.
Please note that some devices (for example, Strymon pedals) do not use the standard preset numbering scheme. For these devices, consult the user's manual to see how to convert the device's preset numbering to standard MIDI preset numbering.
### IA Buttons
The bottom section, by default, contains a virtual device display that looks similar to the one in the [Buttons Tab](http://www.rjmmusic.com/wiki/index.php?title=V4:Buttons_Tab "V4:Buttons Tab"). In this mode, you can click on IA buttons to select whether the button turns on or off when this preset is selected. When you click on the button, it will change color to indicate its saved state. This allows you to program loops, effects, etc. to turn on automatically when the preset is selected.
Please note that only IA buttons that have the "'Update on Preset Change"' checkbox turned on will work in this mode. This setting is found in the [Button Edit Page](https://docs.rjmmusic.com/books/mastermind-editor-manual-46/page/button-edit-page "V4:Button Edit Page").
### Local Button Page Edit
If the **Edit Local Buttons** checkbox is selected, then the virtual device display becomes a full button editor, just like the **Buttons** tab. This allows you to edit a [button page](https://docs.rjmmusic.com/books/mastermind-editor-manual-46/page/buttons-and-pages "V4:Buttons and Pages") that's only displayed when the current preset is selected. You can have a different page of buttons - with a completely different button layout - for every preset if you wish.
### Preset Actions
Clicking the **Preset Actions** tab above the virtual device display allows you to add [Actions](https://docs.rjmmusic.com/books/mastermind-editor-manual-46/page/actions "V4:Actions") to your preset, which will allow you to send specific MIDI messages when the preset is loaded.
## More Details
More details on editing presets can be found in the [Presets Tab](https://docs.rjmmusic.com/books/mastermind-editor-manual-46/page/presets-tab "V4:Presets Tab") section.
# Editing Songs and Setlists
[](http://www.rjmmusic.com/wiki/index.php?title=File:SongsTab-V4.png)
[](http://www.rjmmusic.com/wiki/index.php?title=File:SetlistsTab.png)