# Tutorials
# New Page
# Create a Button Page that Controls a Device
If you have a device that has multiple effect blocks, effect loops or other MIDI-controllable switches, you can create a page of buttons that control this device. You don't necessarily need to devote a whole page to a device, but this tutorial will assume that you want to use a whole page.
## Create the Button Page
1. First, go to the [Globals Tab](http://www.rjmmusic.com/wiki/index.php?title=V4:Globals_Tab "V4:Globals Tab") and find the **Max Button Page** parameter. This shows the highest numbered page that you're using right now. Increment this number by 1. If you're replacing an existing page, you can skip this step.
[](http://www.rjmmusic.com/wiki/index.php?title=File:MaxButtonPage.png)
2. Now, go the the [Buttons Tab](http://www.rjmmusic.com/wiki/index.php?title=V4:Buttons_Tab "V4:Buttons Tab"). Use the page selector at the bottom of the tab to select the page that you wish to work on.
[](http://www.rjmmusic.com/wiki/index.php?title=File:PageSelector.png)
3. Right click on a button (Ctrl-click on a Mac), and choose **Assign CC**, then your device name from the submenu that pops up, and the function you wish to control from the submenu that pops up.
[](http://www.rjmmusic.com/wiki/index.php?title=File:ButtonsTabAssignCC.png)
4. Repeat the above step for each button you wish to assign.
## Accessing the Page
Now that you have a button page created, you need to be able to display that page when you need it. There are several ways to do this, and you can use one or more methods in the same configuration.
### Page Up/Page Down Buttons
**Page Up** and **Page Down** buttons are the simplest way to access your button pages. These allow you to scroll from page to page as you tap the button. The Mastermind GT has a **Page / IA Store** button by default, which is a **Page Up** button that has a second function when held. The Mastermind PBC does not have Page Up or Down buttons by default, but you can use them if you like.
To assign a Page Up or Page Down button, do the following:
1. Go the [Buttons Tab](https://docs.rjmmusic.com/books/mastermind-editor-manual/page/buttons-tab "Buttons Tab")
2. Use the page selector at the bottom of the window to select the button page where you want to have this page button.
[](http://www.rjmmusic.com/wiki/index.php?title=File:PageSelector.png)
3. Double-click the button you wish to convert to a Page button
4. Set the **Button Type** option to **Page Up**, **Page Down** or **Page/IA Store** as desired.
[](http://www.rjmmusic.com/wiki/index.php?title=File:GeneralSettingsPageUp.png)
5. If desired, you can set the **Min Page** and **Max Page** limits. This controls the range of pages that the page button accesses. If you want the Page buttons to access all button pages, set the Min Page and Max Page parameters to the same number.
Usually, you will want a page button to be global. That is, the button should appear on every button page so you can always switch to the next page. To do this, turn on the **Global** checkbox.
Click **Done** when you're finished editing the button.
###
On the Mastermind GT, you can have a **Page Menu** button. When pressed, it displays a list of your available button pages which you can use to select the page to view.
To assign a Page Menu button, do the following:
1. Go the [Buttons Tab](https://docs.rjmmusic.com/books/mastermind-editor-manual/page/buttons-tab "Buttons Tab")
2. Use the page selector at the bottom of the window to select the button page where you want to have this page button.
[](http://www.rjmmusic.com/wiki/index.php?title=File:PageSelector.png)
3. Double-click the button you wish to convert to a Page Menu button
4. Set the **Button Type** option to **Page Menu**.
[](http://www.rjmmusic.com/wiki/index.php?title=File:GeneralSettingsPageMenu.png)
If you want this button to appear on every button page, turn on the **Global** checkbox.
Click **Done** when you're finished editing the button.
### IA Button with Page Action
You can use an IA Button to jump to a specific button page instead of cycling through a range of pages, like the Page Up/Down buttons do.
To set up an IA button to jump to a page, follow these steps:
1. Go the [Buttons Tab](https://docs.rjmmusic.com/books/mastermind-editor-manual/page/buttons-tab "Buttons Tab")
2. Use the page selector at the bottom of the window to select the button page where you want to have this page button.
[](http://www.rjmmusic.com/wiki/index.php?title=File:PageSelector.png)
3. Double-click the button you wish to convert to a IA button
4. Set the **Button Type** option to **IA**
5. Turn off all checkboxes except **Momentary**, which should be turned on. A button that selects a page should never turn on and stay on, it should only trigger when pressed. This is why **Momentary** is selected here.
6. In the **IA Actions** section at the bottom of the window, select any actions that are in the gray box to the left. Select each line and click **Remove Action** to delete it.
7. Now, click **New Action**, and set **Action Type** to **System** and **Subtype** to **Page**
8. Set the page number to the desired page.
[](http://www.rjmmusic.com/wiki/index.php?title=File:PageAction.png)
# Set up a Group of Buttons that Recall Presets on a Device
You can set up some buttons that change presets on a specific MIDI device, without the need to change presets on your Mastermind. There are two ways to do this. The instructions assume you are putting the buttons on an existing button page. If you need to add a new button page, follow the instructions found in the [Create a Button Page that Controls a Device](https://docs.rjmmusic.com/books/mastermind-editor-manual/page/create-a-button-page-that-controls-a-device "Create a Button Page that Controls a Device") section.
## Using Device PC+ and Device PC- Buttons
The **Device PC+** and **Device PC-** button types will let you move through the presets on a single MIDI device. Each press advances up or down one preset as appropriate, sending a MIDI PC (Program Change) message to the device.
On the Mastermind GT, the button will display the current PC number (and bank number, if appropriate) for the device.
On the Mastermind LT and PBC, the current PC and bank will be displayed briefly in the main display if you have the **Show Button Names** global parameter turned on.
To set buttons to Device PC+ and PC- types, go to the [Buttons Tab](https://docs.rjmmusic.com/books/mastermind-editor-manual/page/buttons-tab "Buttons Tab") and double-click the button you wish to edit. The [Button Edit Page](https://docs.rjmmusic.com/books/mastermind-editor-manual/page/button-edit-page "Button Edit Page") will pop up. Set the button type to **Device PC +** or **Device PC -**. Below the **Button Type** dropdown menu, there will now be a **Device** dropdown menu. Select the device you wish to control using this menu.
[](http://www.rjmmusic.com/wiki/index.php?title=File:Device_PC_Example.png)
You can repeat this, creating PC+ and PC- buttons for any devices you wish.
### Saving Device PC+/PC- Settings
When you use an IA Store button, the PC number for each device will be stored to the current Mastermind preset. When you return to that preset, the devices will return to the last saved PC. In the PBC/10's factory configuration, holding the Loops button will store your IA state and PC numbers. On the LT and PBC/6X, holding the Function button will store IA state and PC numbers.
## Using IA buttons
You can also set things up so that there are individual buttons that select specific presets on a device. You can do this with IA buttons.
First, go to the [Buttons Tab](https://docs.rjmmusic.com/books/mastermind-editor-manual/page/buttons-tab "Buttons Tab") and double click the first button you wish to have control your device. The [Button Edit Page](https://docs.rjmmusic.com/books/mastermind-editor-manual/page/button-edit-page "Button Edit Page") will pop up.
First, set the **Button Type** parameter to **IA**.
[](http://www.rjmmusic.com/wiki/index.php?title=File:IA_Button_Type.png)
Next, set the **Group** parameter to a group number that is not being used elsewhere.
[](http://www.rjmmusic.com/wiki/index.php?title=File:Set_Group_Number.png)
Also make sure the **Send on Preset Change** and **Update on Preset Change** checkboxes are checked. This allows you to save the on/off state of these buttons in each preset and have the device PC automatically recalled when you change presets.
Next, in the [Actions](http://www.rjmmusic.com/wiki/index.php?title=V4:Actions "V4:Actions") section at the bottom of the window, delete any actions in the action list on the left side. Click on each action, then click Remove Action to delete it.
Now, click **New Action**. Set **Action Type** to PC. Set **Device** to the desired device. Set **PC Number (off)** to None, and set **PC Number (on)** to the PC number you want this button to select on the device.
[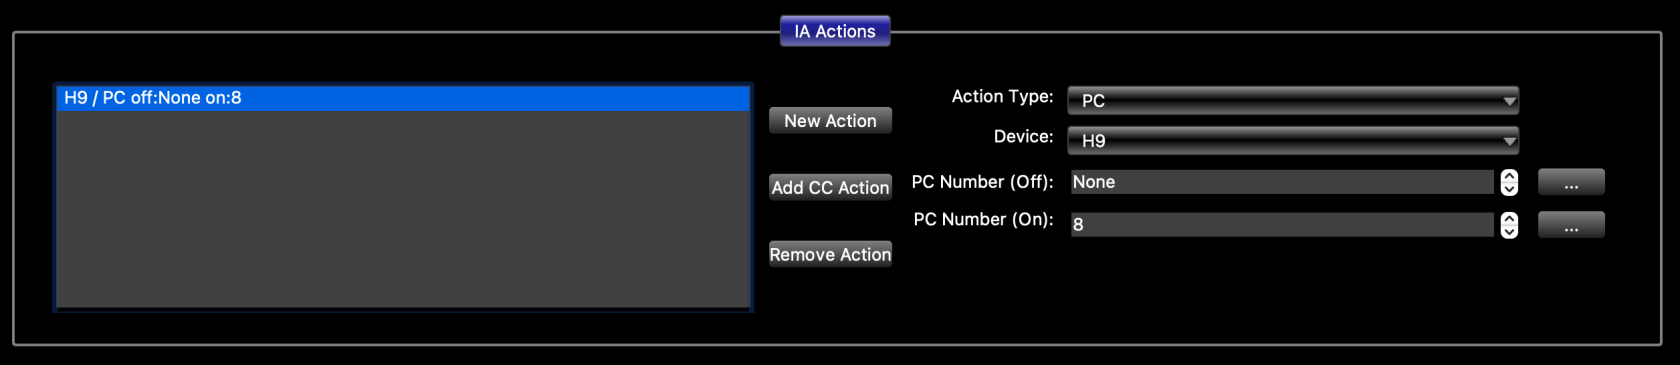](https://docs.rjmmusic.com/uploads/images/gallery/2022-09/screen-shot-2022-09-16-at-9-52-36-am.png)
Repeat this for each button you wish to set up to send PCs to your device. Make sure that each of these buttons is assigned the same group number. This will insure that only one button in the group can be on at any time.
The last thing you need to do is set up the button group, This is done in the [Globals Tab](https://docs.rjmmusic.com/books/mastermind-editor-manual/page/globals-tab "Globals Tab"). At the bottom left of the window, select the group number you used for your buttons, then make sure that **Send Off messages** and **Allow all buttons off** are not checked for that group.
[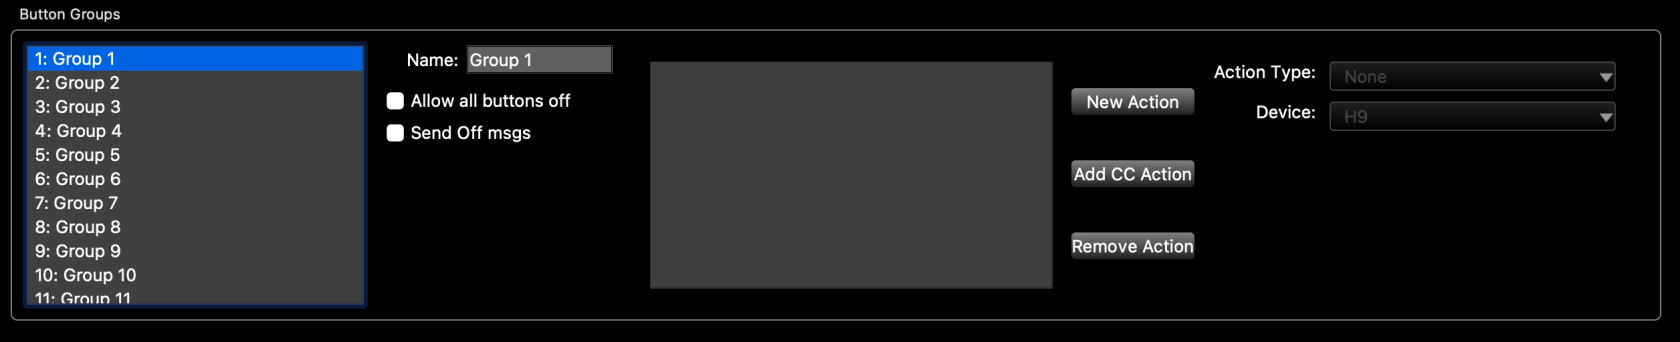](https://docs.rjmmusic.com/uploads/images/gallery/2022-09/screen-shot-2022-09-16-at-9-54-38-am.png)
### Option 1: Send a different preset when all buttons are turned off
You can set up the button group so that pressing the currently selected button again will turn the button off, switching the effect device to a certain preset. Usually, this is a preset that has no effect or is bypassed, but it can be any preset you wish.
First, in the [Globals Tab](https://docs.rjmmusic.com/books/mastermind-editor-manual/page/globals-tab "Globals Tab"), turn the **Allow all buttons off** checkbox ON for the group you're using. Make sure **Send Off msgs** is still turned off.
Next, edit each of the buttons you're using to control the device. Go the action list, select the PC action and set the **PC Number (off)** parameter to the number of the desired preset.
### Option 2: Turn a loop off when all buttons are turned off
This option allows you to automatically control an effect loop so that it turns on when you select a preset on the device. The loop will turn off when you press the currently selected button again, turning the button off.
First, go to the [Globals Tab](https://docs.rjmmusic.com/books/mastermind-editor-manual/page/globals-tab "Globals Tab"), turn the **Allow all buttons off** checkbox ON for the group you're using. Make sure **Send Off msgs** is still turned off.
Next, you need to edit the buttons to perform the desired action:
*To send a MIDI CC message to a switcher:* On each button that controls your effect, add a second action that sends the desired CC number. If your switcher is in the device database, you can press **Add CC Action**, then select your device and CC number in the window that pops up.
[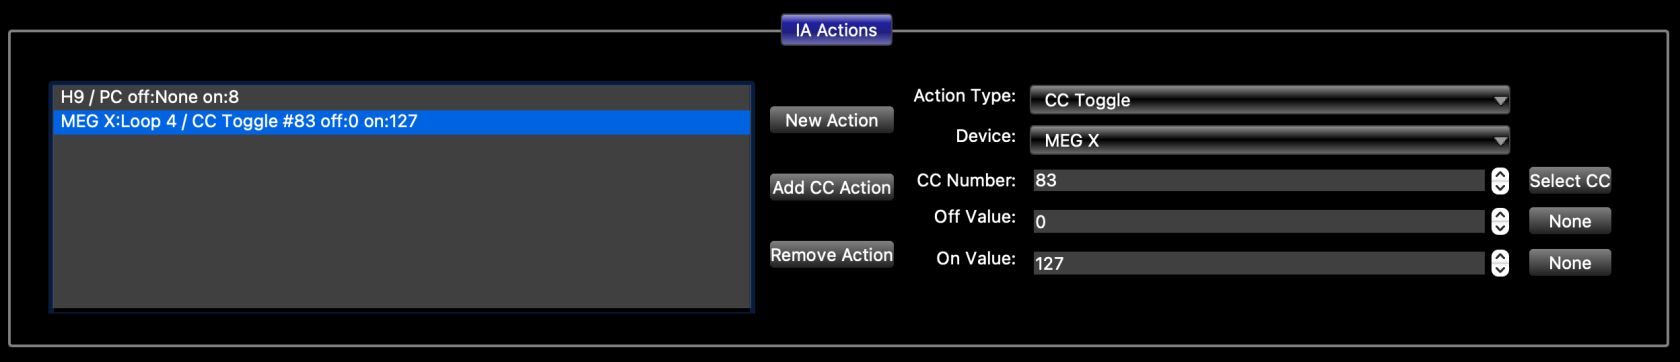](https://docs.rjmmusic.com/uploads/images/gallery/2022-09/screen-shot-2022-09-16-at-9-58-17-am.png)
*To control a Mastermind PBC loop:* In each button that controls your effect, add a second action that controls the loop containing your effect. Press **New Action**, then set **Action Type** to **Audio**. Next, set **Subtype** to **Loop** and set your loop number. Make sure **Off Value** is set to OFF and **On Value** is set to ON.
[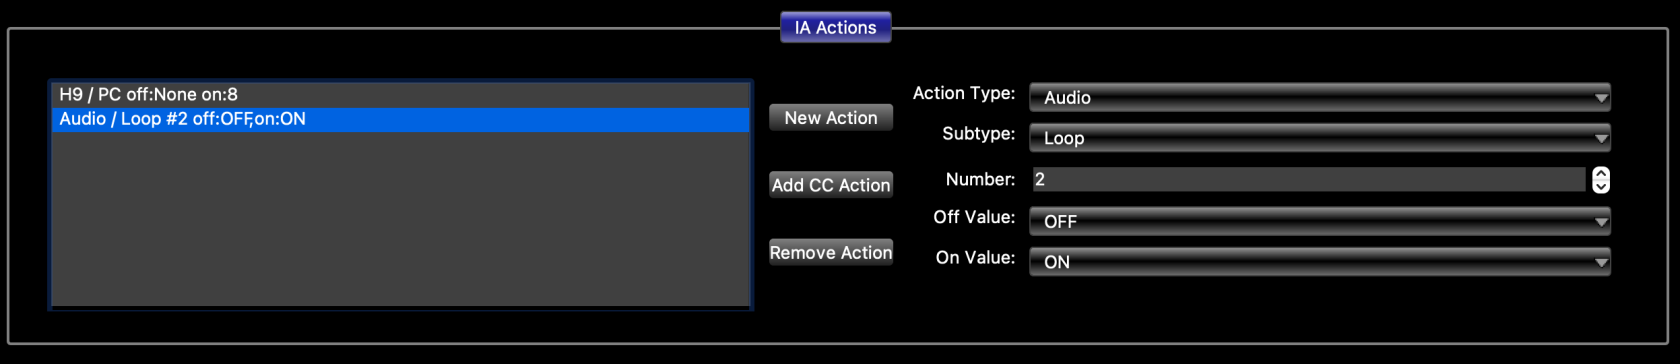](https://docs.rjmmusic.com/uploads/images/gallery/2022-09/screen-shot-2022-09-16-at-9-59-20-am.png)