Mastermind Editor Manual
Documentation for the Mastermind Editor software. This includes the editor for the Mastermind GT, Mastermind LT and Mastermind PBC models.
This manual currently reflects version 5.2.x of the Mastermind Editor
- Introduction
- Basic Concepts
- Basic Operation
- Creating a New Configuration
- Loading and Saving Settings
- Transferring Settings Between Device and Computer
- Initial Setup
- User Interface
- Globals Tab
- Devices Tab
- Buttons Tab
- Button Edit Page
- IA Cycle
- Presets Tab
- Songs Tab
- Setlists Tab
- Sysex Tab
- Macros Tab
- MIDI Tab
- Audio Tab
- Expression Pedal Edit Page
- Special Features
- Tutorials
Introduction
About the Editor Software
The Mastermind GT is a very advanced MIDI controller with extensive capabilities and an LCD over every button. The Mastermind PBC is a pedalboard based audio switcher that uses the same "brains" as the Mastermind GT, giving it similar MIDI capabilities. And the Mastermind LT is a small, low cost MIDI controller using the same core as the Mastermind PBC. All of these devices are able to connect to a PC or Mac using a standard USB connection and communicate with our editor software.
The editor software is able to edit settings and transfer those settings to and from the GT, LT and PBC. On the Mastermind GT, the editor permits much faster editing using a familiar user interface. The editor does the same for the Mastermind LT and PBC, but also unlocks the full power of these units, allowing the user perform far more editing tasks than is possible using the on-board editing.
System Requirements
The Mastermind GT, LT and PBC editor can run on a Windows PC or a Macintosh running OS X.
Windows:
- Windows 7 or later, 32 or 64-bit
- 2GB RAM
- One free USB port
- A USB cable that ends in a USB B connector, which is the square type that most printers use.
Mac OS X:
- OS X 10.13 (High Sierra) or later, 64-bit only
- 2GB RAM
- One free USB port
- A USB cable that ends in a USB B connector, which is the square type that most printers use.
Installation - Mac
To install on a Mac OS X system, first download the file from the Downloads page on the RJM Music website. Before downloading, make sure the correct product is selected in the bar above the list of releases.
Important note: The editor version needs to match the first two numbers of your product's firmware version. For example, If you have firmware version 4.6.1, the editor needs to be version 4.6.x. In general, it's best to have the latest firmware and editor version. Your Mastermind's firmware version is displayed in bottom right corner of the main LCD display for 2 seconds on power up.
Double-click the .dmg file that was downloaded, and it will open up a window showing the Editor app and a link to the Applications folder. Drag the editor app file to the Applications folder to install.

To run, open up your Applications folder, where you'll find the MMGTEditor or MastermindEditor file. Double click the file and the editor will start up.
Installation - PC
To install on a PC system, first download the file from the Downloads page on the RJM Music website. Before downloading, make sure the correct product type is selected in the bar above the list of releases.
Important note: The editor version needs to match the first two numbers of your product's firmware version. For example, If you have firmware version 4.6.1, the editor needs to be version 4.6.x. In general, it's best to have the latest firmware and editor version. Your Mastermind's firmware version is displayed in bottom right corner of the main LCD display for 2 seconds on power up.
Double-click the .zip file that was downloaded, and it will open up a window showing the editor MSI (installer) file. On some systems, the .zip file will automatically be extracted, in which case you will already have a MSI installer file. Double click this file to start the installation process. Follow the prompts to complete installation.
To run, go to the Start Menu and look for "MMGTEditor" or "MMEditor" under "All Programs" and select the editor app within that folder.
Basic Concepts
Buttons and Pages
One of the most important features of the Mastermind is the ability to redefine buttons. Each button can be configured for function, color and name, as well as quite a few other settings.
There are many button types available, but they can be broken down into a few categories:
Preset and Bank Buttons
When you're selecting banks, the bank number will be displayed in the main display, and it will cycle through the names of all presets in the current bank, lighting the appropriate preset button. (On the Mastermind GT, the preset names will be displayed over each preset button and the LCDs over the preset buttons will flash). This allows you to preview the presets in the bank without needing to select a preset. The Mastermind will wait for you to select a preset before continuing. You can either stay in bank selection and continue to use the Bank Up and Bank Down buttons to move through the banks, or you can press a preset button to load that preset.
Example: A Mastermind PBC/10 has five preset buttons. When you power it up, the preset buttons select presets 1-5. Pressing Bank Up will shift the preset buttons to access presets 6-10. Pressing Bank Up again will shift the preset buttons to access presets 11-15. Pressing the second preset button at this time will select preset 12.
Instant Access ("IA") buttons are multi-purpose buttons that perform a list of actions when pressed. These actions can send MIDI messages, turn on audio loops in the PBC, and many other functions. Typically, these buttons are used to perform small changes in a system. For example, turning on a loop on a switcher, or turning on an individual effect on a multi-effect processor.
For more information on preset, bank and IA buttons, see Mastering the Mastermind Episode 3, MIDI Controller Basics
The Mastermind is not limited to the number of physical buttons the device actually has. Buttons are arranged in 16 button pages, and each page can have completely different settings for each button. There are Page Up and Page Down button types that allow you to switch between these button pages. On the Mastermind GT, there is also a Page Menu button type that lets you choose a button page from a list.
Each preset can be programmed to automatically recall a specific button page. You can, for example, use this feature to switch between a button page that controls your effects and another page that has controls for your looper, depending on which controls you need in each preset.
For more information on button pages, see Mastering the Mastermind Episode 4, Using Button Pages
Local Button Pages
Also, each preset can have a local button page. This is an additional button page that's only available when you're using a specific preset. When using a local page, the local page takes the place of button page 16. Each preset can have its own local button page if desired. This allows you to have up to 768 additional pages, one per preset.
For more information on local button pages, see Mastering the Mastermind Episode 18, Local Button Pages
In the Globals Tab, there are some settings that affect how each group works:
Send Off Messages - When this is checked, a button that is turned off as a result of pressing another button will send its messages. When this is not checked, only the button that's actually being pressed will send its messages.
Group Actions - You can assign up to 20 actions to a group. If one button in the group is on, and you press it again to turn that button off, that's considered an "off" event, and it will run the actions. Conversely, if no buttons in the group are on and you press a button to turn it on, that's considered an "on" event, and it will run the actions. Using Group Actions requires that Allow All Buttons Off is turned on for the group.
For more information on button groups, see Mastering the Mastermind Episode 9, Groups
Actions
Actions are instructions given to the Mastermind to tell it to perform certain tasks. This can be sending MIDI messages, engaging the tuner display, changing button pages or presets, turning on audio loops and many other functions. By using action lists, you can configure your buttons and presets to perform complex tasks that go way beyond the capabilities of most MIDI controllers.
Actions are arranged into ordered lists, and these action lists can be used in a number of places:
Editing Actions
The action editor looks the same wherever it is displayed. The list of actions is displayed in the left column. Selecting an action in the left column displays its parameters in the rightmost column, where you can view and edit them.
The action list is executed when a button is pressed, preset is selected, or expression pedal is moved. When this happens, the actions in the list will be executed from top to bottom. You can change this order by clicking on an action and dragging it to its new position in the list. When dragging, a line is displayed showing where the action will be inserted.
The middle column contains buttons that allow you to create and delete actions:
New Action - Creates a new action and adds it to the end of the action list.
Add CC Action - Pops up a requester, showing a list of your devices and the CCs that are available for the currently selected device. Select a device, then select a CC and press Done. This is the quickest way to add an action to control your devices. This option is not available for Generic MIDI devices.
Add Step - Adds a Step action to an IA Cycle button to the bottom of the action list. This button is only visible when editing a button and the IA Cycle checkbox is checked.
Remove Action - Removes the currently selected action from the list.
Action Parameters
The rightmost column is where you can edit each action's parameters.
Many actions have an On Value and an Off Value. These actions can do something different when the action is turned on and when it is turned off. When using an action with a button, external switch or expression pedal position switch, turning on a button or switch turns the action on and turning off the button or switch turns the action off. When using actions in a preset, the action is turned on when the preset is loaded. A preset action is never turned off, and for that reason doesn't have an Off Value.
In certain places, you can specify special values. Where special values are supported, there is an ellipsis (...) button next to the value field. Clicking this button lets you choose a special value instead of a number. For example, on the System / Page action, you could specify Previous instead of a specific page number. This switches to the previously selected page.
Action Type - Selects the action's type
- None - disables the action
- CC Toggle - sends a MIDI CC (Continuous Controller) message. You can set different CC values for On and Off states. When assigned to an IA button, each press of the button will toggle between sending the Off Value and the On Value
- CC Momentary - sends a MIDI CC message. This differs from the CC Toggle type in that the On Value is sent each time an IA button is pressed and the Off Value is sent each time the button is released. When using this action in a preset or expression pedal's action list, it works the same way as CC Toggle
- PC - sends a MIDI PC (Program Change) message to a device. You can set different PC numbers for On and Off states
- Note - sends a MIDI Note On message to a device. You can set a note number and velocity. These will be sent when the action is turned on. When the action is turned off, the same note number will be sent with a velocity of 0, indicating Note Off. (Note: in the Globals tab, there is a setting that configures the Mastermind to send "true" Note Off messages instead)
- Sysex - sends a MIDI Sysex message. These are predefined MIDI messages that can be of any type. You can select different Sysex messages for both On and Off states. Both the On and Off messages are chosen from a list of messages that are defined in the Sysex Tab
- System - indicates a System action. System actions don't send a MIDI message, but perform other actions such as changing button pages, presets, etc. There is a Subtype parameter, which determines what the System action does:
- BPM - sets the current system tempo in BPM. The parameter is a number (with one decimal place) indicating BPM, or one of several special values:
- Off - Turns off tempo, shuts off MIDI clock if it was active
- Preset - Selects the tempo specified in the current preset
- Same - Leaves the current tempo unchanged
- Song - Selects the tempo specified in the current song
- Add 1 - Adds 1 BPM to the current tempo value
- Minus 1 - Subtracts 1 BPM to the current tempo value
- Add 0.1 - Adds 0.1 BPM to the current tempo value
- Minus 0.1 - Subtracts 0.1 BPM to the current tempo value
- ExpPedal - Loads one of the specified expression pedal settings blocks for a specific expression pedal. This allows you to change the expression pedal settings at any time. The parameters are pedal number and settings block number. The Settings block number can also have special values:
- None - Disable expression pedal
- Global - Select the global setting for this pedal
- Preset - Select the preset override setting for this pedal
- Same - leave the expression pedal settings unchanged
- Send - force the expression pedal to send its current value again. Doesn't load new settings
- IA Mode - Turns IA mode on or off when the action is turned on or off
- IA Store - Stores the current state of IA buttons and PC numbers for each device to the current preset
- Macro - starts executing a macro. All of the actions in the macro are executed, then the next action in this action list is executed. You can define a different macro for the On state and Off state. Macros are defined in the Macros Tab
- Page - displays one of the 16 available button pages when the action is turned on. The parameter can be a page number, or one of several special values. Please note that page 16 loads the current preset's local button page, if the preset has one.
- Down - Moves down one page
- Up - Moves up one page
- Previous - Goes to the previously selected page
- Preset - loads one of the 768 available presets when the action is turned on. The parameter can be a preset number, or one of several special values:
- Alternate
- Down - Moves down one preset
- Up - Moves up one preset
- Previous - Goes to the previously selected preset
- Global - Goes to the Global Preset
- Same - Stays on the same preset
- Set IA - Turns other IA buttons on or off, triggering their actions. See the Set IA section for more details.
- Setlist - Switches to one of the 64 available setlists, or one of these special values:
- Down - Moves down one setlist
- Up - Moves up one setlist
- All Songs - Switches to the All Songs setlist, which contains all songs in numerical order.
- Same - Stays on the same setlist
- Reload - Go back to the first preset in the first song of this setlist
- None - Switches to normal bank/preset mode, disabling song and setlist mode.
- Song - Switches to a specific song, or one of these special values:
- Down - Moves down one song in the current setlist
- Up - Moves up one song in the current setlist
- Same - Stays on the same song
- Step - indicates where one step ends and another begins in an IA Cycle button
- Tuner - turns on tuner mode when the action is turned on and turns off tuner mode when the action is turned off. On the Mastermind PBC, this activates the internal tuner function as well. On other Mastermind models, this activates the tuner display, which will display incoming tuner data from a device like Axe-Fx or Kemper Profiler.
- Wait - Makes the system wait for the specified number of milliseconds, up to 4095 (4.095 seconds). Please note that the system pauses for this time and won't process any other commands or register keypresses until the time has elapsed. However, tempo related functions will continue to operate.
- BPM - sets the current system tempo in BPM. The parameter is a number (with one decimal place) indicating BPM, or one of several special values:
- Audio (PBC Only, LT has Audio/Fn Switch action only) - controls one of the audio functions on the Mastermind PBC. The Audio type has a Subtype parameter indicating what you wish to control, and a Number parameter which indicates which loop, buffer, etc. you wish to control. The subtypes are:
- Loop - turns an audio loop on or off
- Buffer - turns an audio buffer on or off
- Parallel - turns a loop parallel switch on or off. When turned off, the loop is in series. Available on PBC/10 only
- Fn Switch - turns a function switch on or off
- Input - turns an audio input on or off
- Invert - turns the output invert switch on or off. Available on PBC/10 only
- Signal - turns an audio signal mute on or off. This is how you control the dry signal feed to the internal mixer. Available on PBC/10 only
- Output - turns one of the two audio outputs on or off. On the PBC/6X, output #3 is the tuner output which can be activated on the IN 2 jack.
Device - when using an action type that sends a MIDI message, this is where you specify the destination device for the message.
The remaining parameters displayed will depend on the action type selected. These will indicate the MIDI parameters of the message to send, the number of the audio loop to select, etc. Many action types have an On value and an Off value, indicating a value to use when the action is turned on and a different value to use when it is turned off.
For more information on actions, see Mastering the Mastermind Episode 10, Actions
Songs And Setlists
For live performances, your presets can be arranged into Songs and Setlists. Using this feature allows you to group presets by song and makes it easy to rearrange those songs for each performance.
A Song is a group of presets – up to 16 of them – that are selected for use in a particular song. Each preset is typically chosen for the sounds needed in different parts of a song: intro, verse, chorus, bridge, solo, etc. Each preset in a song can be chosen from any of the 768 presets defined in the system, and presets can be used in more than one song.
A Setlist is an ordered list that represents the songs you’re going to play in a particular performance. You press a button to move to the next song in your setlist as you finish each song. You can have multiple setlists defined for different performances - up to 64 of them, or you can choose the "All Songs" setlist, which contains all 1008 songs in numerical order.
When Song and Setlist mode is active, the Bank Up and Bank Down buttons move from song to song instead of moving from bank to bank. When a song is selected, the preset buttons on the current button page display the presets assigned to the song.
If there are more presets in the song than there are visible preset buttons, the remaining presets will not be displayed. On devices like the Mastermind LT, PBC and GT/10, you can't have 16 preset buttons, but you can use Preset + and Preset - buttons to cycle through all presets without needing to have a preset button for each song.
Song and Setlist mode is enabled using the Setlist parameter in the Globals Tab. If Setlist is set to None, the normal bank and preset mode is active. If Setlist is set to All Songs or any of your 64 setlists, then Song and Setlist mode is active.
You can also select setlists using a System / Setlist action. This allows you to switch setlists - or switch in and out of song/setlist mode - with a button press or other event.
For more information, see Mastering the Mastermind Episode 11, Songs and Setlists
IA Mode
As discussed in the Buttons and Pages section, there are many button types, including IA (Instant Access). IA buttons are the most general purpose type - they execute a list of Actions that can send MIDI messages and perform many other functions.
Note 1: This feature was introduced in earlier MIDI controllers, where it was often referred to as IA Reveal.
Note 2: The default Mastermind GT configuration is set up to use IA Mode and has an IA Mode button defined. The Mastermind LT and PBC are not set up to use IA Mode by default, but can be programmed to use it if desired.
Note 5: If you have Actions defined on a button, and Send on Preset Change is turned on for that button, the button's actions will be run every time you change presets. This will happen whether IA Mode is active or not.
More information about IA Mode can be found in Mastering the Mastermind Episode 3, MIDI Controller Basics (towards the end of the video) and Episode 7, Advanced Button Editing
Presets
Presets are the primary way to get many things to happen with a single button press. Each preset can do the following:
- Send a MIDI program change (PC) message to any of your connected MIDI devices
- Perform up to 10 actions, each of which can send any MIDI message or activate another function on the Mastermind.
- Change the state of each of the IA buttons and force those buttons to send their MIDI messages
- Change the currently visible button page, and load a local button page if requested
- Adjust the current system tempo
- Load new settings for expression pedals and external switches (if requested)
These steps are performed in the order shown above – PC messages are sent first, preset actions are executed next, etc.
You can load a preset by pressing a Preset button, or by executing a System / Preset Action. On the Mastermind GT, you can also choose a preset using a Preset Number or Preset Menu button.
Alternate Preset
Each preset can have a Alternate Preset defined. This is a second preset that you want to associate with your preset. Perhaps your preset is used in a solo, but at a certain point of the solo, you need to kick in an additional effect as an accent for a few bars. You can edit another preset and set it as an alternate for the first preset and switch over to the alternate preset for the accent part.
There are two ways you can recall an alternate preset:
- You can set the Preset 2nd Press parameter to Alternate. When you press the active preset button a second time, it will switch you to the preset's alternate preset (if it has one). Pressing the preset button again switches you back to the main preset.
- You can execute a System / Preset action with the special value Alternate. This action can be assigned to an IA button, or used in any other action list.
When an alternate preset is active, the associated preset button (if any) is changed to the Alt Preset Color specified in the Globals Tab. If the alternate preset has its Button Color parameter set to something other than None, that color will be used instead of the global Alt Preset Color setting.
Global Preset
The Global Preset is an additional preset intended to be your 'go-to' sound - a standard sound that you would like to be able to access at any time. Like Alternate Presets, there are two ways to access the Global Preset:
- You can set the Preset 2nd Press parameter to Global. When you press the active preset button a second time, it will switch you to the Global Preset. Pressing any preset button switches you away from the Global Preset back to the selected preset in your current bank or song.
- You can execute a System / Preset action with the special value Global. This action can be assigned to an IA button, or used in any other action list.
More information about presets can be found in Mastering the Mastermind, Episode 3, MIDI Controller Basics and Episode 5, Basic Preset Editing
Basic Operation
Creating a New Configuration
The editor starts up with the factory default configuration. You can always return to factory default by selecting File / New in the menu.
In the upper left corner of the Globals Tab, there is a Model parameter. This is where you can select which model of RJM product you're using. In the Mastermind editor, you can choose from LT/7, PBC/6X and PBC/10. In the Mastermind GT Editor, you can choose from GT/10, GT/16 and GT/22
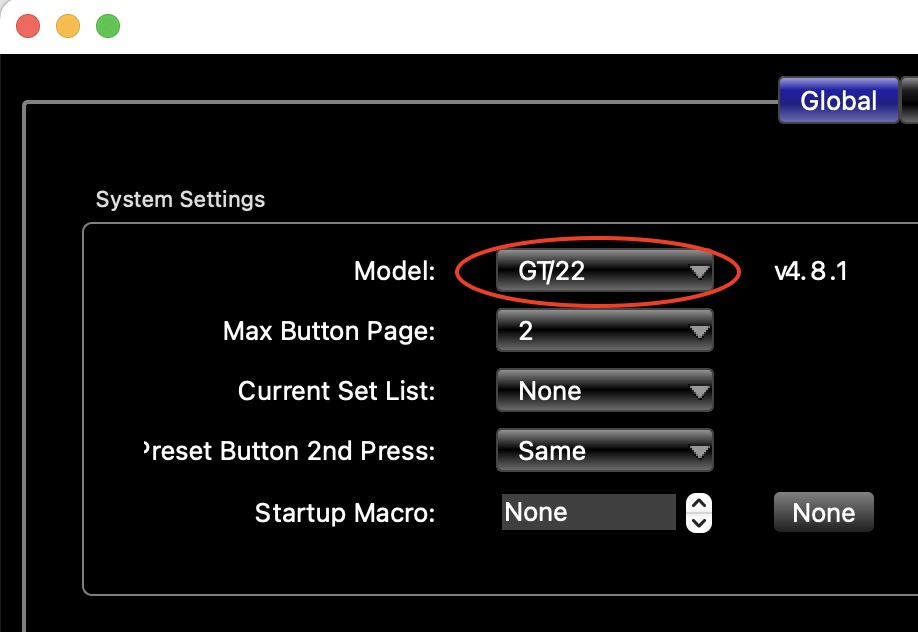
Selecting a new value for Model will affect which settings are loaded when selecting File / New. When you change the selected model, you will also be prompted to revert to factory settings for the newly selected model. In most cases, it's recommended to say 'Yes' when prompted so that you start with settings that are known to work on your device.
Loading and Saving Settings
Loading Settings
Saving Settings
The File / Save As menu option brings up a file dialog where you can choose to save the settings under a new file name.
The required .rjs extension will automatically be appended to the filename.
Exporting Settings
The File / Export menu option brings up a dialog that allows you to save a portion of your settings. This is useful if you need to move certain presets, sysex messages, macros, etc. to another device.

Use the checkboxes to select which items you wish to write to the file, and set the upper and lower numbers to be transferred (if applicable). Once you click OK, you will be prompted for a filename where the settings will be saved.
When you load an exported file, it will overwrite only the data that you specified when exporting the file. For example, you can copy the presets from one configuration to another by doing this:
- Load the file that has the presets you want to copy
- Use the Export option to save only the presets
- Load the file where you want the presets to be copied
- Load the file exported in step 2
This will overwrite only the presets in the original file with the new preset list.
Transferring Settings Between Device and Computer
The Mastermind can connect to a Mac or PC computer using a standard USB B cable, often known as a USB printer cable. When connected, the device will appear as a standard MIDI device. The first time it's plugged in, it may take a while to appear as the drivers install. The standard system drivers are used, so you don't need to provide a driver file.
- Connect To Device
- Read Settings From Device
- Write Settings From Device
- Write Changes To Device
It's important to make sure that at least your editor version and firmware version match, at least in the first two numbers. For example 4.8.0 and 4.8.1 will work together, but 4.7.0 and 4.8.0 will not. The below menu options won't work correctly if the versions are not close enough.
In general, it's best to keep up to date with the latest firmware and editor versions.
Connect To Device
This option simply checks to see if the device is connected. If it is, a green "Connected" message appears in the upper right corner of the editor. If a device is not found, an error message is displayed.
This step is optional - the editor will always make sure the device is connected before transferring settings.
Read Settings From Device
Selecting this option reads the settings from the device into the editor. This will overwrite any settings you have in the editor, so be sure to save your settings if needed.
Write Settings From Device
This option writes all of your settings from the editor to the device, overwriting any settings on the device.
Write Changes To Device
This option also writes your settings from editor to device, but only settings that have changed since they were last written to the device. This option is often faster than Write Settings To Device, but the speed depends on the extent of changes performed. The first time you write changes during an editing session, it will take longer because it writes all of your settings, but subsequent writes will be faster.
Initial Setup
Creating Devices
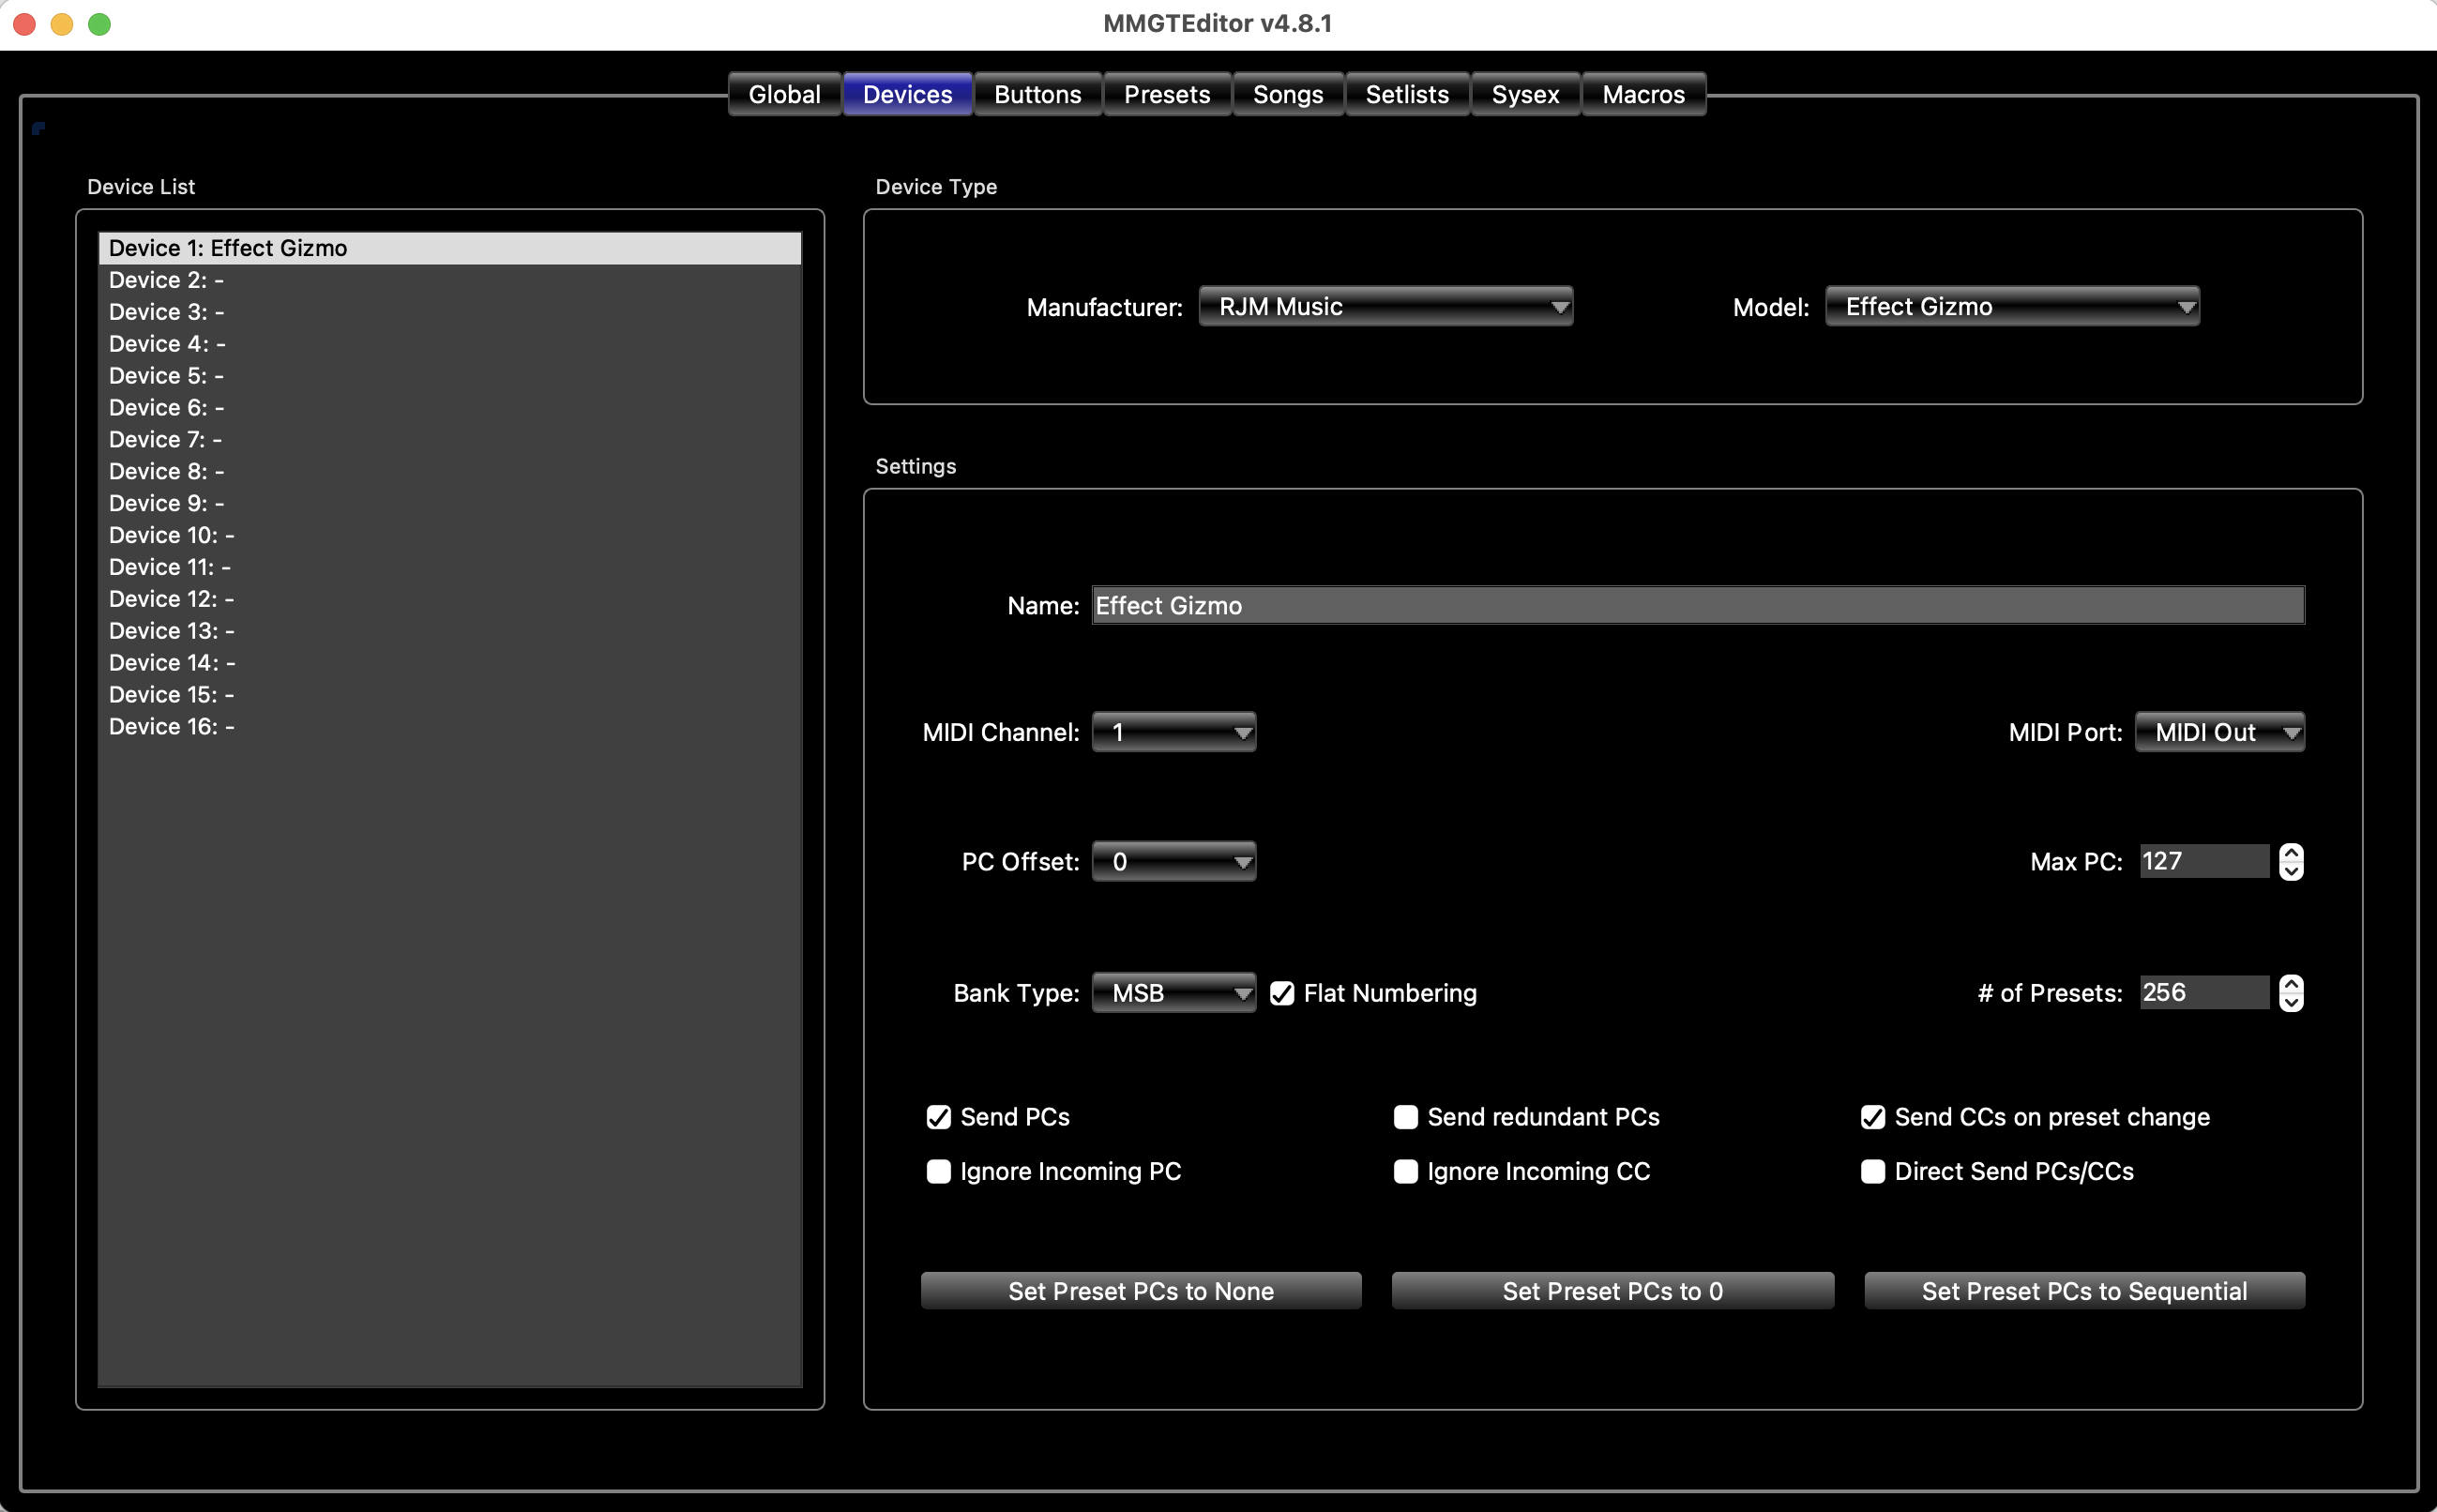
The first thing you'll need to do for a new setup is define one or more devices. The Devices page in the editor allows you to set up an entry for each MIDI device you wish to control. These device entries contain information about what the device's capabilities are and how it needs to be controlled. The editor contains a database of settings for popular MIDI devices, and in many cases, you'll only need to select the device by manufacturer and model, then set the device's MIDI channel and everything else is set up for you.
In the Devices tab, you will see a list of 16 device slots on the left, and a lot of parameters on the right:
Select one of the device slots on the the left, and its parameters are displayed. There will be one device defined by default (a Mini Effect Gizmo on the Mastermind PBC and an Effect Gizmo in the Mastermind GT). If you have one of these devices in your system, you can leave the default device as it is. Otherwise, you can change the device to something else.
First, click the Manufacturer dropdown menu and choose your device's manufacturer. Then, click the Model dropdown menu, and select your device model. If your device is not listed, you can use the Generic manufacturer and Generic PC/CC Device model.
If you found an entry for your manufacturer and model, the settings in the lower half of the screen should be pre-configured for you. The only thing that you will likely have to change is the MIDI Channel parameter. More information about these settings can be found on the Devices Tab page.
It's very important that each MIDI device is set to its own MIDI channel number. Which number you choose for each device doesn't matter, except that the channel number in the editor, and the channel number on the actual MIDI device should agree, and each device should have a different MIDI channel number. Each MIDI device has some method of choosing its MIDI channel - consult its user manual for instructions.
Editing Buttons


Your device will have a default button configuration right out of the box, so you may wish to skip this step at first and get right to editing presets. However, if you're ready to start changing your buttons, this is what you need to do:
In the editor, switch to the Buttons tab to begin working with your button configuration. You'll see a virtual display of your device, showing its current configuration. At the bottom of the screen are controls that allow you to select which of the 16 button pages is currently visible. You can also name the button page here.
The most basic operation is swapping the position of two buttons. Simply click and drag a button to a new position, and the source and destination buttons will switch locations. (Note: in the Mastermind GT editor, you drag the LCD display over another display instead of the button itself).
When you right-click on a button (or Ctrl-click on a Mac), a menu pops up. This menu allows you to perform basic operations on the button, including copy and paste, and also assigning the button to control a particular function on a device.
Copy and Paste a Button
To copy and paste buttons, simply right-click on a button and select Copy. Then right-click on the button position where you wish to move the button to, and select Paste. You can copy buttons from one page to another using this method.
Assign CCs
If you're using devices that were selected by manufacturer and model on the Devices page, then you can easily assign buttons to control functions on those devices. Right-click on the button (or Ctrl-click on a Mac) , then go to Assign CC. A submenu will pop up, showing your devices. Under those device entries, you'll see a list of functions. These could be loops on a device like an Effect Gizmo, an effect block on a multi-effect processor, or anything else that can be controlled by a MIDI continuous controller message. Select the desired function and the button will now be set to control that function.
Other Options
The rest of the right-click menu options are described in the Buttons Tab section.
Double-clicking on a button opens up the full button edit page. This page allows you to edit all of a button' s parameters in detail. You can find more information in the Button Edit Page section.
External Switches
You can connect two external switches to a Mastermind LT or PBC and four to the Mastermind GT. These additional switches can perform any function the internal switches can, except that they're limited to having a single color LED indicator.
You can edit the external switch settings by double clicking on them in the Buttons Tab. They're positioned on the right side of the virtual Mastermind display. As of the 4.0 firmware, external switches can have different settings on each page just like internal buttons can, although the external switches are set to be global by default. If you'd like to have different external switch settings on different pages, edit the external switch and turn off the Global checkbox.
You can also override these global settings in any preset by editing the external switch settings in the Presets Tab.
More information can be found in Mastering the Mastermind Episode 6, Button Editing part 1 and Episode 7, Advanced Button Editing
Editing Presets

After setting up devices and buttons, you'll want to set up your presets. Presets are the primary and most basic way to get things done on the Mastermind series, and are also the basis of songs and setlists.
Contents
- 1 Editing
- 1.1 Preset List
- 1.2 Function Switches (LT and PBC only)
- 1.3 General Settings
- 1.4 PC Messages
- 1.5 IA Buttons
- 1.6 Local Button Page Edit
- 1.7 Preset Actions
- 2 More Details
Editing
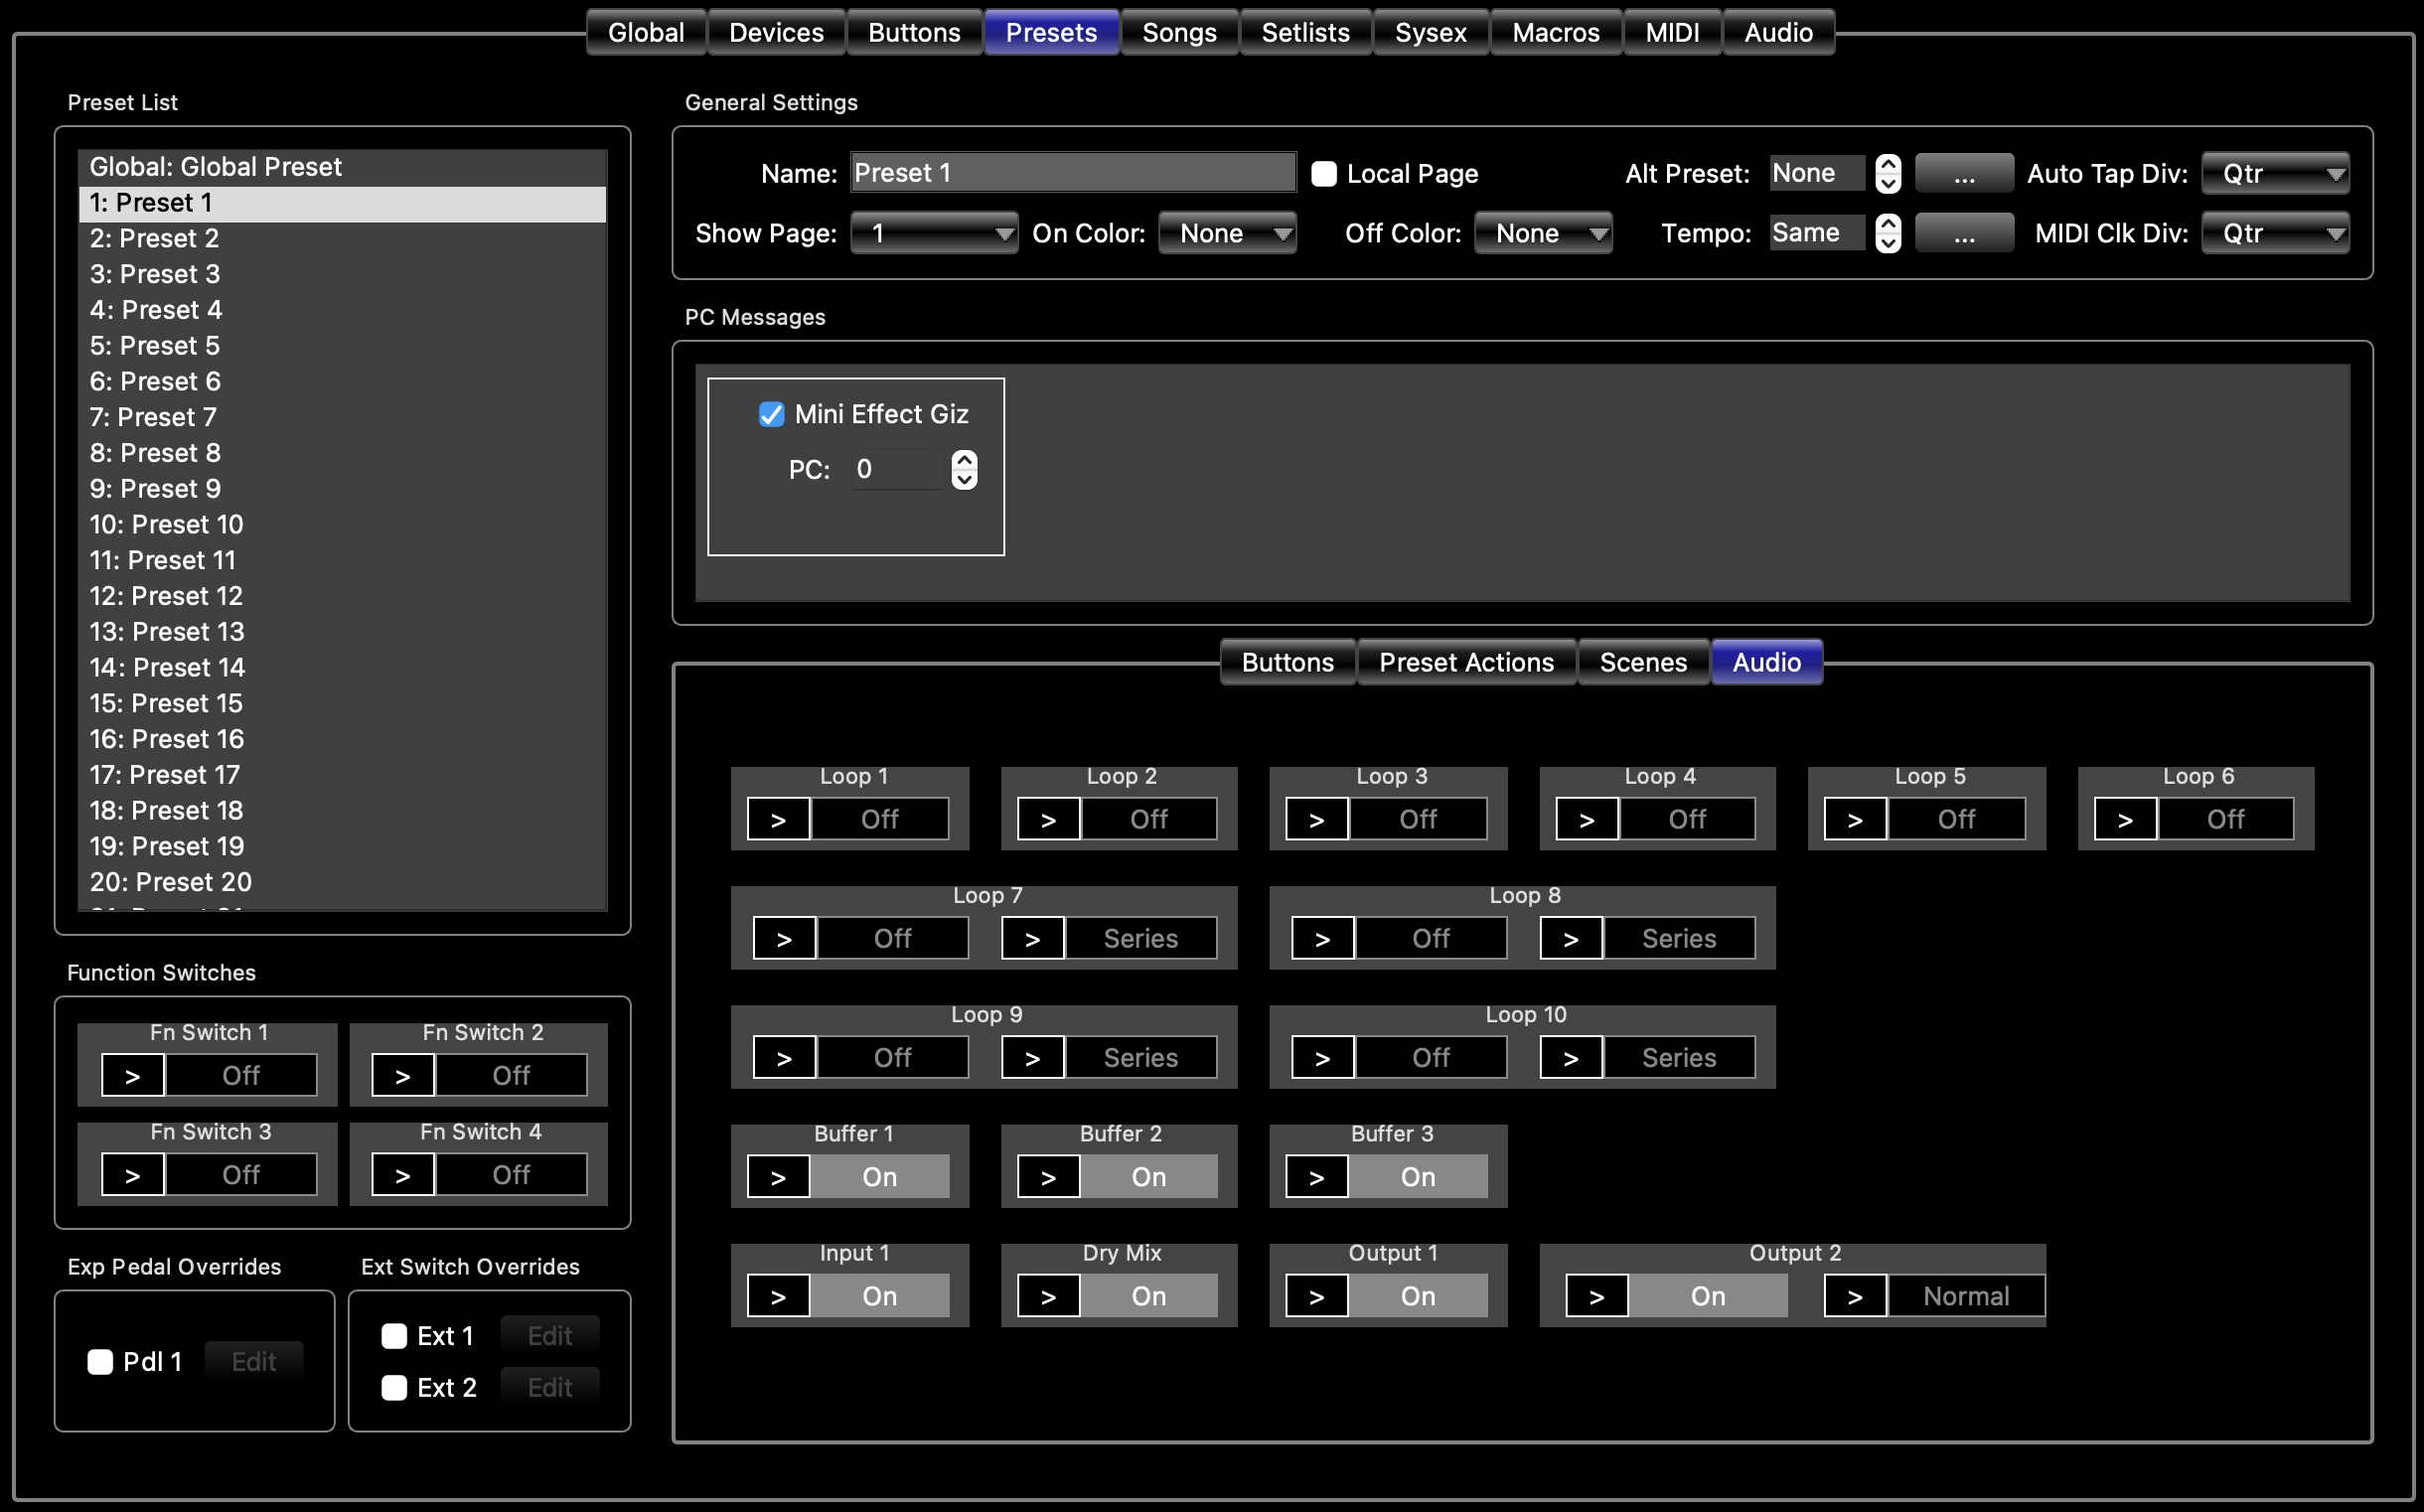
To edit presets, go to the Presets tab. You'll see a list of your presets on the left, three sections underneath the preset list, and three sections on the right. The typical process for editing a preset has several steps:
- Select a preset in the Preset List section on the left side of the screen.
- In the General Settings section, edit the preset name. There are many other parameters you can edit in this section. These are described in the Presets Tab section.
- In the PC Messages section, each device that accepts PC messages will have a box where you can specify the program number that should be sent to each device. This is how you select which preset is recalled in each one of your MIDI-capable devices. There's also a checkbox in each box - when the checkbox is not checked, no PC message will be sent to that device for the selected preset.
- If desired, you can create specific expression pedal and external switch settings for the current preset. To override the global settings and make a preset-specific override, check the checkbox next to the pedal or switch shown in the lower left corner of the screen. Then, click the Edit button to edit the settings. Refer to the Button Edit and Expression Pedal Edit sections for details on these pages. Any changes you make on this page will apply only to the current page.
- (LT and PBC only) Set the function switches to turn on or off, if desired. The function switches will start in the default state you specified in the [[V4::Globals Tab|Globals Tab]]. To change the state, go to the Function Switches section in the left column. Click the override button (>) to override the state for this preset, then click the On / Off button to change the function switch state.
- (PBC Only) You can also set overrides for the audio features of the Mastermind PBC. To do this, select the Audio tab near the center of the screen. Each audio feature will have a box where you can override each feature's settings for this preset. More details can be found in the Audio Tab section.
The other options are described in the Presets Tab section.
Preset List
Here, you can select which preset you wish to edit. You also can right-click (ctrl-click on a Mac) on a preset. This will pop up a menu with two options: Copy From Preset and Copy To Preset. As the names suggest, you can use these options to copy presets from one location to another.
Function Switches (LT and PBC only)
This area allows you to set the state of function switches for this preset. Each switch has an override indicator ('>) and a state (On or Off). The state will be the same as
General Settings
Here, you can assign a name to the preset and set a few preset-level parameters. These other parameters are discussed in more detail in the Presets Tab section.
PC Messages
This section lets you set PC and/or bank messages that should be sent to each device when this preset is selected. PC and bank messages are used to select presets on effect processors and other MIDI devices.
Each device is listed here, with a checkbox to the left of the name. If the checkbox is not checked, no PC message will be sent to that device. Each checked device will have a PC number field and, depending on the device, possibly a bank number field. Set these to call up your desired preset on your device.
Devices that support MIDI banks can have more than 128 presets. On these devices, preset numbers can be specified in two ways - as a single number, or as a bank number and a PC number. In the Devices Tab, you can use the Flat Numbering setting to control how a device's presets are displayed. When Flat Numbering is turned on, the bank and PC numbers are combined and displayed as a single preset number. Either setting can be used for any device, but you should choose the setting that best matches how the device operates. For example, if your device shows both bank and preset numbers, you probably should turn flat numbering off to match.
Please note that some devices (for example, Strymon pedals) do not use the standard preset numbering scheme. For these devices, consult the user's manual to see how to convert the device's preset numbering to standard MIDI preset numbering.
The bottom section, by default, contains a virtual device display that looks similar to the one in the Buttons Tab. In this mode, you can click on IA buttons to select whether the button turns on or off when this preset is selected. When you click on the button, it will change color to indicate its saved state. This allows you to program loops, effects, etc. to turn on automatically when the preset is selected.
Please note that only IA buttons that have the "'Update on Preset Change"' checkbox turned on will work in this mode. This setting is found in the Button Edit Page.
If the Edit Local Buttons checkbox is selected, then the virtual device display becomes a full button editor, just like the Buttons tab. This allows you to edit a button page that's only displayed when the current preset is selected. You can have a different page of buttons - with a completely different button layout - for every preset if you wish.
Preset Actions
Clicking the Preset Actions tab above the virtual device display allows you to add Actions to your preset, which will allow you to send specific MIDI messages when the preset is loaded.
More Details
More details on editing presets can be found in the Presets Tab section.
Editing Songs and Setlists

Editing Songs
To edit a song, go to the Songs Tab. It shows three columns: the left column shows all of your songs, the middle column shows the presets that are in each song, and the right column shows a list of all presets.
Start by selecting a song in the left column. Then, select one of the 16 preset slots in the middle column (usually, you start with slot 1 and move down from there). Finally, use the right column to select the preset you'd like to go into that slot. Repeat this for each preset slot within the song, then you can go on to the next song and define its presets.
You can name the song using the Name field at the top of the window. The other options are described in the Songs Tab section.

Editing Setlists
Editing setlists works exactly like editing songs. Go to the Setlists Tab and you'll see a similar three-column layout. The left column contains a list of setlists, the middle column contains a list of songs within that setlist, and the right column contains a list of all songs.
Start by selecting a setlist in the left column. Then, select one of the 100 song slots in the middle column (usually, you start with slot 1 and move down from there). Finally, use the right column to select the song you'd like to go into that slot. Repeat this for each song slot within the setlist, then you can go on to the next setlist and define its songs.
You can name the song using the Name field at the top of the window. The other options are described in the Setlists Tab section.
In order to use a setlist it needs to be selected using the Setlist parameter in the Globals Tab.
User Interface
Globals Tab
The Globals tab is the first thing you see upon starting the editor. It contains system-wide parameters that aren't specific to any song, preset or setlist.
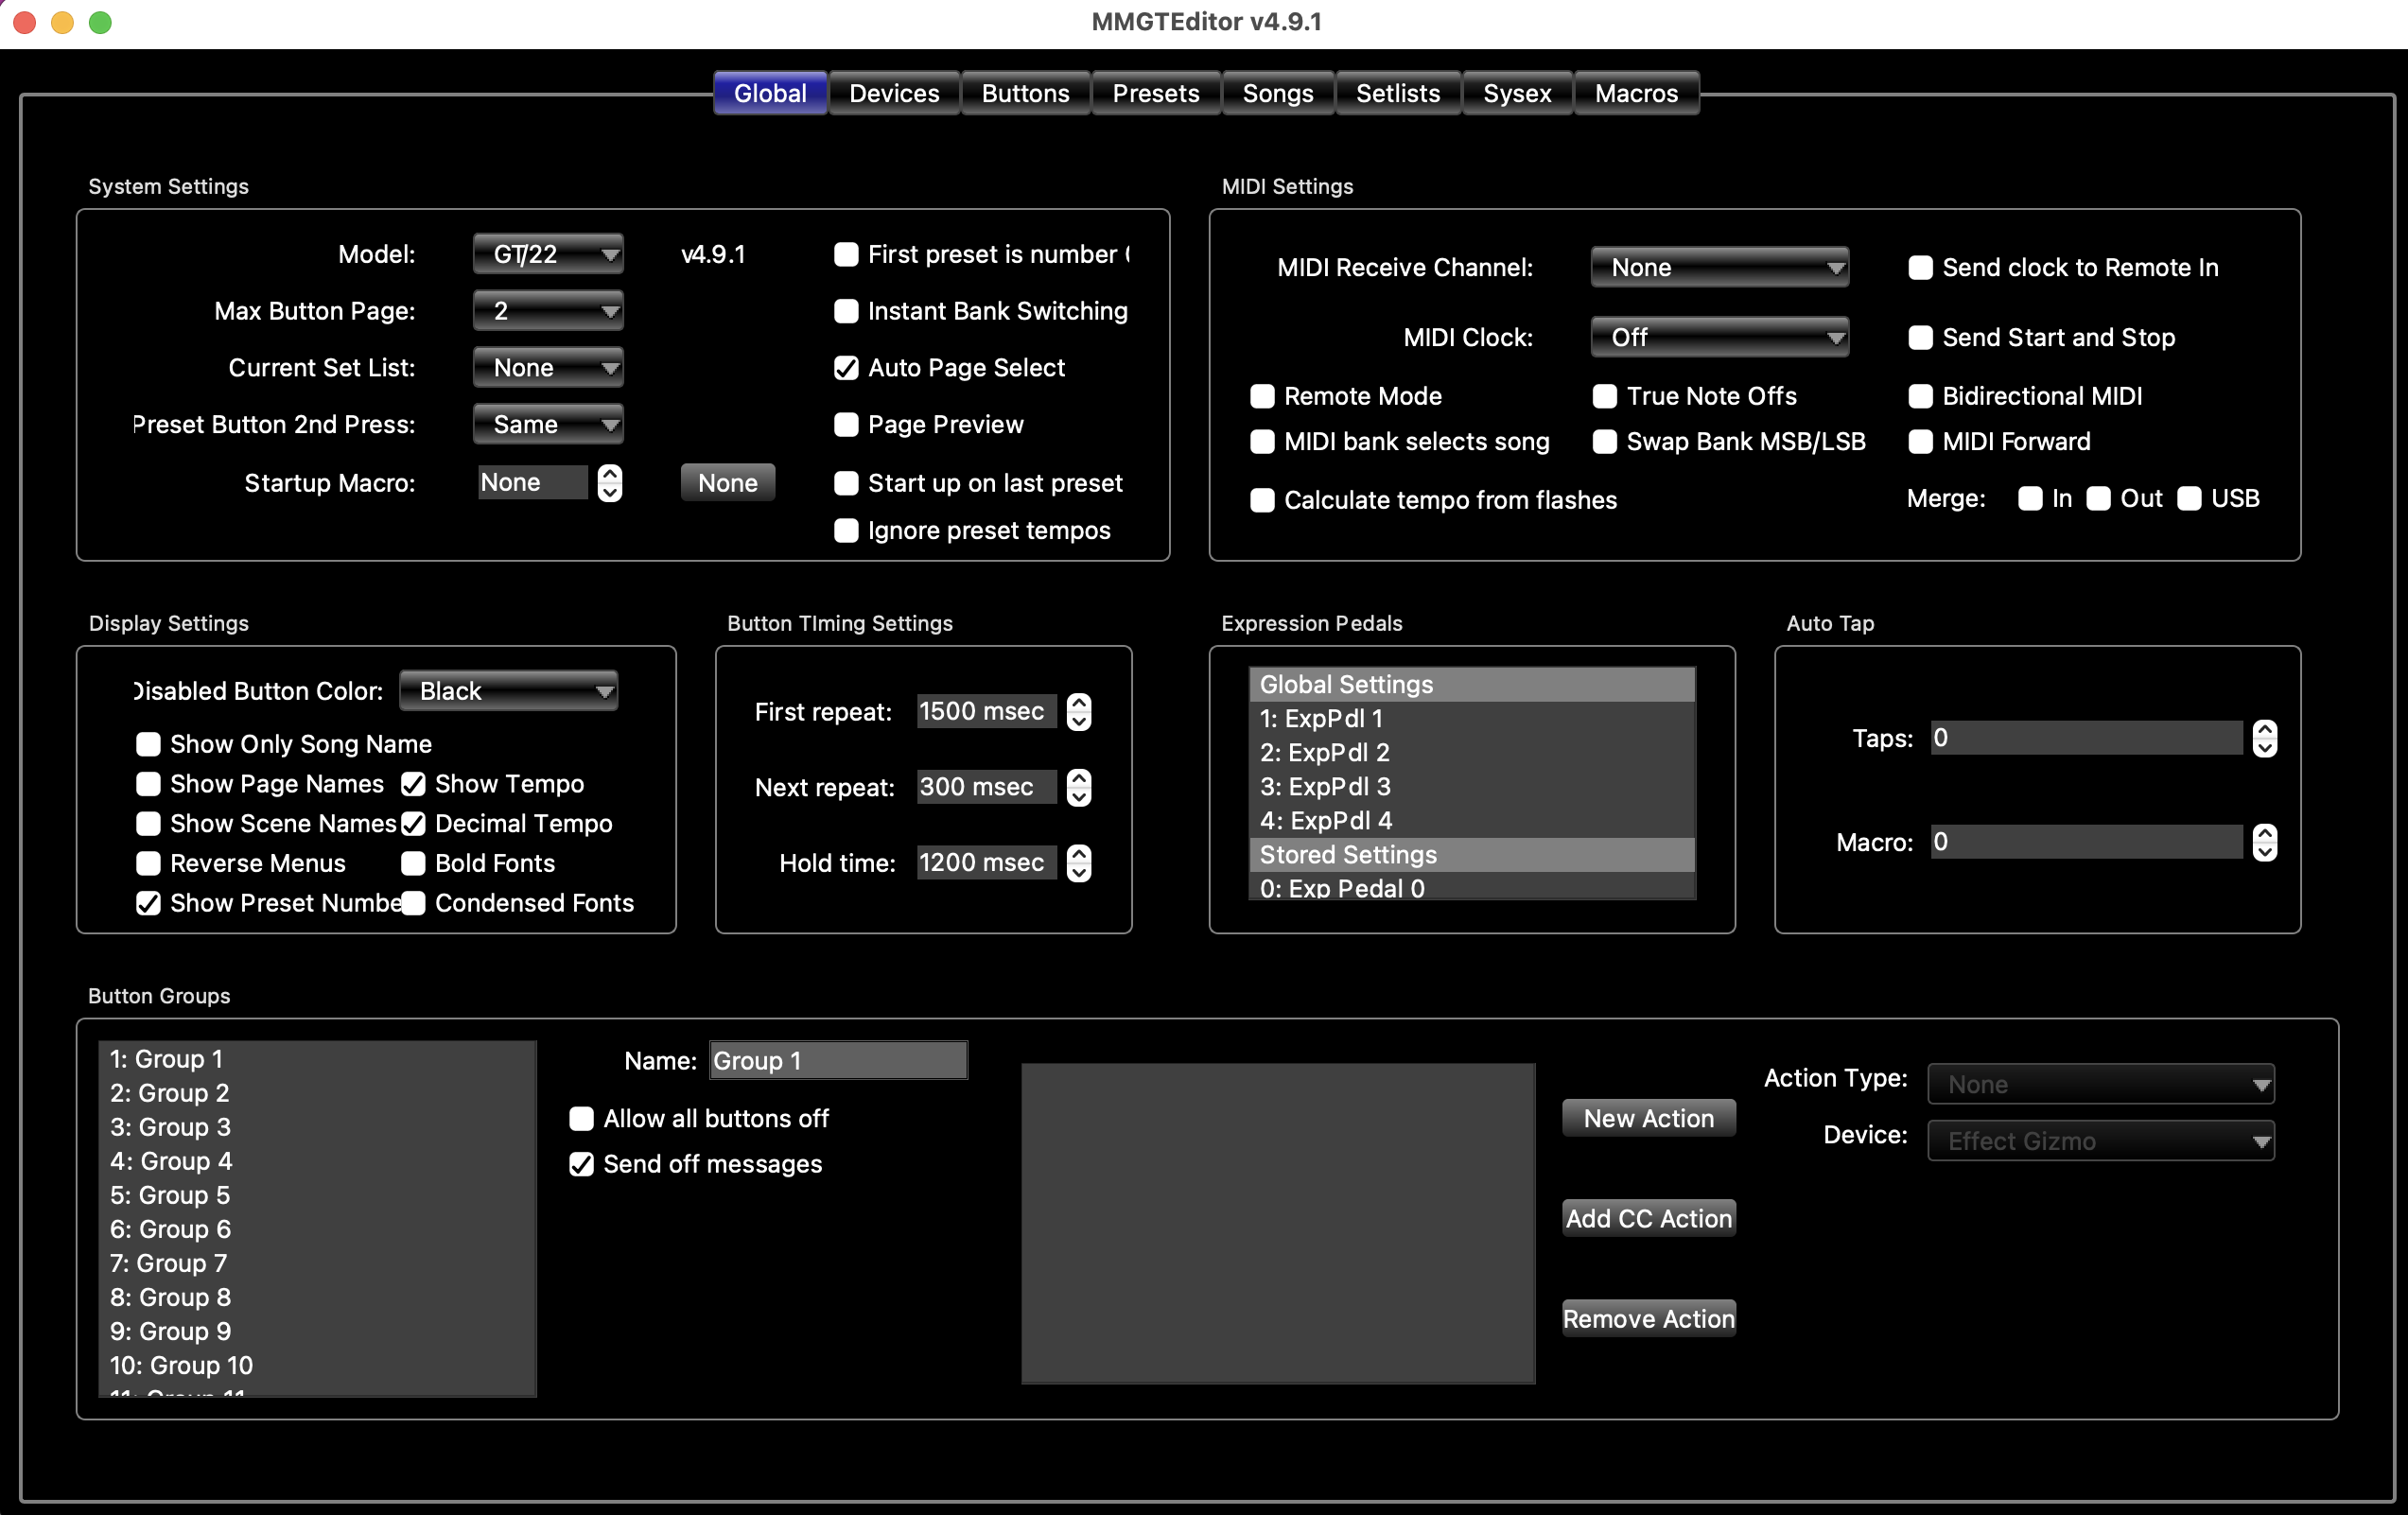
System Settings
Model - Chooses which model of Mastermind you are working with. You will be asked whether you wish to revert to factory settings for the model. In most cases, it's best to answer Yes to start with new settings.
Current Set List - selects which setlist is currently active. Possible values are:
- None - no setlist is active, the normal preset and bank mode is active.
- All Songs - setlist mode is active, and the setlist is made up of all all available songs, in numerical order.
- 1...64 - setlist mode is active, and the selected setlist is loaded.
- Same - does nothing special - just selects the same preset again
- Previous - selects the previously selected preset
- Global - selects the Global Preset
- Reload - reloads the current preset, resetting all IA buttons and PC messages to the state that is stored in the preset
- IA - runs the IA actions that are specified on this button
- Alternate - recalls this preset's Alternate Preset
Startup Macro - Specifies a Macro that will be executed on startup. This macro can send MIDI messages, change audio features on the Mastermind PBC, etc.
First preset is number 0 - when checked, the first preset in the system is numbered preset 0. When not checked, the first preset is numbered preset 1. This setting is primarily used to have the Mastermind's preset numbering match an external effect device's numbering scheme.
Instant Bank Switching - in the normal (not checked) setting, when Bank Up or Bank Down are pressed, the preset buttons flash, waiting for the user to select a preset. No preset is loaded until a preset button is pressed. When this setting is checked, pressing Bank Up or Bank Down result in an immediate preset change. The preset selected in the new bank is in the same position as was selected in the previous bank. For example, if the third preset button was selected, and Bank Up was pressed, the third preset in the new bank will be selected.
Auto Page Select - when checked, each preset change will also trigger a button page change. Each preset can have a page number specified with the preset's settings, and this is how the button page is selected. Turning this setting off will prevent the button page from changing automatically when the preset changes.
Page Preview (GT Only) - when checked, pressing Bank Up or Bank Down will switch button pages to the page specified in the first preset of the bank. This allows you to see not only the presets in the new bank, but also the button layout for the first preset in the bank, before actually selecting a preset. This setting only has an effect if Instant Bank Switching is turned off and Auto Page Select is turned on.
Show Page Names (GT Only) - When checked, the upper half of the main display shows the current button page's name, if any is defined.
Start on last preset - when checked, the last selected preset is loaded when the device powers up. When not checked, the device always powers up on preset 1 (or preset 0 if First preset is number 0 is turned on).
Show Tempo - When checked, the current tempo will briefly be displayed in the main LCD display when the tempo changes.
Ignore Preset Tempos - When checked, tempos specified in each preset are ignored. Only tempos specified in songs and ones tapped in manually will have any effect.
Show Exp Pedal Pos (PBC/LT Only) - When checked, the current expression pedal position will be displayed as a bar graph on the right side of the main LCD display.
MIDI Settings
This section applies only to the Mastermind GT. On the Mastermind PBC and Mastermind LT, the MIDI settings are located on a separate MIDI Tab.
MIDI Receive Channel - selects which MIDI channel the Mastermind responds to. Incoming Program Changes and Bank messages on this channel will cause the Mastermind to switch to the indicated preset. This setting also enables incoming CC (Continuous Controller) messages, which are set in the right side of this tab. Can also be set to None which makes it ignore all incoming Program Changes and Continuous Controller messages.
This setting is typically used when controlling the Mastermind from a computer or other MIDI controller.
You should not set MIDI Receive Channel to be the same channel as one of your other MIDI devices. This includes devices with bidirectional MIDI communication such as the Axe-Fx and Kemper Profiler. When using these devices, you don't need MIDI Receive Channel to be set to anything other than None.
MIDI Clock - selects how the Mastermind PBC handles MIDI clock messages. Possible values are:
- None - does not transmit or receive MIDI clock
- Transmit - transmits a MIDI clock signal. The tempo can be set using tap tempo button, or can be programmed in any song or preset.
- Receive - receives a MIDI clock signal. It will also send the incoming clock signal out the MIDI output.
- Auto - If an incoming MIDI clock signal is detected at the Remote In or USB port, act as if Receive was selected. If no incoming MIDI signal is detected, act as if Transmit was selected.
Clock Pulse Limit - If set to 0 (the default), MIDI clock will be sent normally - as a continuous stream of MIDI messages. If set to a number higher than 0, the Mastermind will send that many MIDI clock messages every time the tempo changes, then stop sending. This is similar to tap tempo, but is faster.
Bidirectional MIDI - when turned on, makes the MIDI Out and Remote In ports bidirectional. Pins 1 and 3 are used for the second communication channel. This is used for Remote Mode or to communicate with bidirectional MIDI devices like the Axe-Fx.
Remote Mode - when enabled, allows you to link two or more Masterminds together and have them all operate in unison. This makes it possible to use one Mastermind as a remote controller for another. When using this mode, the MIDI Out of each device connects to the Remote In of the next MIDI device. The last device's MIDI Out is used to connect to the rest of your MIDI devices.
Bidirectional MIDI should be turned on when using Remote Mode, and all Masterminds need to have the same exact settings on them in order for Remote Mode to work correctly.
Expander - when checked, allows you to link two Masterminds together and use them as one unit. This is different from remote mode in that you can use the audio loops in each unit independently and you can have different button configurations on both units. Remote Mode needs to be turned on for this parameter to be visible. Bidirectional MIDI needs to be on when using expander mode.
MIDI bank selects song - This setting changes how the Mastermind responds to MIDI bank messages. Refer to the External MIDI Control section for more details.
Use Song Index - This setting, along with the above setting, controls how the Mastermind responds to MIDI bank messages. Refer to the External MIDI Control section for more details.
Merge (In / Out / USB) - when one or more of these checkboxes are checked, the Mastermind takes any MIDI messages received at that port and forwards them out the MIDI Out port.
MIDI Forward - when enabled, the Mastermind takes any MIDI messages received at the USB Device port and forwards them out the MIDI Out port. And, any MIDI messages coming in to the Remote In port are forwarded out the USB device port. This allows you to use the Mastermind as a MIDI interface for a computer.
Display Settings
This section applies only to the Mastermind GT
Show Only Song Name - when checked, displays only the song name on the main display (not the preset name).
Show Page Names - when checked, displays the current button page's name in the upper line of the main display. If the current page has no name, it is not displayed.
Bold Fonts - when checked, sets all fonts to bold.
Show Tempo - When checked, the current tempo will briefly be displayed in the main LCD display when the tempo changes.
Auto Tap
Auto Tap allows you to send tempo taps to devices that support them. When the Taps parameter is set to a number other than zero, it will send the specified number of taps every time the tempo changes.
Auto Tap uses a Macro to specify what it does. On the Mastermind PBC and LT, you can use a System / Fn Switch action to send taps through a function switch output - this will work with any pedal that has a tap switch input jack. You can also use a CC, PC, Note or Sysex action to send MIDI messages for each tap.
Some devices accept momentary taps, some accept latching. If your tempos are not coming out correctly, try changing the function switch's momentary setting. If you're sending a CC message, change the action from CC Toggle to CC Momentary or vice-versa.
Each preset can specify a different a different tap division, which allows you to change from standard quarter note taps to other note types. This is described in the Presets Tab section.
For more information about Auto Tap and Tap Tempo, please see Mastering the Mastermind episode 22, Tempo
Timing Settings
First repeat - sets the number of milliseconds needed to hold a button before the button starts repeating
Next repeat - sets the number of milliseconds between button repeats
Hold time - sets the number of milliseconds needed to hold a button before its Hold Function is activated
Bank time (PBC/LT Only) - when you press a Bank Up or Bank Down button, the Mastermind will enter bank selection mode. The main display will scroll through all of the presets in the currently selected bank, displaying the name of the presets in the bank one at a time. This parameter sets the number of milliseconds that each preset name is displayed.
Name time (PBC/LT Only) - If Show Button Names is turned on, this controls how many milliseconds each button name is displayed on the screen.
Function Switch Settings
This section applies only to the Mastermind PBC and LT
In this section, there's one block for each function switch. Each block has a lock icon and an on/off switch. The on/off switch next to the lock icon allows you to select the state of the function switch. This state will be used for the function switch unless it's overridden by a button press or a preset change.
The lock icon controls whether it's possible to override the global on/off setting. It has three states:
- Unlocked (open lock icon) - This function switch can be changed by IA button presses and preset changes. This is the default setting.
- Locked (closed lock icon) - This function switch is locked. It can't be changed by IA buttons or preset settings. The function switch will always stay in the specified state.
- Independent ("I" icon) - This function switch is independent. It will not change automatically when changing presets, but will allow you to change states by pressing an IA button.
FNx Inv (invert) - when checked, the selected function switch will be inverted - when the function switch is 'on', the relay is open, when the function switch is 'off', the relay is closed. This is also known as a 'normally closed' switch. When not checked, the switch is not inverted and 'normally open'.
FNx Mom (momentary) - when checked, the selected function switch will be momentary. That is, each time the function switches' state changes, the relay will turn on for a short period of time and then turn off. When not checked, the function switch will be latching - it will turn on or off and stay that way until the next time the function switches' state changes.
FNx On Only - this parameter is designed to be used in conjunction with the Momentary setting. When this setting is turned on, the function switch output will only pulse when the switch is turned on, not when the switch is turned off. This setting is used when controlling channel switching on certain amps, but should be left turned off in most cases.
Momentary Time - sets the number of milliseconds that momentary switches stay on before they automatically turn off.
For more information about Function Switches, see Mastering the Mastermind episode 17, Function Switches
Expression Pedals
This section contains buttons that bring up the Expression Pedal Edit Page to edit a pedal's global settings. These are the settings used for each expression pedal, unless the settings are overridden by the current preset or using an ExpPedal action. Expression pedal overrides are specified in the Presets Tab.
The section has settings for each button group. On the left, there's a list of groups. You can select a group there, and edit its parameters:
Name - Sets the group's name. This name is only used for reference
Send Off msgs - selecting a button contained in a group will result in messages being sent by the button that's been turned on. When this setting is checked, the button that was turned off as a result of the button press will also send its messages.
There is also an action list associated with each group. This action list is run when you switch from no buttons turned on to 1 button turned on, or vice-versa. This feature requires that Allow all buttons off is turned on. Example: you have three buttons grouped together, each of which selects a different preset on an effect device. You can set up a group action to bypass the pedal when all of the buttons in the group are turned off, and to enable the pedal as soon as one of the buttons in the group is turned on.
Devices Tab
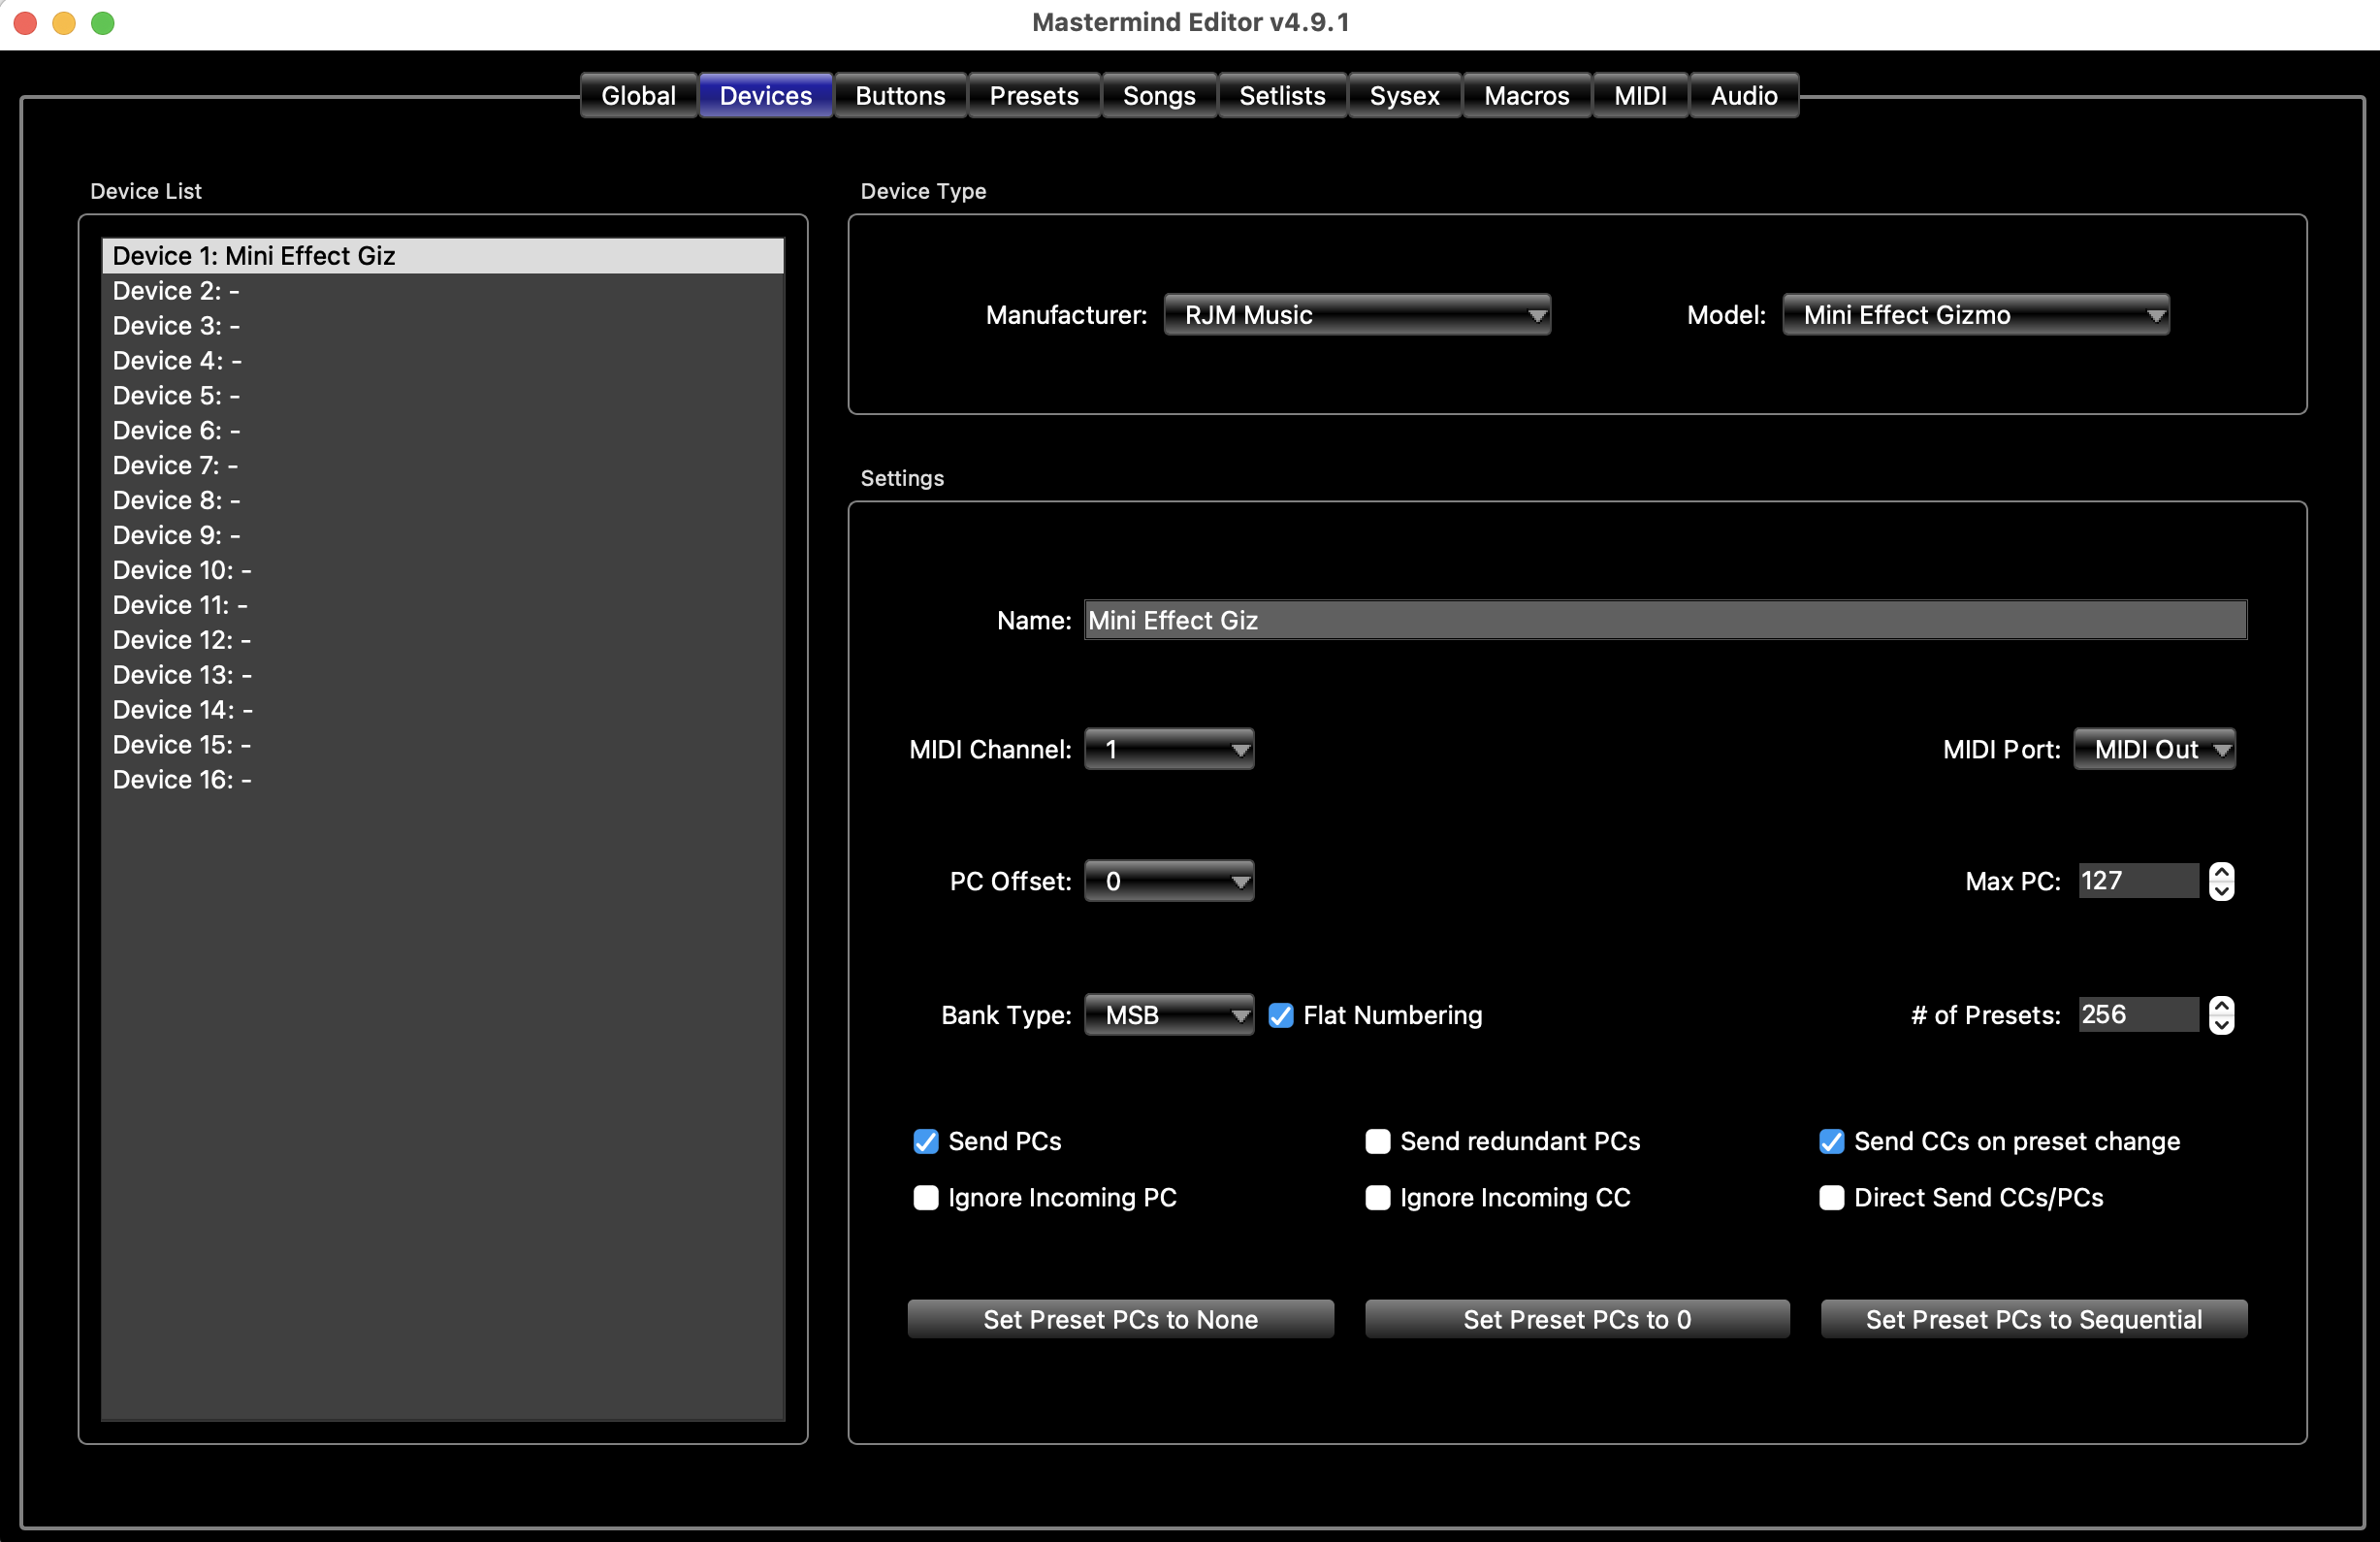
The Devices Tab is where you tell your Mastermind about each device it needs to control. All of the devices' MIDI parameters are defined here.
Device List
The left column contains a list of the 16 possible device slots. Select one of these to edit its parameters.
Device Type
In the Device Type group, you can select a Manufacturer and Model for each device. The editor has a built-in database of popular devices, and if your device is listed, the editor will fill in all of the other parameters for you (except MIDI channel, which you'll need to configure yourself).
Settings
Name - Sets the device's name
MIDI Channel - Sets the MIDI channel number that the device is on. This number needs to agree with the channel number that the device is set to (in its own settings menu).
MIDI Port - Sets which MIDI port is used when sending MIDI commands to this device
- MIDI Out - This is the default setting, and the one you should use in most cases
- Remote In - The Remote In port is bidirectional, and can be used as an additional MIDI output with an appropriate adapter cable
- USB - Sends the MIDI data over the USB port. This allows the GT or PBC to communicate with a computer
PC Offset - Sets whether the first preset on the device is numbered 0 or 1
Max PC - Sets the maximum PC (program change) number the device accepts. On devices that support MIDI banks, this determines the number of presets in each bank. Typically this is set to the maximum (127), but can be lower on some devices.
Bank Type - Sets the type of MIDI bank selection the device accepts
- No Banks - The device does not support MIDI banks
- LSB - The device uses CC32 to select banks
- MSB - The device uses CC0 to select banks
- MSB:LSB - The device uses CC0 and CC32 to select banks
Flat Numbering - On devices that support MIDI banks, this setting controls how device presets are specified in the Presets Tab. When Flat Numbering is turned on, banks and PCs are combined into a single preset number. The Mastermind does all of the calculations to figure out bank and PC numbers. When Flat Numbering is off, you can specify PC and bank numbers separately. Any device can use either setting; you should choose the setting that best matches how your device works. If your device has bank and preset numbers, you should turn flat numbering off. If the device only has preset numbers, you should turn flat numbering on. The exception to this is Strymon pedals - they use their own bank scheme that doesn't match the standard MIDI bank scheme. Turn on Flat Numbering for Strymon pedals and Axe-Fx.
# of Presets - Sets the total number of presets on this device
Send PCs - When checked, the GT or PBC will send PC messages to the device. When not checked, no PC messages will be sent to the device.
Send Redundant PCs - When not checked, the GT or PBC will not send the same PC message to a device twice in a row, assuming that a second PC message would be redundant. This feature exists because some effect processors' audio drops out when a PC message is received, even if it's already on the requested preset. Turning this setting off disables this feature and allows all PC messages to be sent.
Send CCs on preset change - When checked, any IA buttons that control this device are allowed to send their MIDI messages to the device automatically when you change presets. Please note that the IA buttons have to have Send on Preset Change and Update on Preset Change turned on for this to work. When this setting is turned off, the IA buttons will only send their messages to this device when the IA buttons are actually pressed.
Ignore Incoming PC - Some devices that support bidirectional MIDI can send program changes back to the GT or PBC. Examples are the Fractal Audio Axe-Fx and Kemper Profiling Amp. When this setting is disabled, manually changing presets on the front panel of the device will result in a preset change on the GT or PBC. Turning this setting on disables incoming PC messages and prevents the GT or PBC from changing presets automatically.
Ignore Incoming CC - Some devices that support bidirectional MIDI can send CC messages back to the GT or PBC. Examples are the Fractal Audio Axe-Fx and Kemper Profiling Amp. These messages can update the state of IA buttons to reflect the state of effect blocks in the device. Turning this setting on disables incoming CC messages and prevents IA buttons changing under the control of the effect processor.
Direct Send PCs/CCs - When this is off, actions sent to a device are filtered - CC messages are sorted and duplicates are removed. This helps reduce the number of messages sent, but it also can change the order that messages are sent. Turning this on disables all filtering for the device. Messages will be sent exactly in the order specified in action lists.
Auto Names - Turning this on enables real-time display of preset and bank names from a connected device. This is only supported on the Kemper Profiling Amp in Performance mode. Preset buttons will be displayed with the rig names in the current performance and bank names will be displayed as the name of the current Kemper performance.
Sync Names - Turning this on enables real time downloading of preset names from a connected device. This is only supported on the Fractal Audio Axe-Fx and Kemper Profiling Amp. As each preset is selected, the preset's name will be downloaded and saved to the preset list. This differs from the Auto Names feature in that Auto Names does not change the internal preset list.
Set Preset PCs
- Set Preset PCs to -None- - Sets all presets in the system to send no PC messages to this device
- Set Preset PCs to 0 - Sets all presets in the system to send PC0 (the first preset) to this device
- Set Preset PCs to Sequential - Sets all presets in the system to send sequential program changes. For example, preset 0 sends PC 0, preset 1 sends PC 1, etc.
Buttons Tab
 |
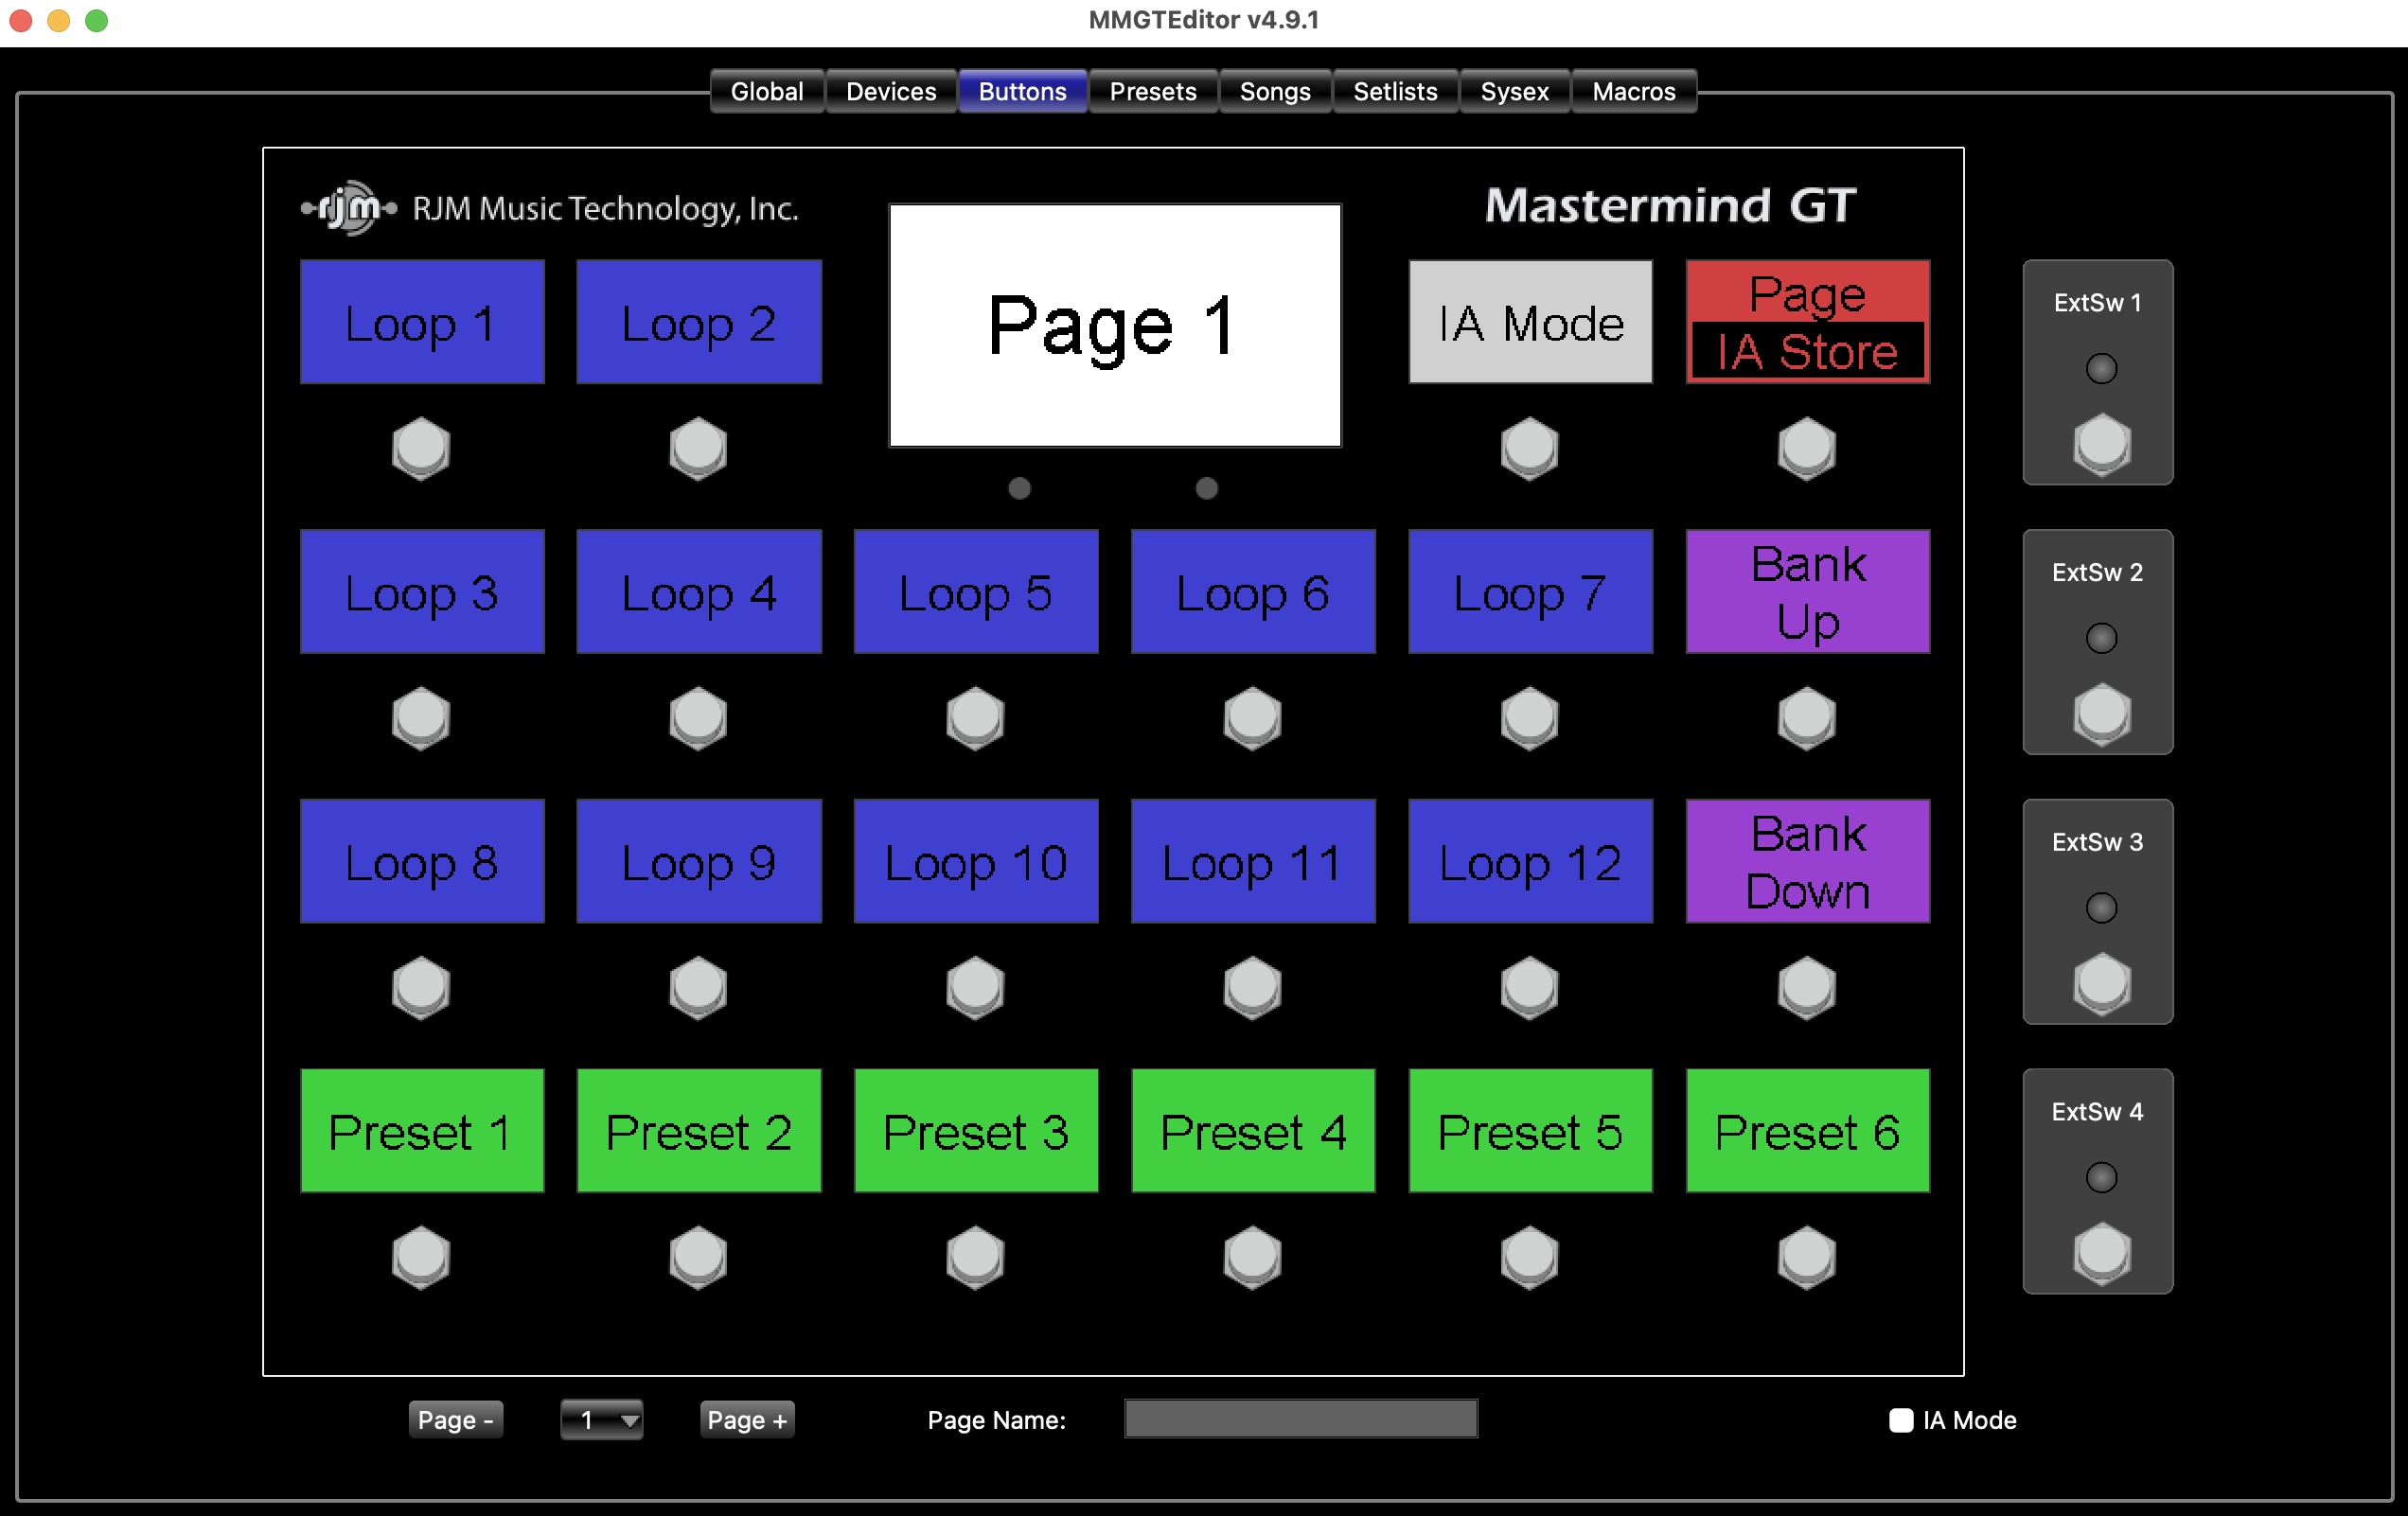 |
| PBC Buttons Tab | GT Buttons Tab |
You can perform functions on these buttons simply by clicking on them in virtual display.
Please note that in the Mastermind GT editor, you click the displays over each button to work with them. In the Mastermind editor, you click on the button itself.
Double clicking on a button opens up the Button Edit Page, where you can edit all of the button parameters in detail.
Right-click menu
There is also a context menu that you can use by right-clicking on a button (on a Mac, use Ctrl-click). This menu is used to provide quick access to certain settings. It has the following options:
Type - Sets the type of the button
Group - Sets the button group number for this button
Assign CC - Allows you to choose a CC (continuous controller) message that controls a function on one of your devices. Any device that was chosen by manufacturer and model in the Devices Tab will have its CC messages available here
Assign Default Buttons (GT Only) - Sets the currently displayed button page to a page of buttons specifically designed to control one of your devices. Any device that was chosen by manufacturer and model in the Devices Tab will be listed as an option here. Please note that non-IA buttons such as presets and bank up/down will not be overwritten with new functions, but will change the buttons' IA Mode functions
Copy and Paste - Allows you to copy and paste individual buttons from one location to another, even if they're on different pages
Copy from Page - Overwrites this page with a copy of the selected button page
Copy to Page - Copies this page to the selected button page, overwriting it
Swap This Page with - Swaps this page with the selected page
Copy Page from Preset - Overwrites this page with a copy of a preset's local button page. A dialog will pop up, requesting the number of the preset you wish to copy.
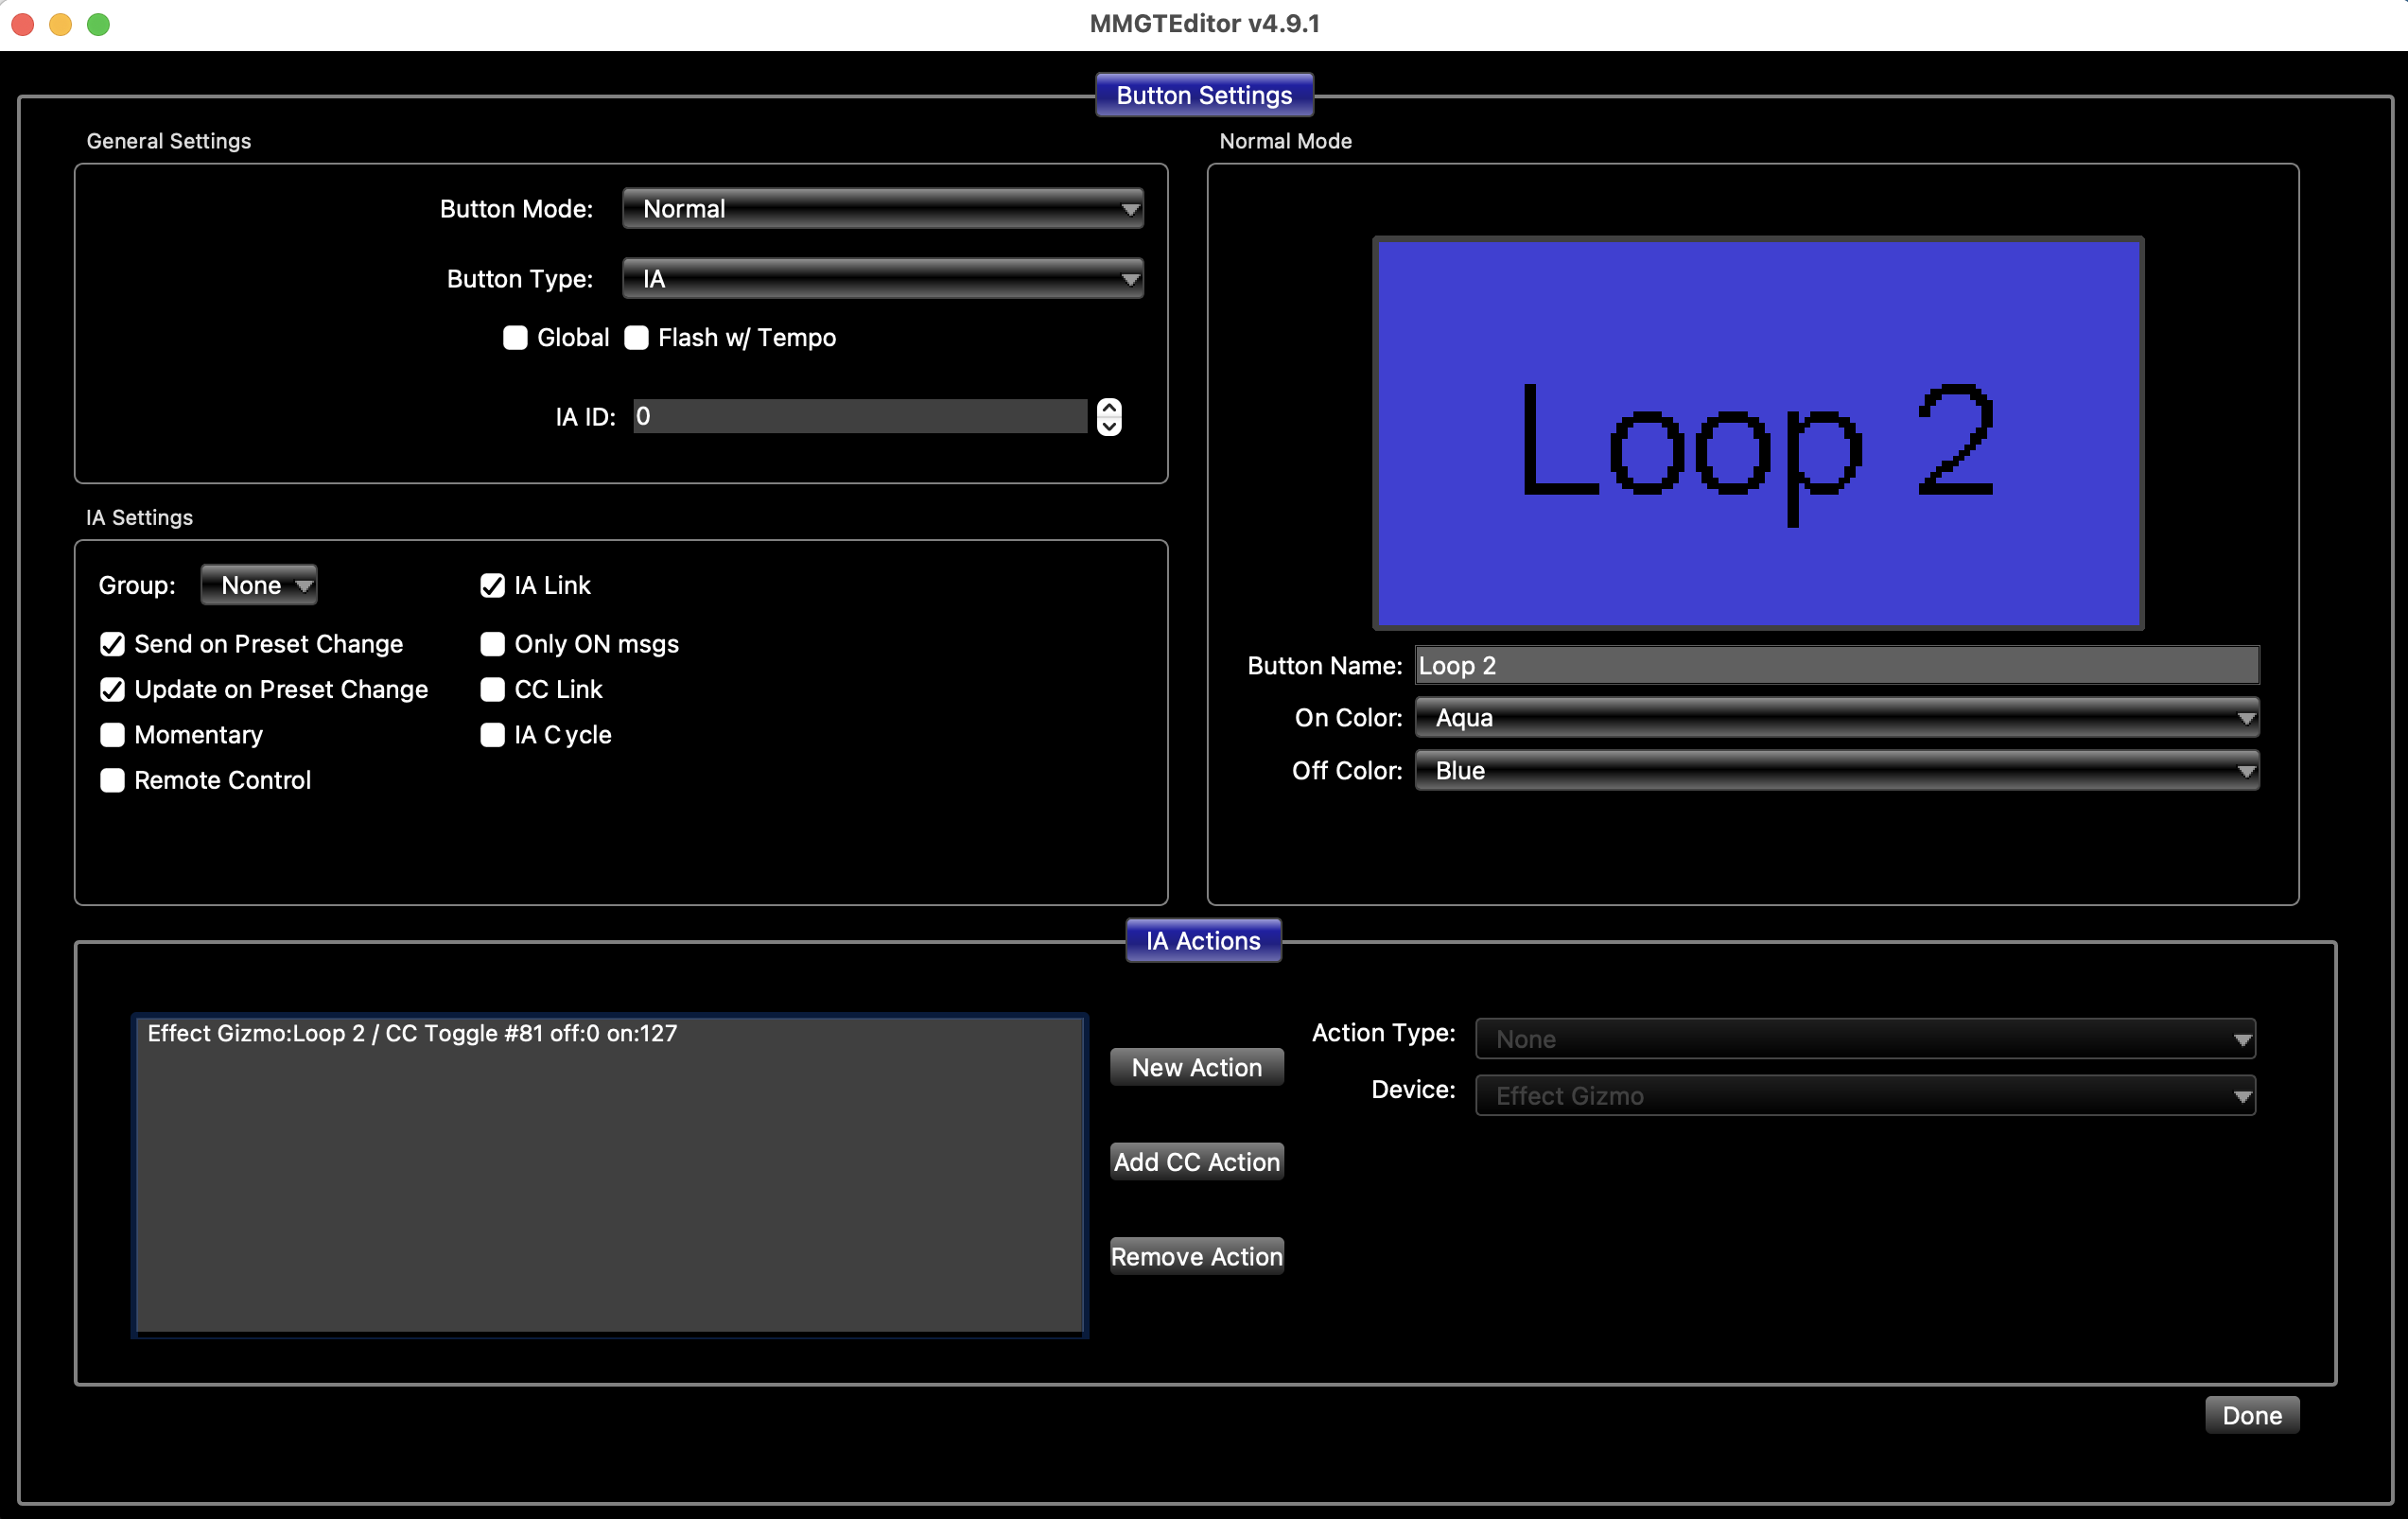
Button Edit Page
Double clicking on a button in the Buttons Tab pops up the Button Edit Page. This is where you can edit all of a button's parameters.
 |
 |
| Button Edit Normal Mode | Button Edit Hold Mode |
General Settings
The General Settings section contains parameters that affect all buttons.
- Bank Down - moves to the previous bank of presets
- Bank Up - moves to the next bank of presets
- Device PC - - Decrements the current program number of a specific device. This allows you to scroll through the list of presets on a specific device without affecting the other connected devices. The button will always display the device’s current PC number (and bank number if appropriate)
- Device PC + - Increments the current program number of a specific device. This allows you to scroll through the list of presets on a specific device without affecting the other connected devices. The button will always display the device’s current PC number (and bank number if appropriate)
- Get Preset Names - displays a menu that allows you to read preset names from a supported device (currently, only Fractal Audio and Kemper products)
- IA (instant access) - a general purpose button that can execute a list of actions
- IA Mode - Reveals the IA buttons “underneath” non-IA buttons (see IA Mode section)
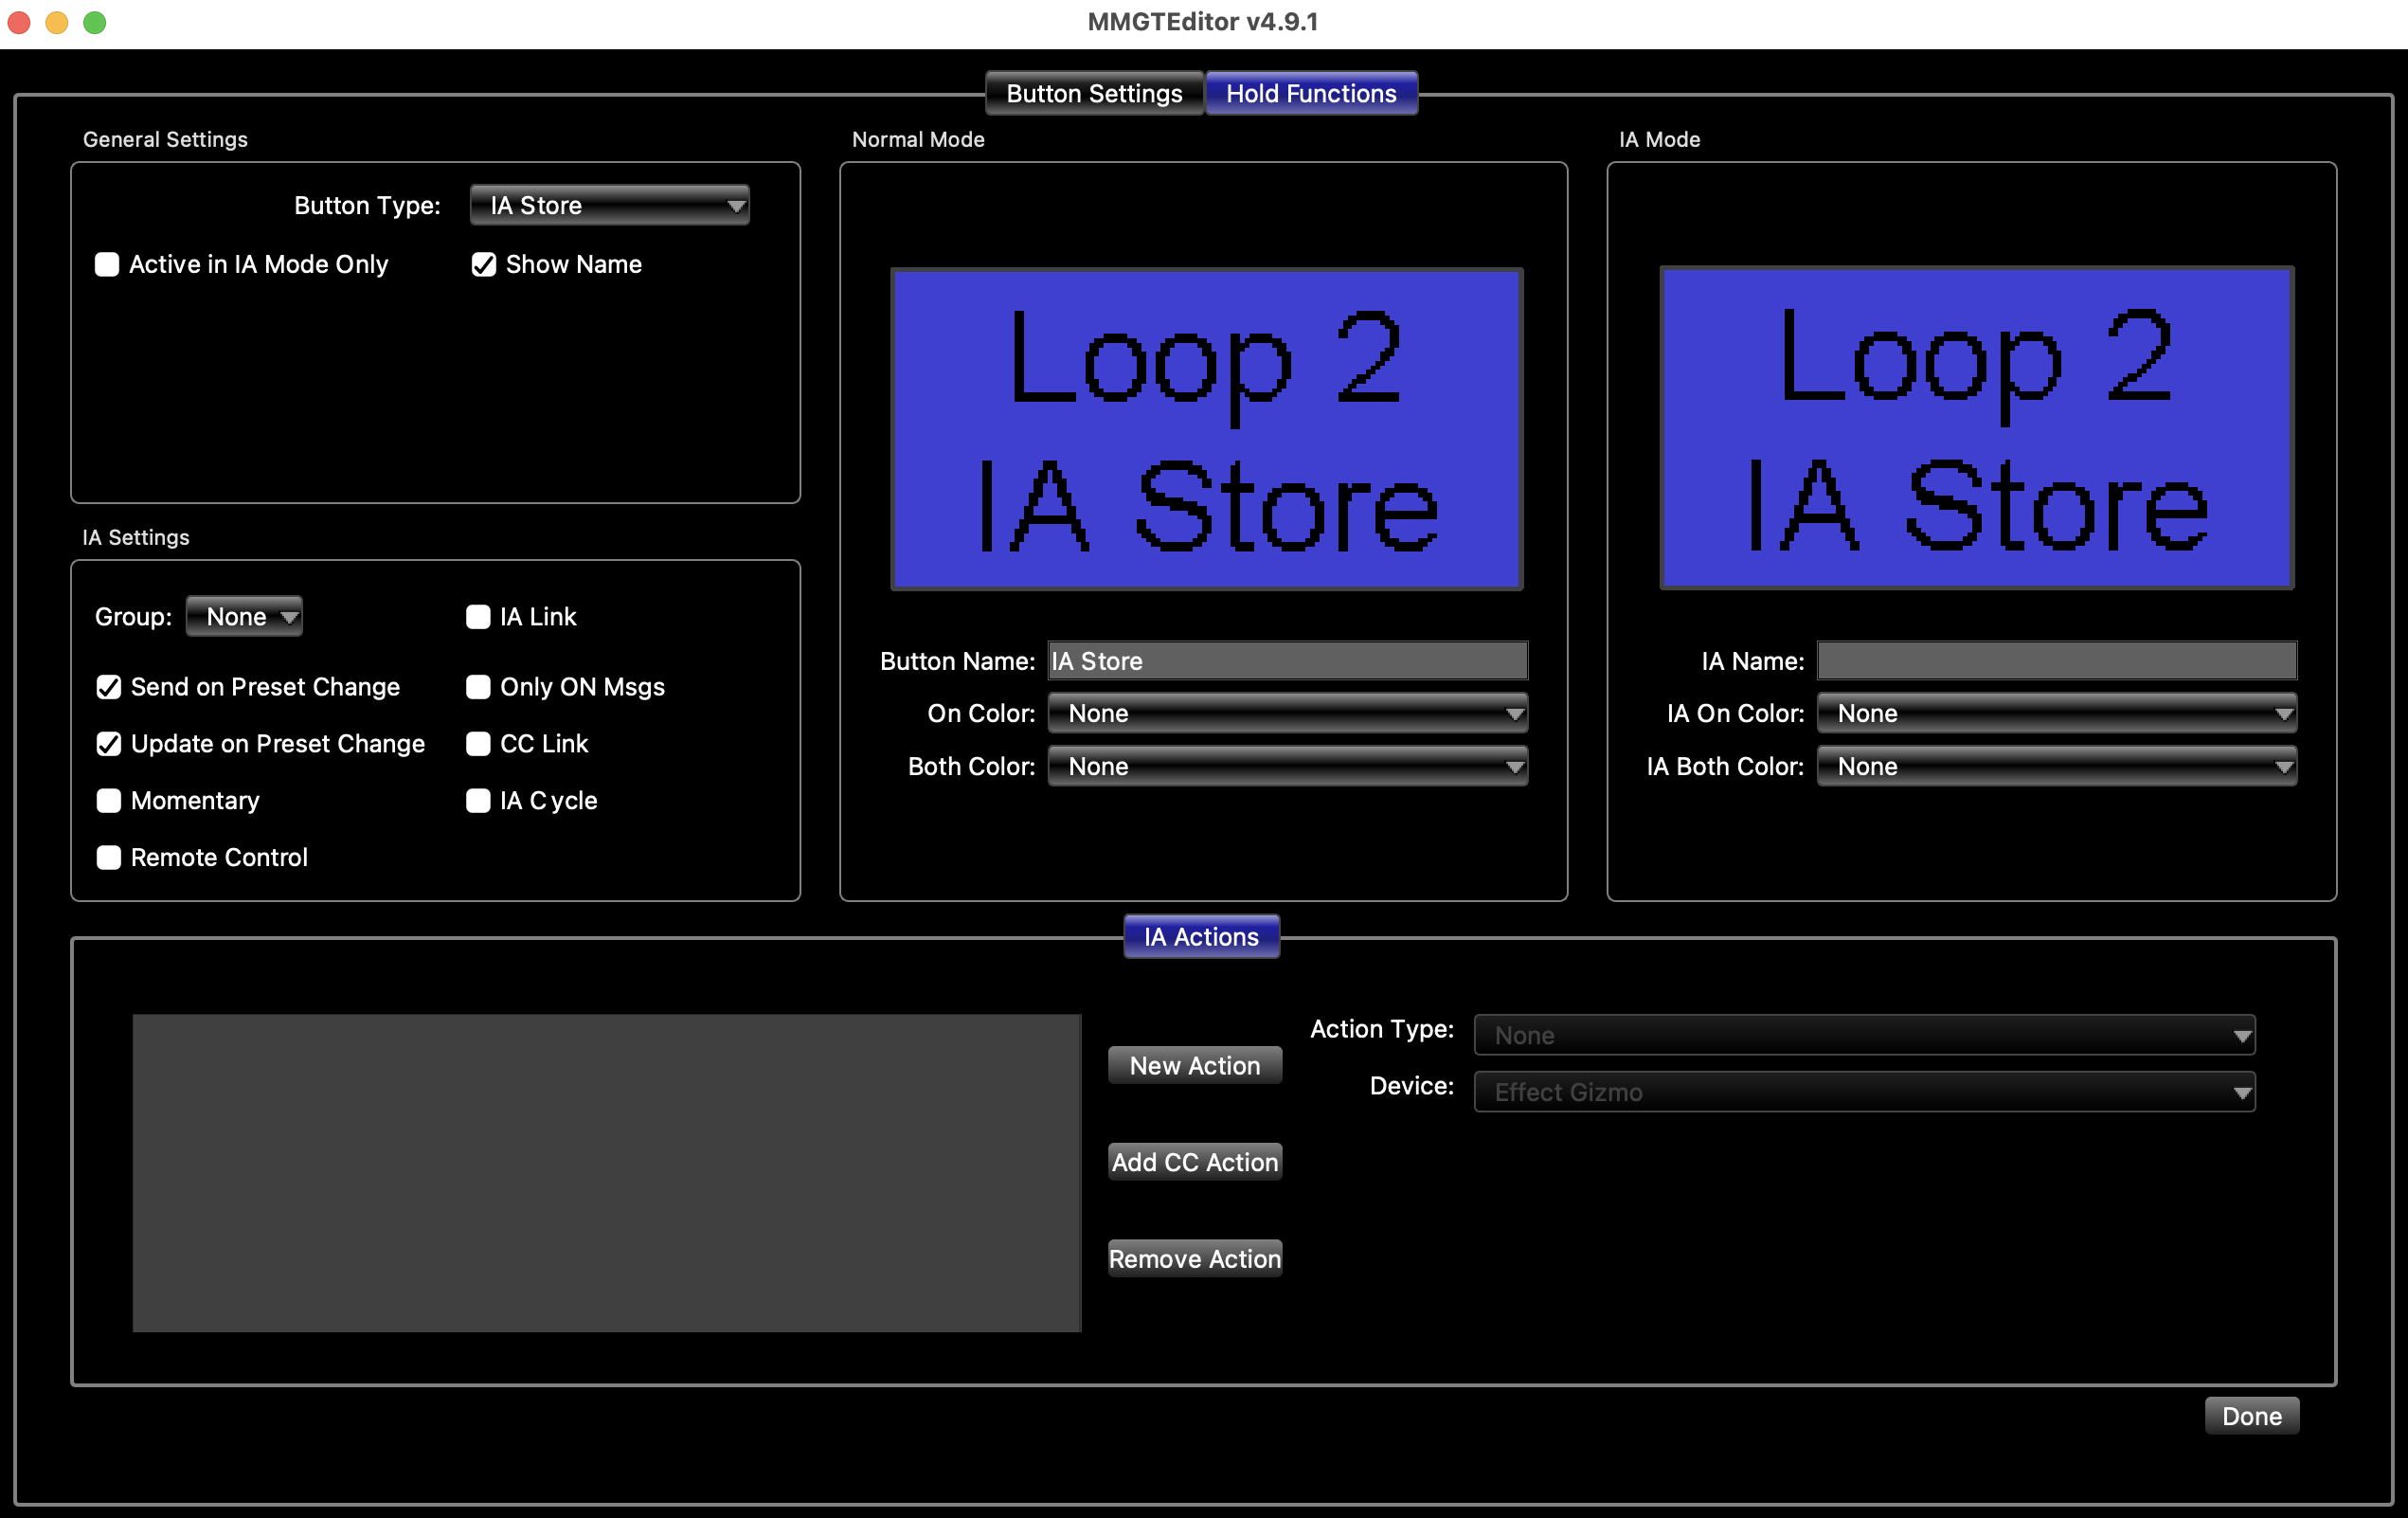
- IA Store - Stores the current on/off state of all IA butons to the current preset
- Page/IA Store - moves to the next button page, or, when held for 2 seconds, stores the current IA state to the current preset
- Page Down - displays the previous button page
- Page Up - displays the next button page
- Preset - preset selection button
- Preset + - moves up one preset
- Preset – - moves down one preset
- Previous Preset - switches back to the previously selected preset
- Setup Mode - activates setup mode
- Update Preset Name - reads and updates the name of the current preset from a supported device (currently, only Fractal Audio and Kemper products)
Global - Sets this button to be global. This is discussed further in the Buttons and Pages section.
Flash w/Tempo - When checked, makes this button flash in time with the current system tempo.
On Device PC - and Device PC + buttons, you can also use the following parameter:
Device ID - Allows you to select which device this button affects.
IA ID - ID number used to identify this button. For use with the Set IA action.
On Bank Up, Bank Down, Page Up, Page Down and Page/IA Store buttons, you can also use the following parameters:
Min, Max - Sets the lower and upper limits of which banks or pages this button can scroll through. If Min and Max are set to the same number, the limits are ignored.
Note on Bank Up/Down buttons: This is typically used in song and setlist mode, where Min and Max limit which songs can be selected
Note on Page Up/Down buttons: If Min and Max are set to the same number, then the buttons will scroll from page 1 through the Max Page settings on the Globals Tab, plus the local preset button page if there is one.
Preset Index - Sets the Preset Button Index which controls how the presets in each bank are assigned to preset buttons.
IA Settings
The IA Settings section contains settings for buttons that are set to type IA. These settings also apply to non-IA buttons when in IA Mode.
Group - sets the button group number. This is described in detail in the Button Groups section.
IA Link - Enables the IA Linking feature on this button.
Send on Preset Change - when checked, this button will send its MIDI messages and perform any other Actions in its list every time a new preset is selected. If not checked, the button will only send its messages when the button is pressed.
Only ON Msgs - when checked, this button will only send messages on preset change when the button is on. If the button is turned off after a preset change, it will not send its messages. Turning the button off by directly pressing the button will still send its messages. This parameter is only available when Send on Preset Change is turned on.
Update on Preset Change - when checked, you will be able to store the state of this button in every preset and have the button automatically change states when you select a new preset. The IA Store button is used to store the current button state to the current preset. You can also set the state of each IA button in the Presets Tab. When this setting is not checked, this button will only change states when it's pressed. This setting needs to be turned off in order to allow this IA button to be controlled by an external device like an Axe-Fx or Kemper Profiling Amp.
Note: In most cases Send on Preset Change and Update on Preset Change are both set to On, or both set to Off.
CC Link - enables CC Linking on this button, where incoming CC messages can control the state of the button.
Momentary - when checked, the button will turn on while it is held and will turn off when released. Turning this setting off returns the button to its normal setting (pressing the button toggles the button between on and off states).
IA Cycle - enables IA Cycle support on this button. IA Cycle buttons can switch between four different settings sequentially when pressed.
Remote Control - disables local control of this button's visible state. When turned on, pressing the button will make the button send its messages but will not switch the button from off to on or vice-versa. This is typically used in conjunction with CC Link when working with a computer application - the GT or PBC sends messages to the computer, and the computer sends messages back indicating what the button's new state should be.
Normal Mode
The Normal Mode section controls the appearance of the button when in normal mode (not IA Mode). On the Mastermind GT, it will display a visual representation of the button's LCD.
On Color - Sets the color of the button to be displayed when the button is on.
Off Color - Sets the color of the button to be displayed when the button is off.
IA Mode
The IA Mode section controls the appearance of the button when in IA Mode. This section is not shown if the button's type is set to IA.
IA Name - Sets the name of the button when in IA Mode. This name is displayed on the Mastermind GT, but is only for informational purposes on the Mastermind PBC and LT.
IA On Color - Sets the color of the button to be displayed when the button is on in IA Mode.
IA Off Color - Sets the color of the button to be displayed when the button is off in IA Mode.
IA Actions
This section allows you to assign Actions to the button. These Actions are executed when an IA button is pressed, or when any button is pressed when in IA Mode.
Hold Functions
Most of the settings available for the normal button function are also available for the hold function.
The hold function of a button has two colors you can set: On Color and Both Color. On Color is the color displayed when the normal function is off and the hold function is on. Both Color is the color displayed when both the normal function and hold function are on. You can specify None for a color to disable the color and show the normal function's color instead.
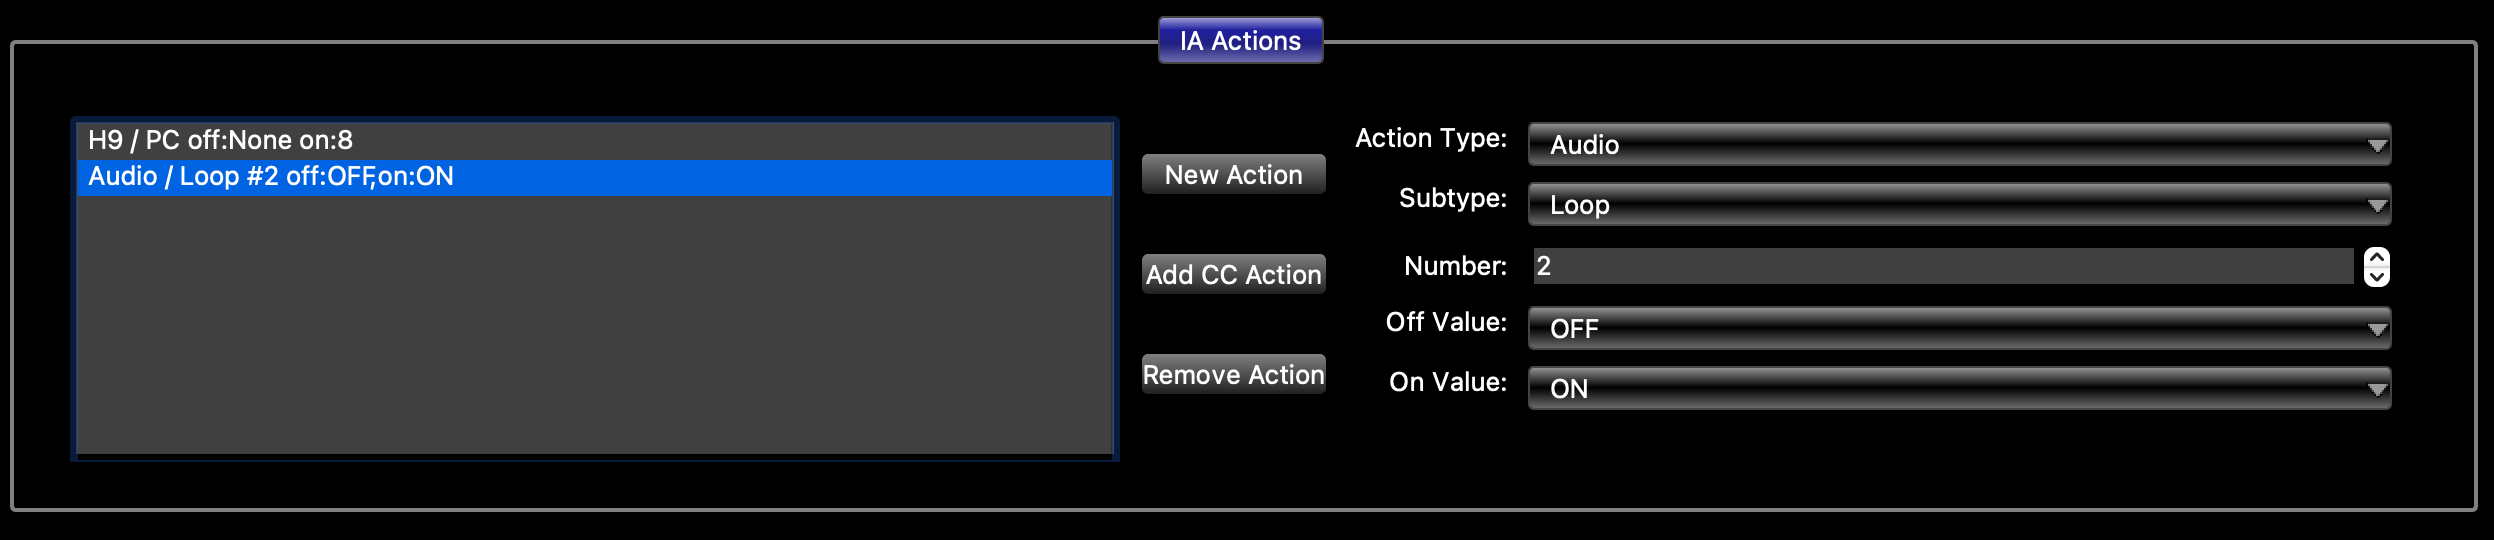
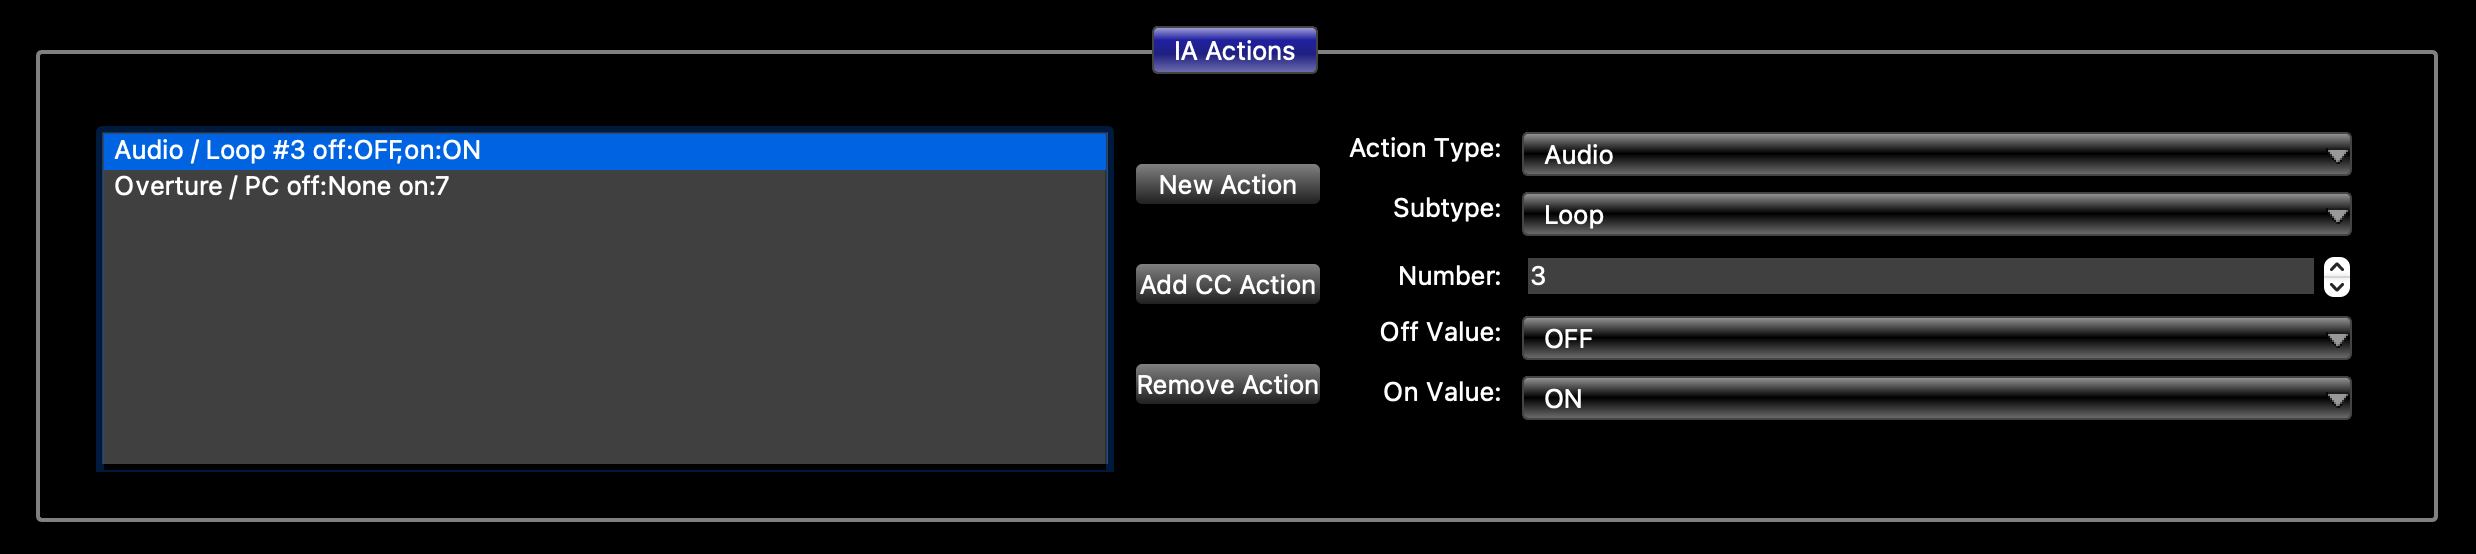
IA Cycle
When IA Cycle is checked, the IA Actions box at the bottom of the window gets a second tab labeled IA Cycle Steps. Clicking on this tab displays a box for each of the four steps. In each step's box, you can select a name and color for the step.
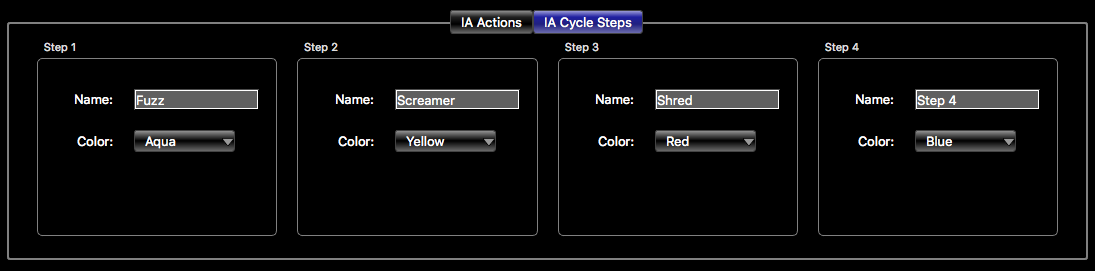
To use these steps, switch back to the IA Actions tab. Insert Actions in the list like you normally would, but use a System / Step action as a divider between steps. (You can press the Add Step button to quickly add a Step action to the end of the list.) You should not put a Step action at the end of the list - it would be interpreted as the beginning of another step. If you put more than three Step actions in the list, that will result in more than the maximum of four steps. Any step after the fourth is ignored.
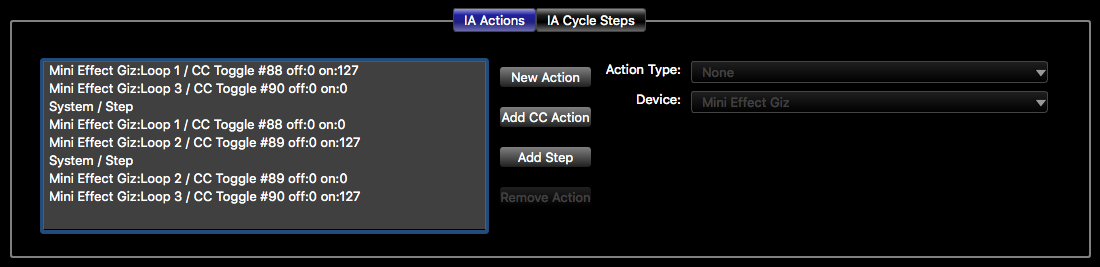
When using an IA Cycle button, only the On values of each action are used - the Off values are ignored.
The images on this page show an example configuration that switches between pedals in the first three loops of a Mini Effect Gizmo. Pressing the IA cycle button switches from one pedal loop to the next. Only three steps are defined in the action list, so the name and color settings for the fourth step are ignored. Note that each step turns on one loop and turns off the previously selected loop. This prevents the case where more than one loop is on at the same time.
IA Cycle Menu (GT Only)
On the Mastermind GT, there's an additional option that appears to the right of the IA Cycle checkbox simply called Menu. Checking this changes the behavior of the IA Cycle button. When checked, pressing the button pops up a menu in the GT buttons, with each button representing a cycle step. This allows you to see all of your cycle steps at the same time, and select from them with a single button press.
For more information about IA Cycle buttons, please see Mastering the Mastermind episode 13, IA Cycle Buttons
Presets Tab
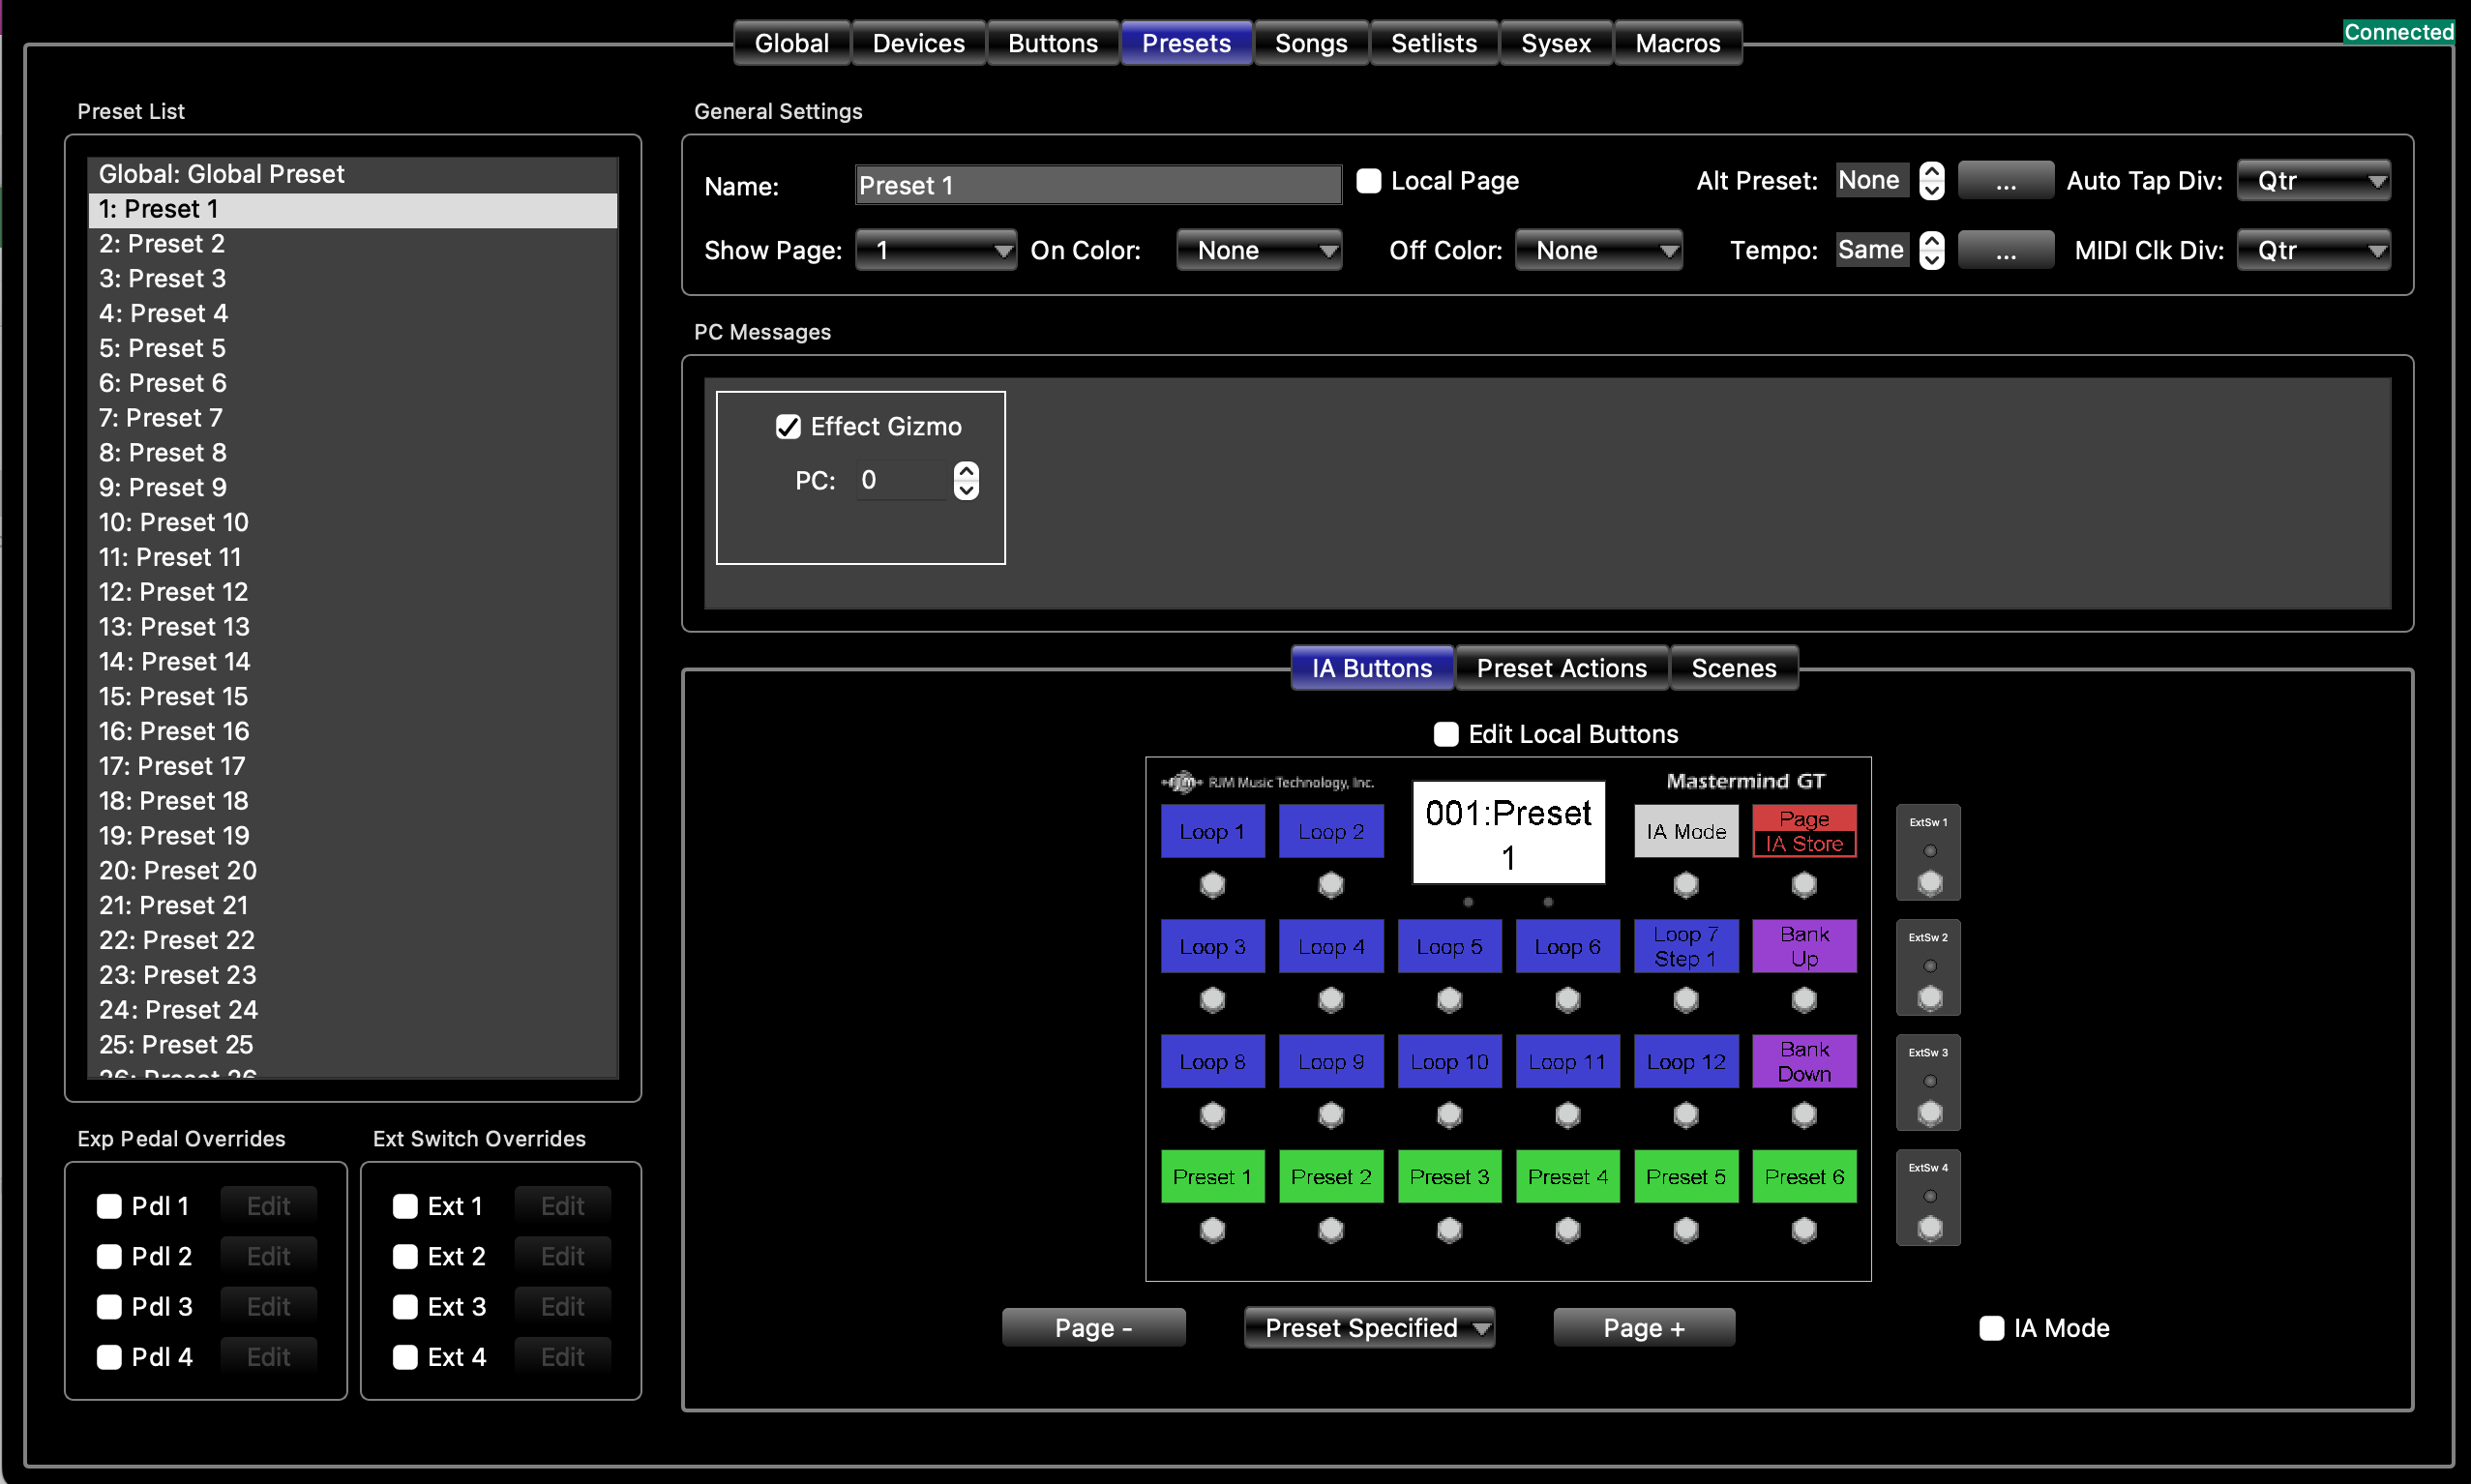 |
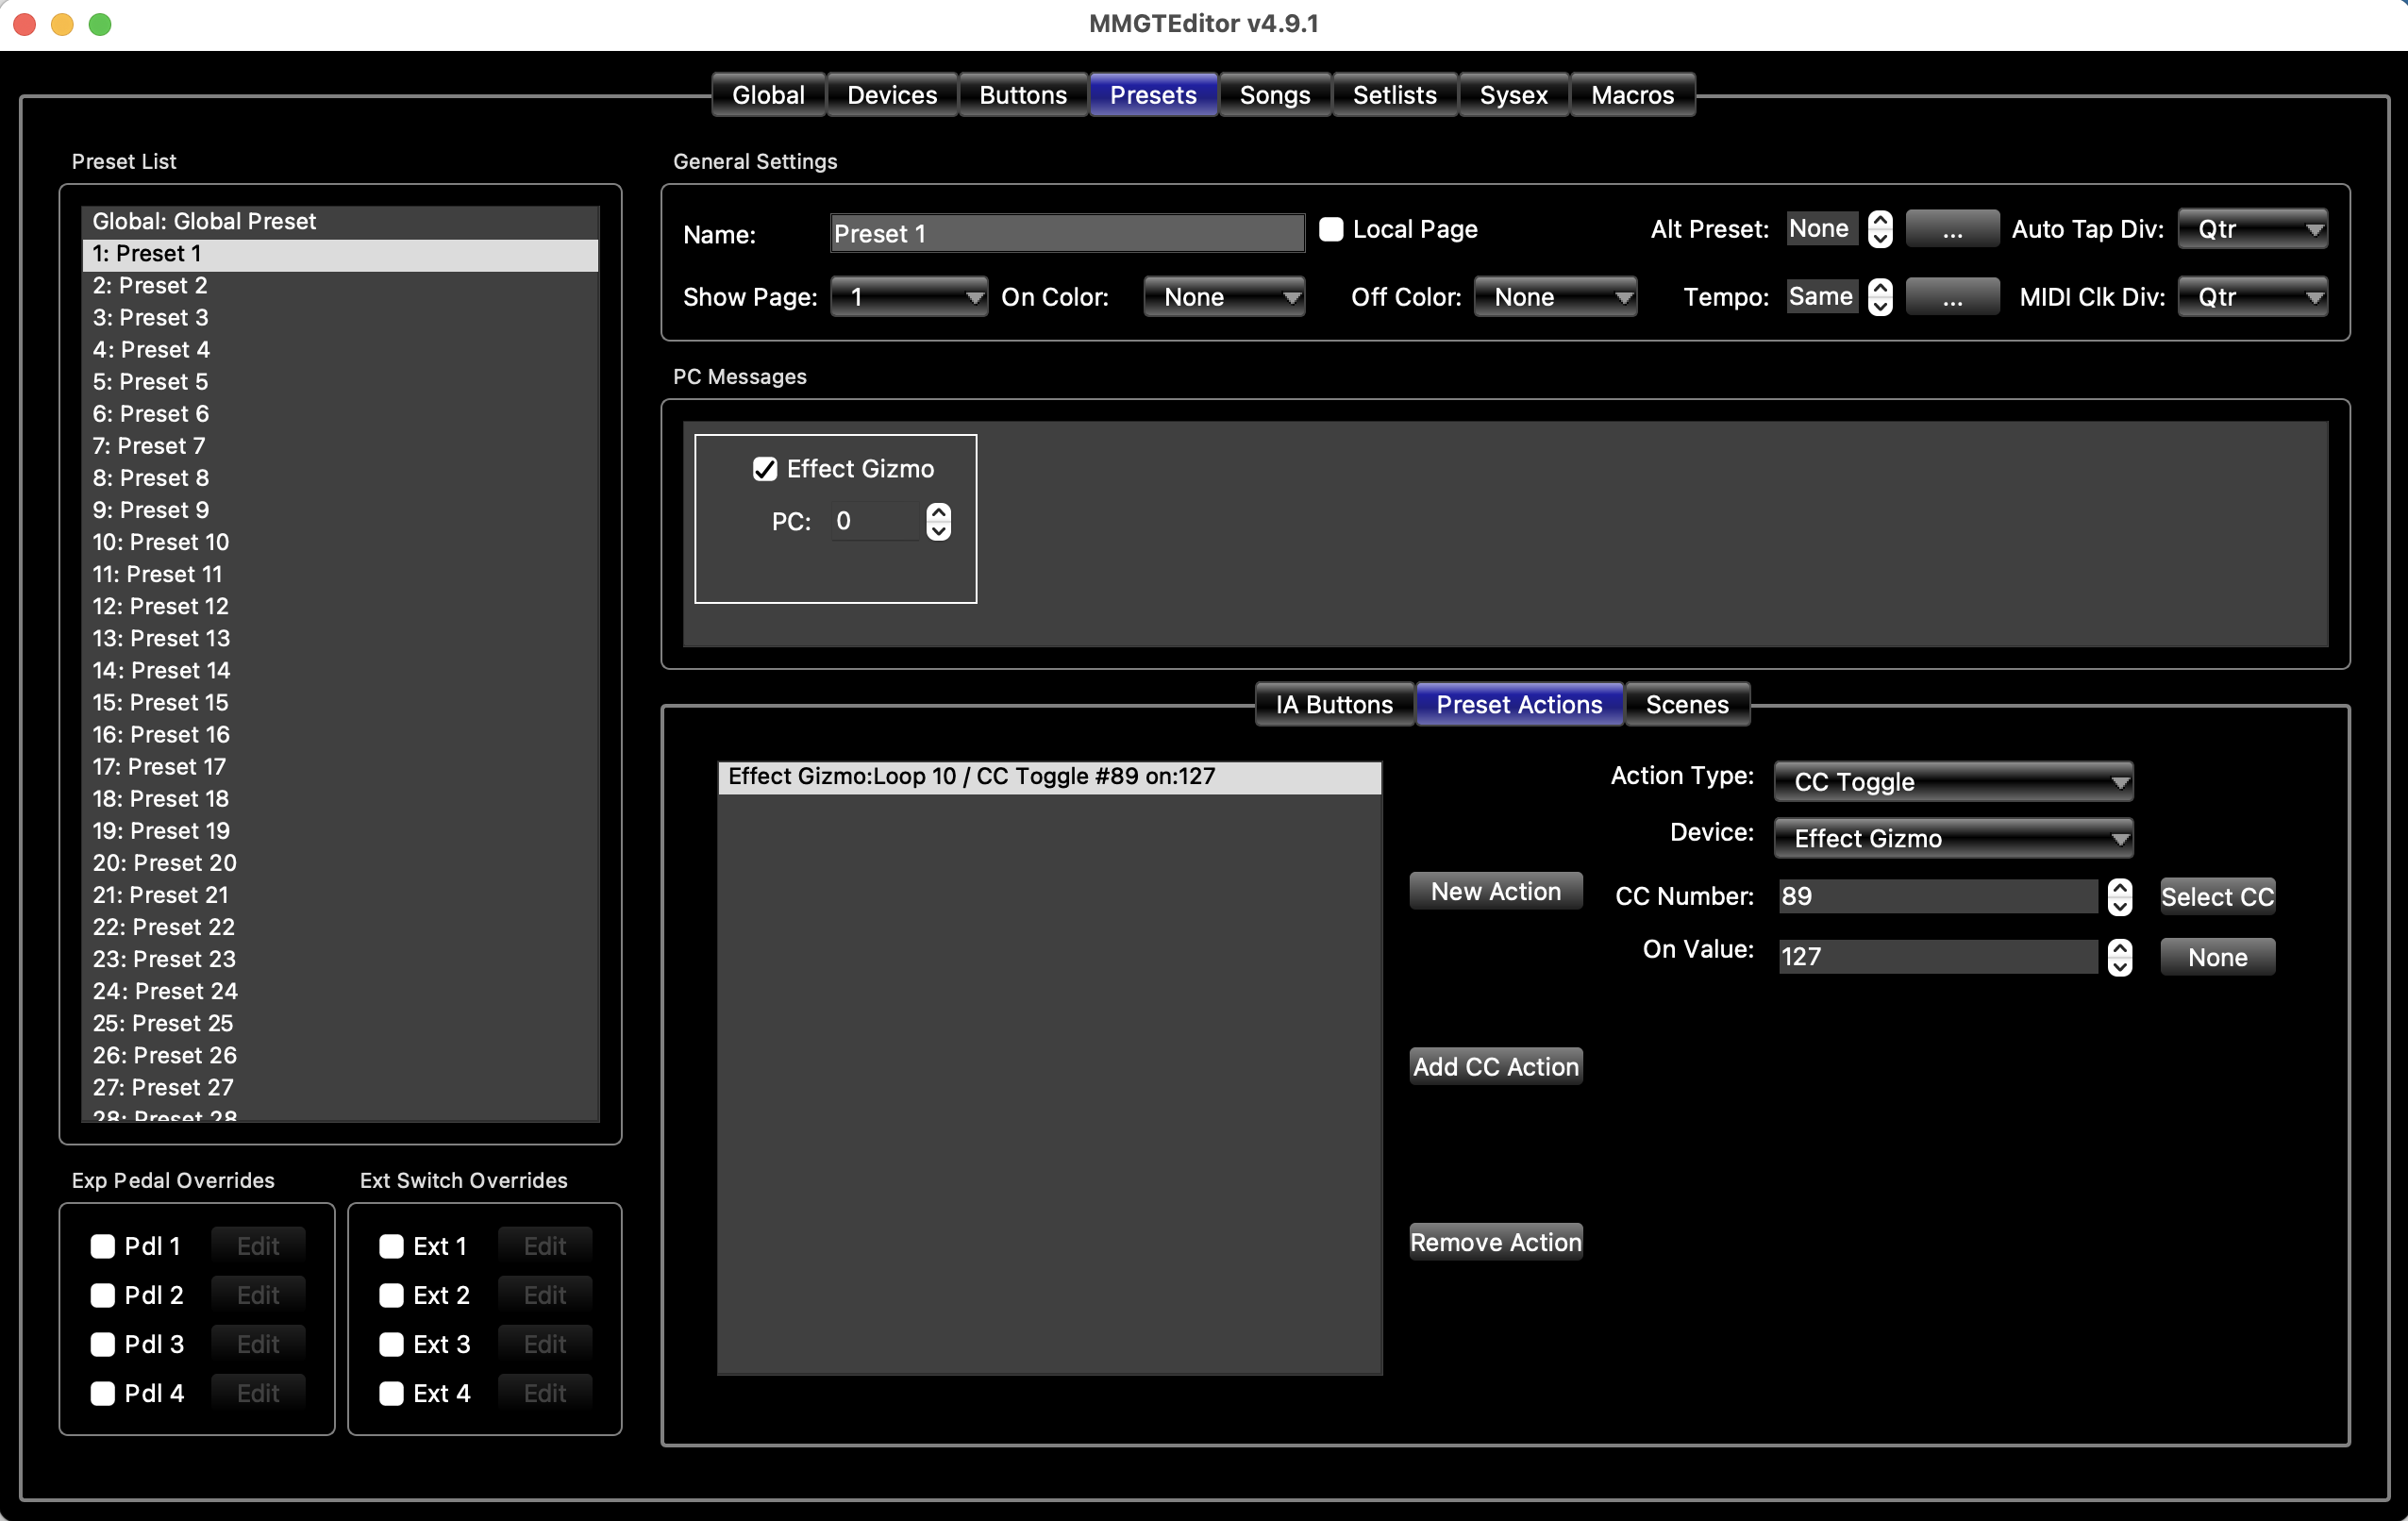 |
| Preset Tab - IA Buttons View | Preset Tab - Preset Actions View |
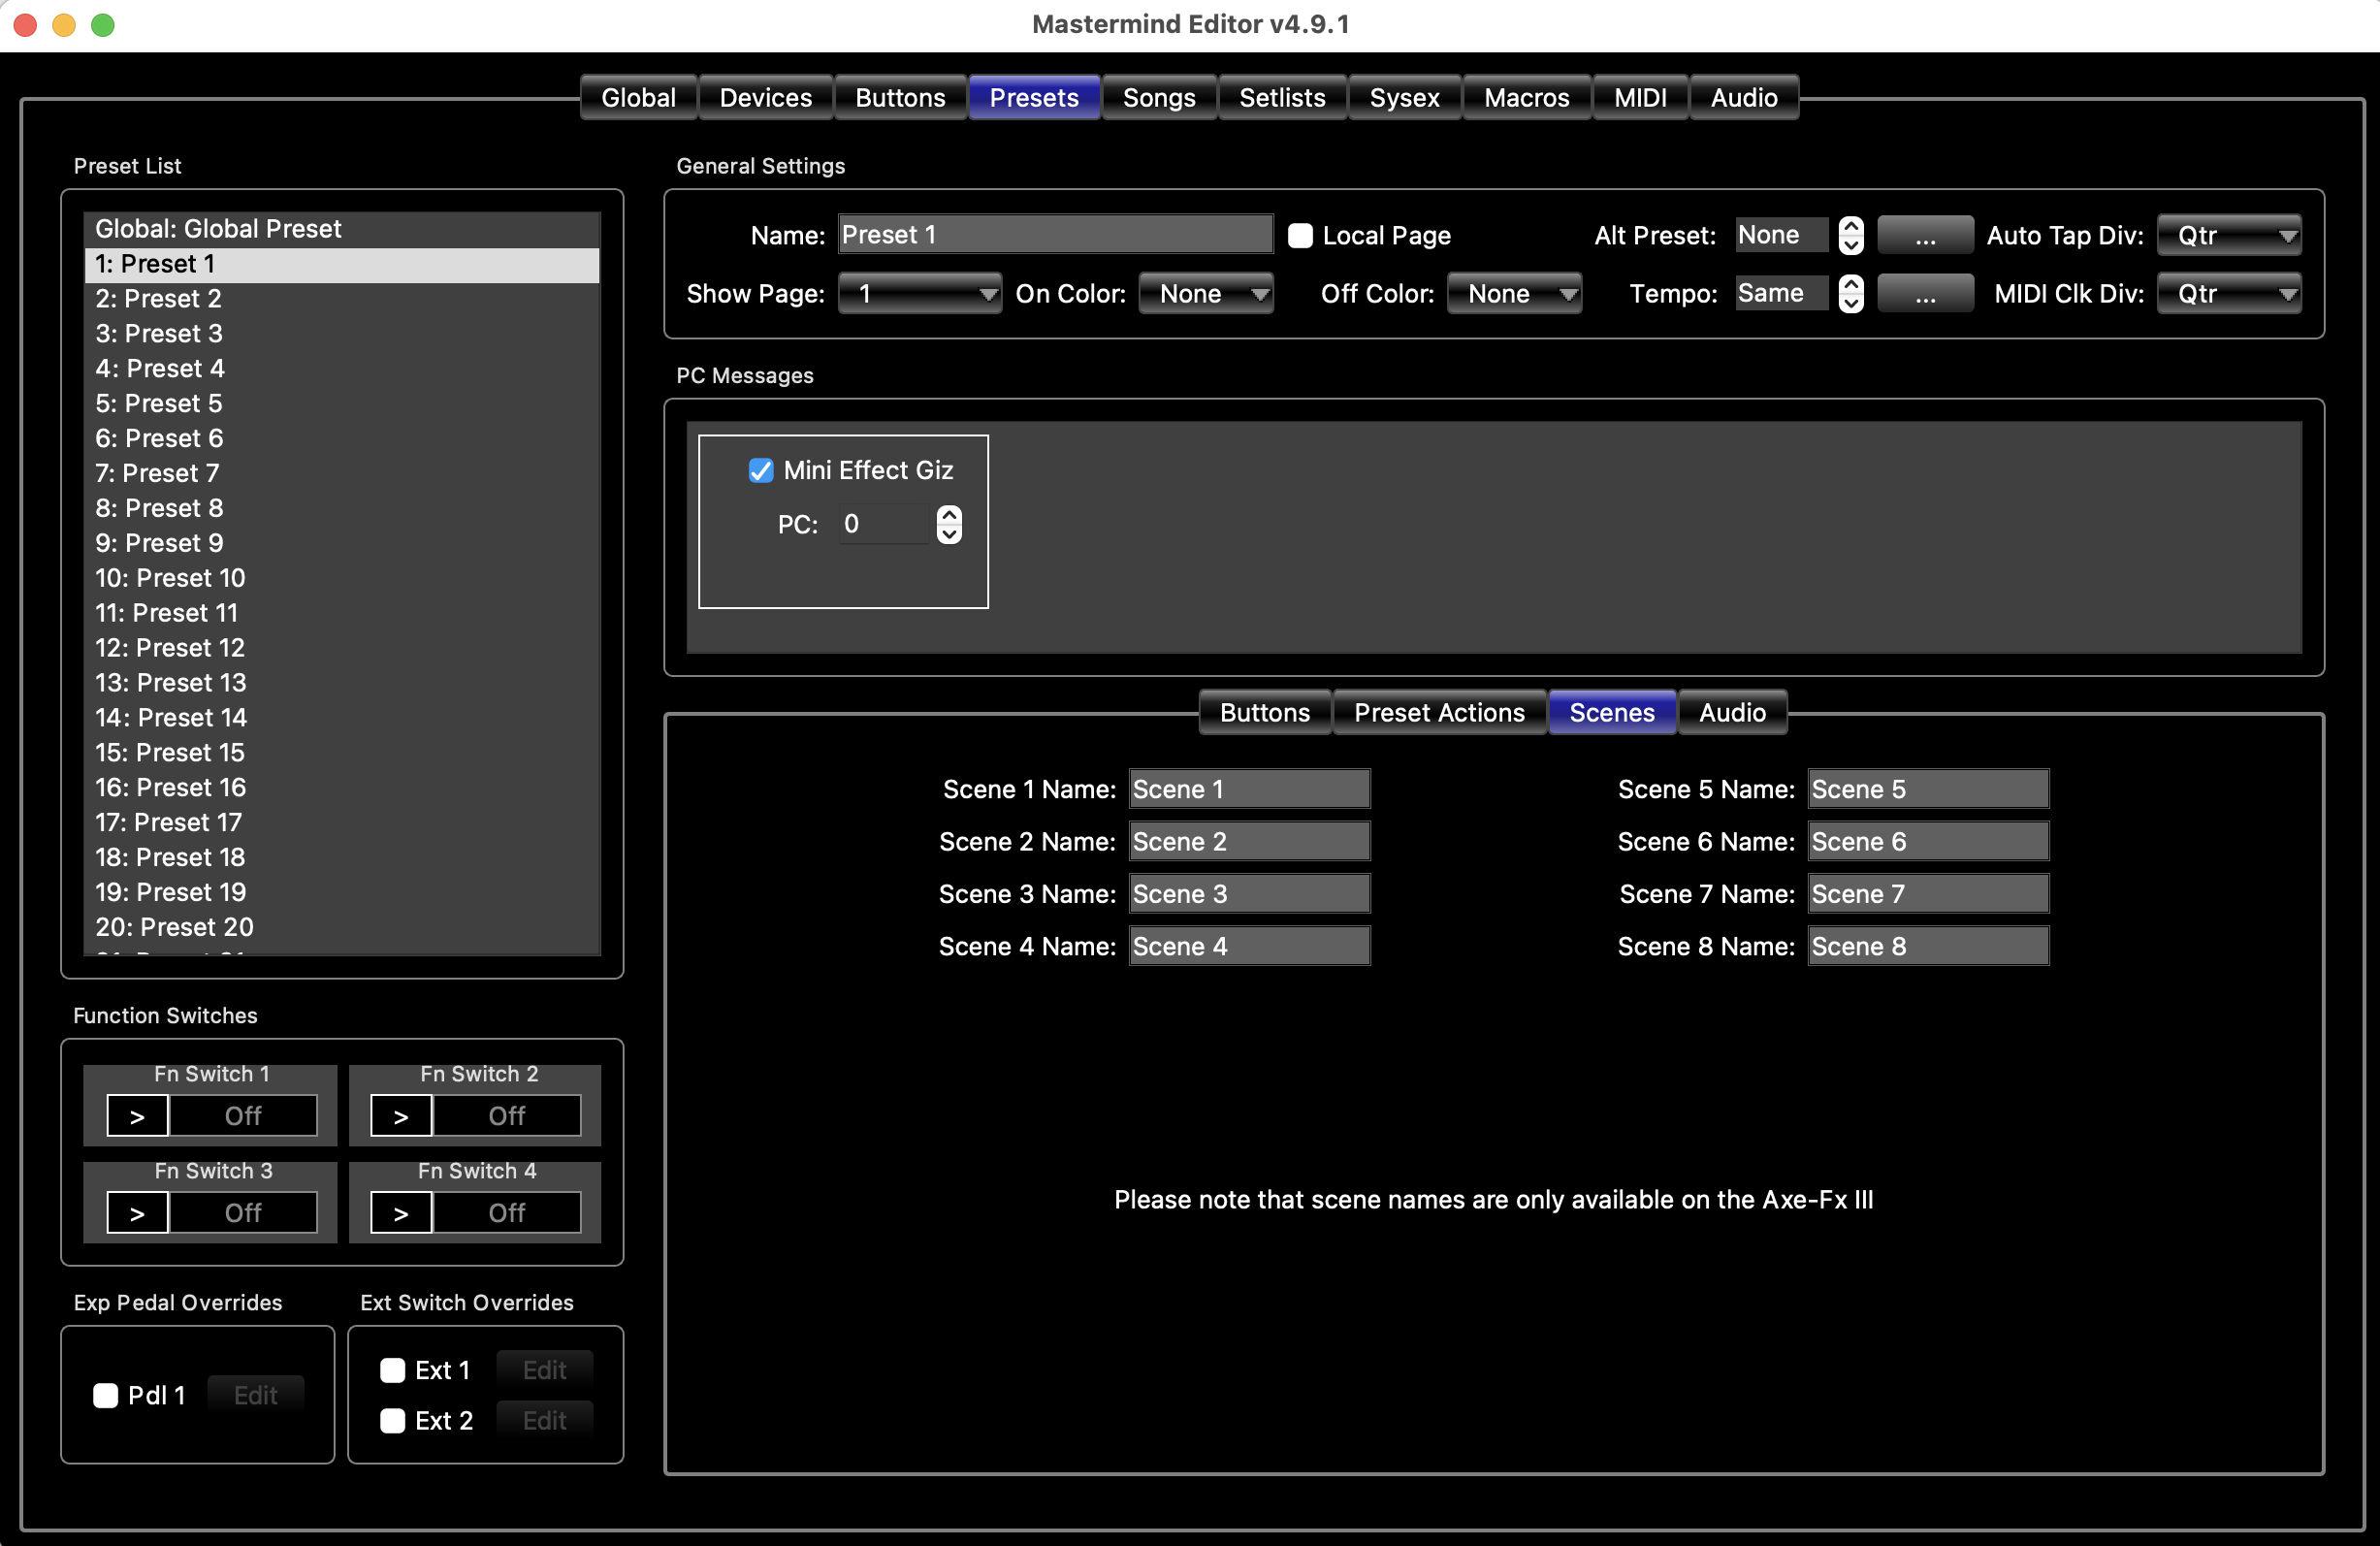 |
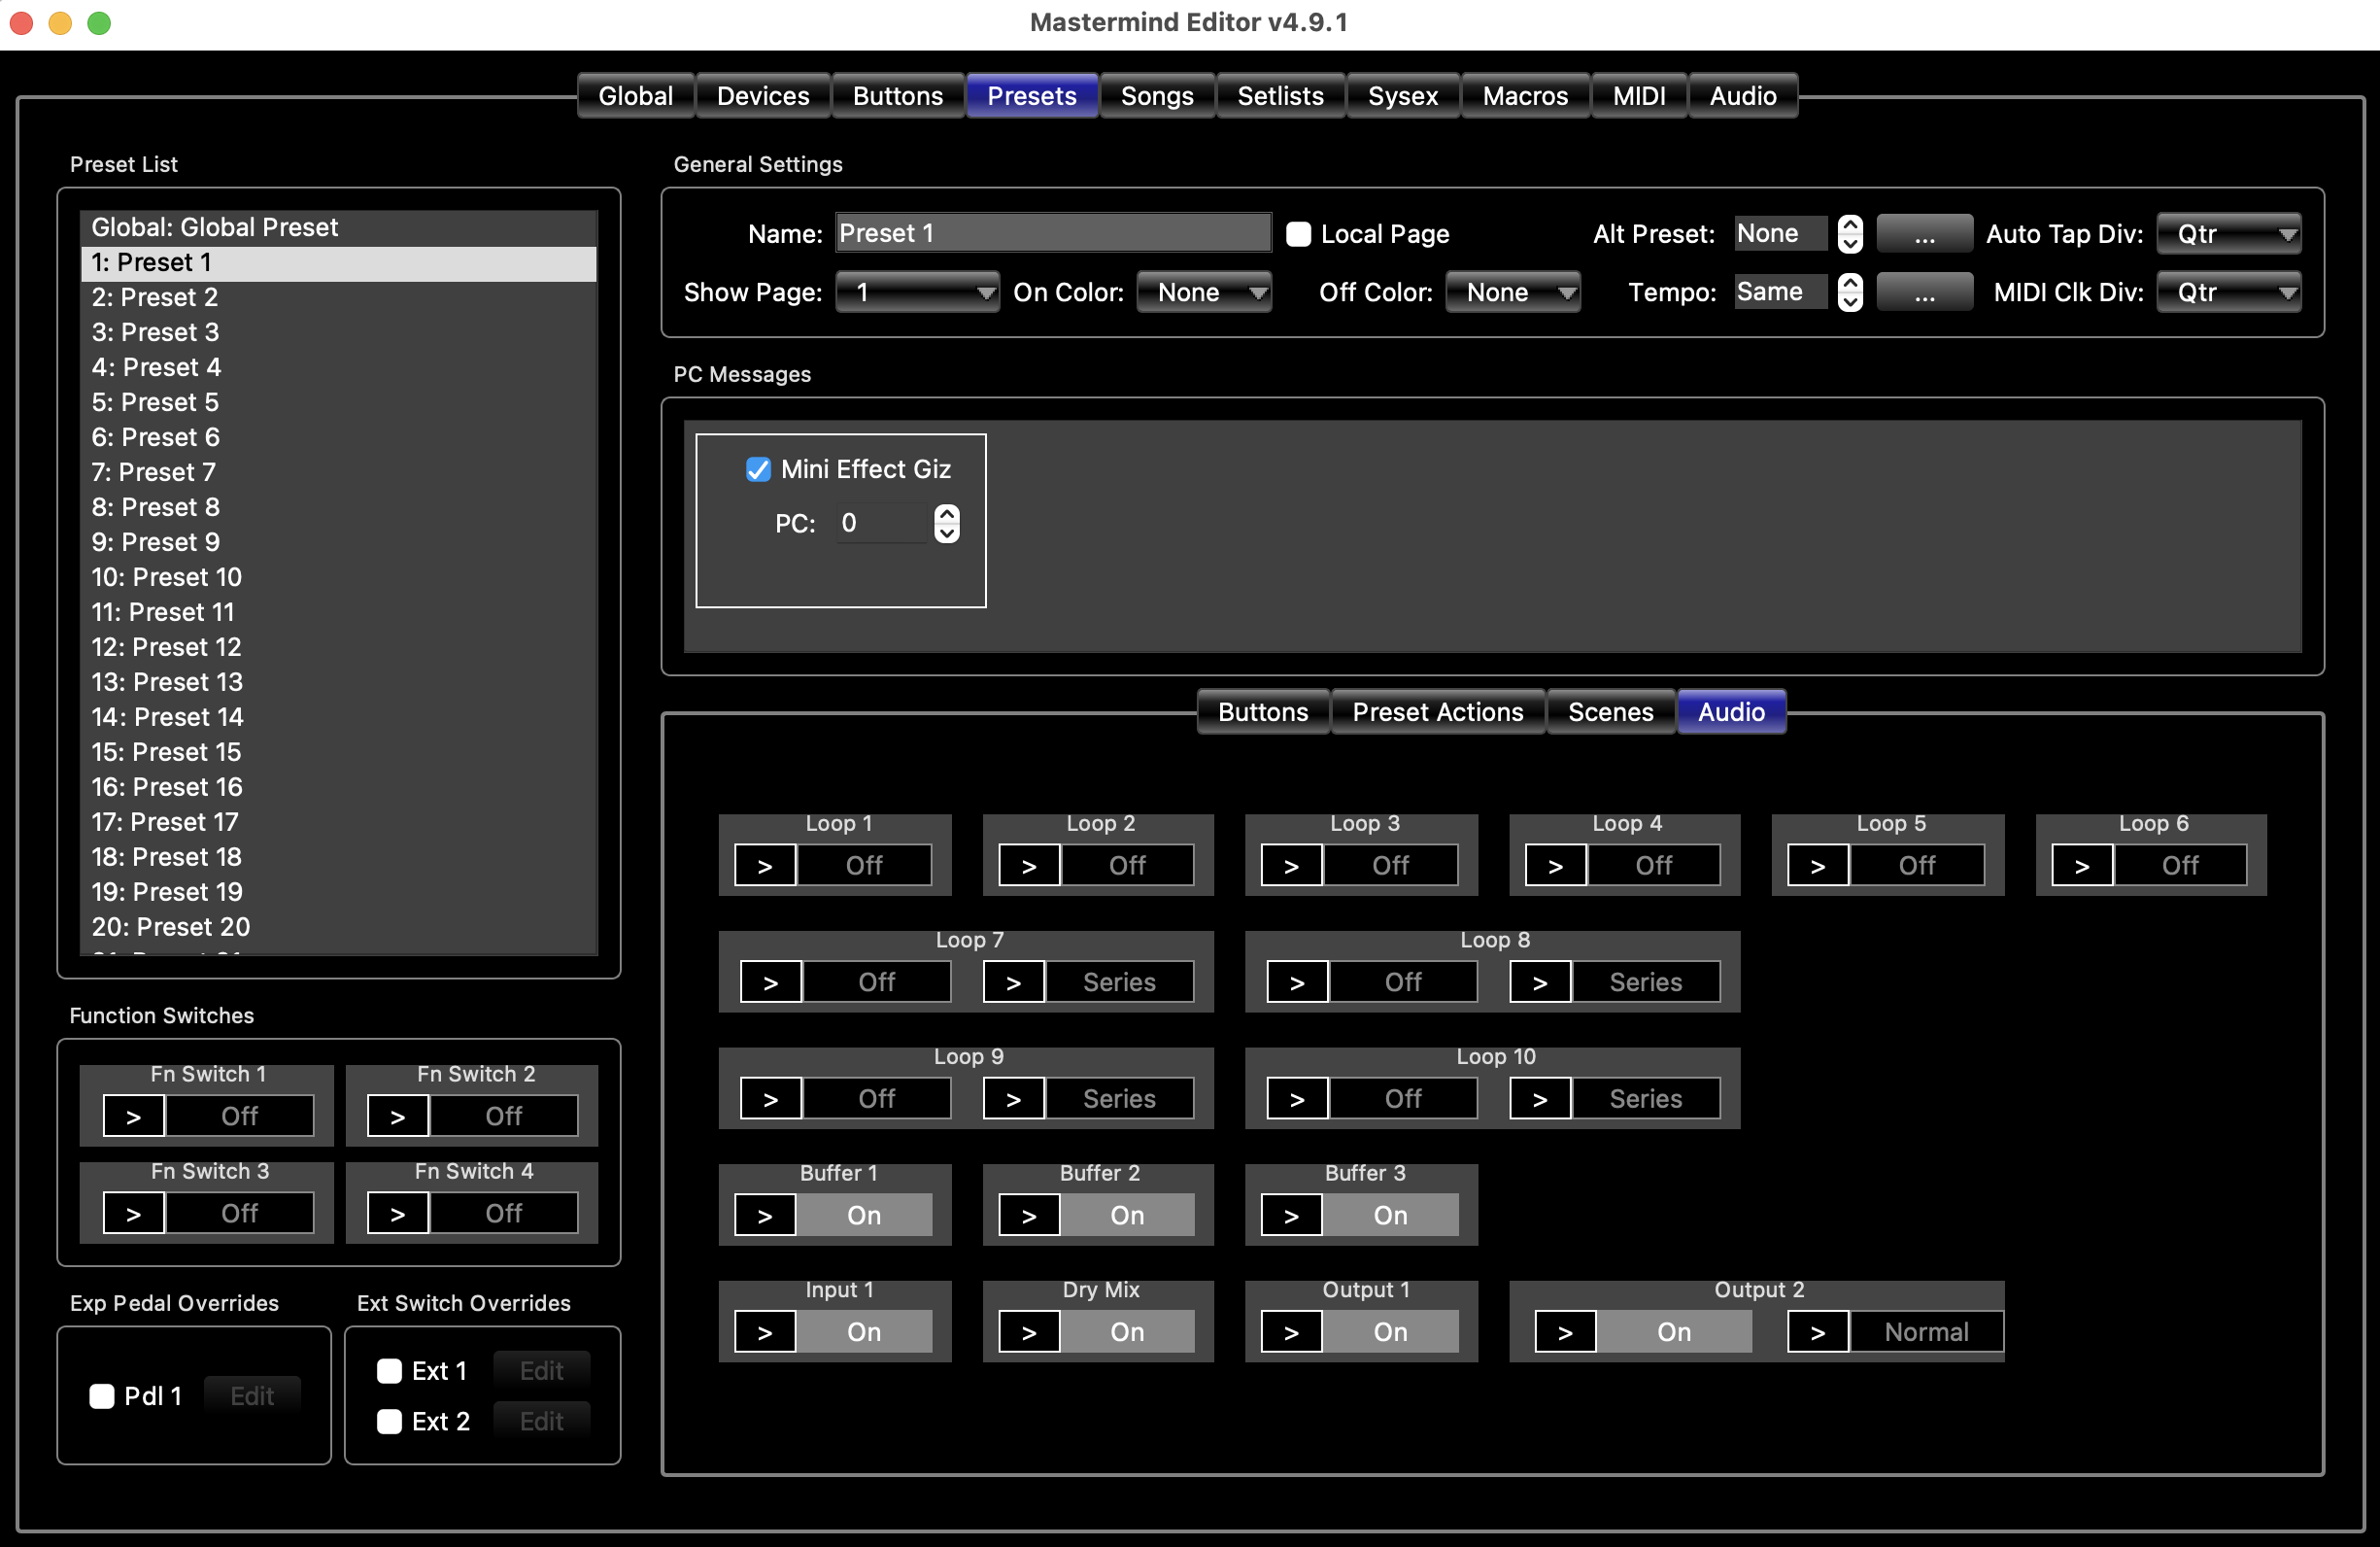 |
| Preset Tab - Scenes View | Preset Tab - Audio View (PBC Only) |
The Presets tab allows you to configure each of the 768 presets on your Mastermind.
Preset List
In the left column, there is a list of all of your presets, including the Global Preset. Selecting a preset in this column displays all of the preset's parameters in the other sections of the window.
Reordering and Copying Presets
You can rearrange presets within the Preset List by dragging and dropping them.
If you right click on a preset within the list (or Ctrl-click on a Mac), you will be presented with a popup menu with two options: Copy to Preset and Copy from Preset. This will allow you to copy the currently selected preset to another preset, or overwrite the current preset with settings copied from another preset. When you select an option, a dialog box will pop up, requesting a preset number that will be where the selected preset will be copied to or copied from.
General Settings
This is where you set up the most basic settings for each preset.
Name - Sets the preset's name
Local Page - When checked, activates a button page that is specific to this preset. When the preset is selected, the page is loaded and replaces button page 16.
Alt Preset - Allows you to set an alternate preset for this preset. You can specify a preset number here, or you can also choose one of the following special values by pressing the "..." button to the right:
- Global - Recall the Global Preset
- None - This preset has no alternate preset
- Previous - Switch to the previously selected preset instead of selecting a specific alternate preset
Show Page - Selects which button page should be displayed when the preset is loaded. Please note that this setting has no effect if Auto Page Select in the Globals Tab is not turned on. Possible values are:
- 1-16 - Displays the selected page
- Local Page - Displays the local button page (if the Local Page checkbox is turned on)
- Same Page - Stay on the same page - don't change pages
Off Color - Selects which color a preset button displays when this preset is not active. It can be set to any color or None, which means this preset doesn't have a special color - it uses the preset button's default Off Color setting.
Tempo - Sets the tempo of this preset. if MIDI Clock is set to Transmit or Auto, then this new tempo will be transmitted to connected MIDI devices. If Auto Tap is active, this will also result in a new tempo being sent. You can also specify one of these special tempo values:
- Off - Don't send tempo for this preset
- Same - Keep the same tempo
- Song - Use the current song's tempo
Auto Tap Div - Sets a tap tempo division for the Auto Tap feature. The tap division changes the rate at which the taps are sent to the connected device. The default setting, Qtr means that the tap tempo is processed as quarter notes - the taps are sent at the exact BPM rate specified in the preset. The other settings speed up the taps to match the new note type. Possible values are Qtr, Dot8th, QtrTrip, 8thTrip and 16th.
MIDI Clk Div - Sets a tap tempo division for the MIDI clock output. The tap division changes the rate at which the MIDI clock signal is sent to the connected devices. The default setting, Qtr means that the tap tempo is processed as quarter notes - the taps are sent at the exact BPM rate specified in the preset. The other settings speed up the clock to match the new note type. Possible values are Qtr, Dot8th, QtrTrip, 8thTrip and 16th.
PC Messages
This section is where you specify the PC and (optionally) bank messages that are being sent to your MIDI devices. Any MIDI devices defined in Devices Tab that have Send PCs turned on will be listed here.
Each device has a checkbox. When the checkbox is not checked, no PC or bank message will be sent to that device for this preset.
If the checkbox is checked, you can specify a program or PC number for each device. If the device has bank support, you will also be able to specify a bank number. These will be sent to your device when the preset is loaded.
Some devices have flat numbering, where the PC and bank number are combined into one preset number. These devices will not have a space for entering the bank number, and will allow you to type in a PC number that's larger than 127 (the standard MIDI limit for PC numbers). For these devices, the Mastermind GT and PBC will automatically calculate the correct PC and bank numbers for you. You can set a device to use flat numbering (or not) using the Flat Numbering setting on the Devices Tab.
When the selector at the top of the box is set to IA Buttons, you can edit your IA buttons and local button page. The Edit Local Buttons checkbox selects which mode you are in.
When Edit Local Buttons is not checked, you are editing the state of your IA buttons. Click on any IA button to turn it on or off. That state will be stored in the currently selected preset, and the button's state will be automatically recalled when the preset is loaded. Only buttons that have Update on Preset Change turned on will be able to be edited in this mode.
When Edit Local Buttons is checked, you are now editing the buttons in the local button page. Double click on any button to edit it. The editor screen works exactly like the Button Edit Page, but changes only apply to this preset's the local button page.
Checking Edit Local Buttons will automatically enable the local button page for the preset and set the Show Page parameter to button page 16, which is the local button page.
Preset Actions
When the selector at the top of the box is set to Preset Actions, you can edit the list of Actions associated with this preset. Each preset can have up to 10 Actions associated with it. These Actions are executed when the preset is loaded. The preset actions are executed after the PC messages are sent, but before the IA buttons send their messages.
Preset Actions only have On values, and those values are sent when the preset is loaded.
Audio
On the Mastermind PBC, you can use the Audio section of the Presets tab to specify overrides to the global audio settings found in the Audio Tab. To override the settings for a loop, buffer, etc., simply click the override ">" icon to enable it, then click the button next to it to set the desired state. You can override the on/off state of any audio feature. You can also set the series/parallel setting for loops that support it, and set the phase invert state for the B output.
Settings made in this section only affect the currently selected preset.
Function Switches
On the Mastermind LT and PBC, you can use the Function Switches section to specify overrides to the global function switch settings found in the Globals Tab. To override the settings for a switch, simply click the override ">" icon to turn it on, then click the button next to it to set the desired state.
Settings made in this section only affect the currently selected preset.
Exp Pedal Overrides
This section allows you to override the global settings for the expression pedal and specify new settings that affect only this preset. To override settings, check the checkbox for the pedal, then click the edit button, which will pop up the Expression Pedal Edit Page and will let you provide new settings.
Ext Switch Overrides
This section allows you to override the global settings for one or more external switches and specify new settings that affect only this preset. To override settings, check the checkbox for an external switch, then click the edit button, which will pop up the Button Edit Page and will let you provide new settings.
Songs Tab
The Songs Tab is where you can edit songs and assign presets to those songs. See the Songs and Setlists section for more information on how songs and setlists work.
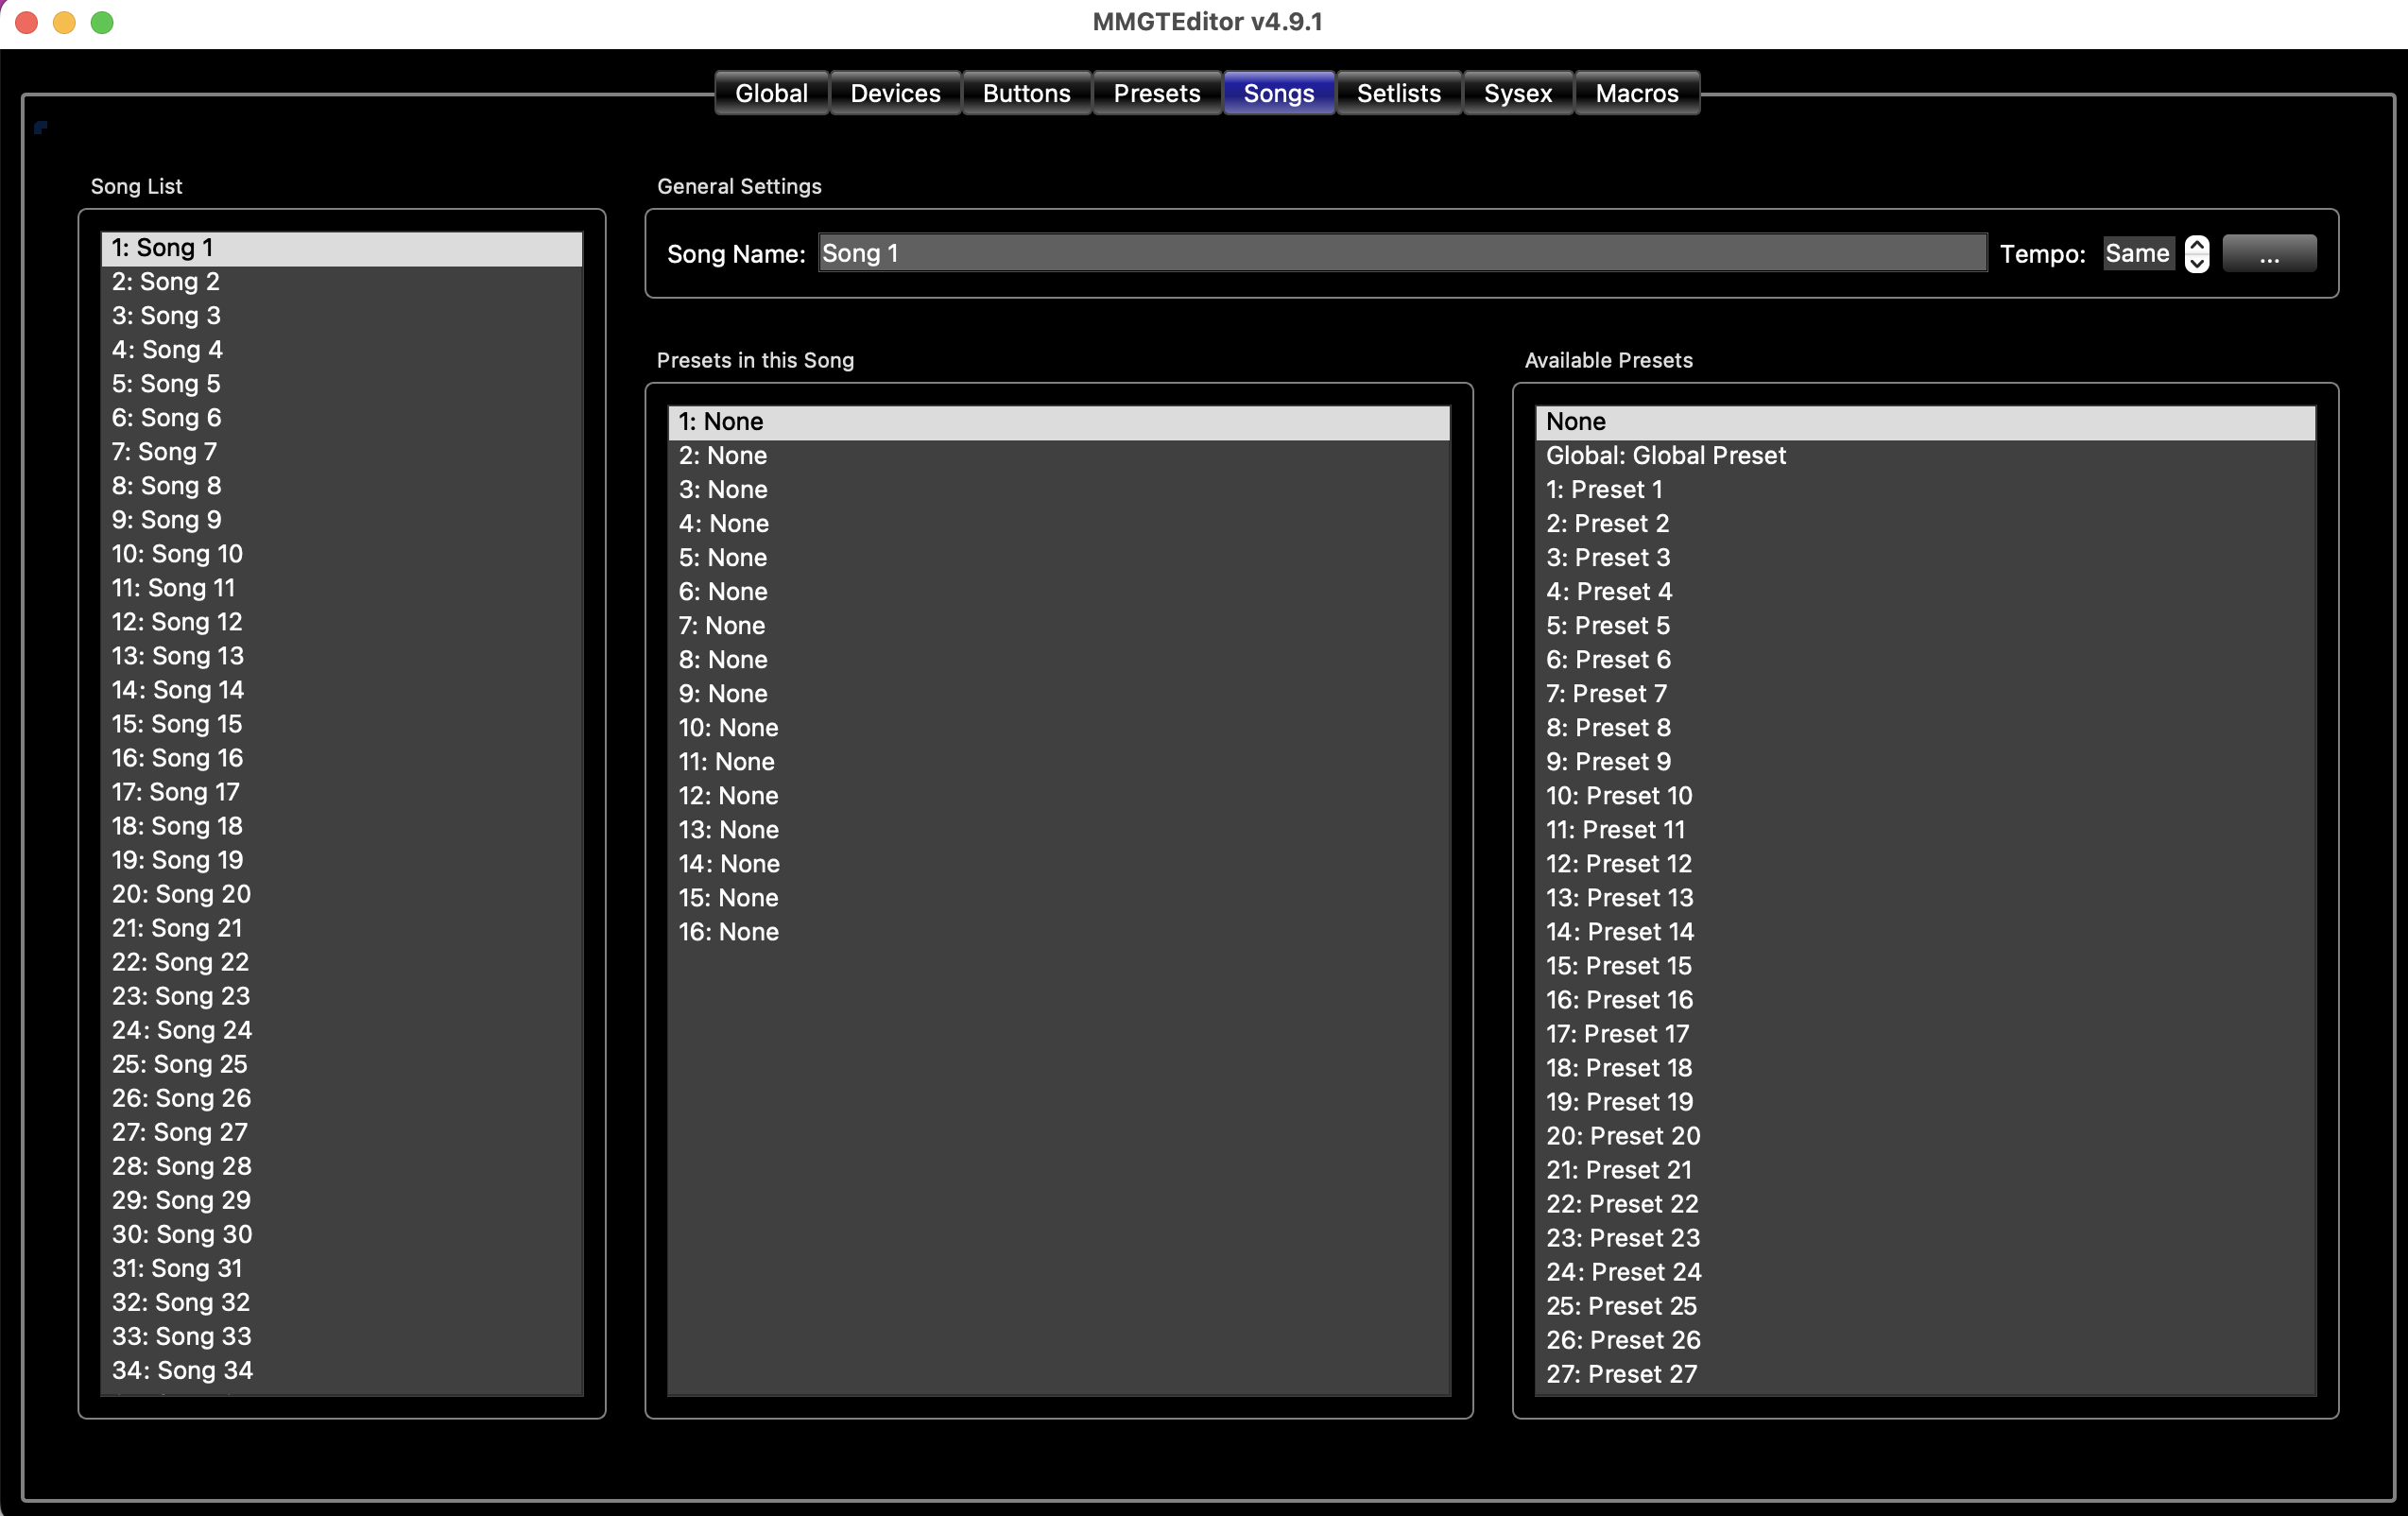
Song List
The leftmost column contains a list of all of the songs in the system. Select a song in this list, and you can edit the song using the fields on the right side of the screen. You can also change the order of your songs simply by dragging and dropping songs within this list
General Settings
Name - Assigns a name to this song
Tempo - Sets the tempo of this song. if MIDI Clock is set to Master or Auto, then this new tempo will be transmitted to connected MIDI devices. You can also specify one of these special values:
- Off - Don't send tempo for this song
- Preset - Use the current preset's tempo
- Same - Keep the same tempo
Presets in this Song
This is a list of presets that are in the currently selected song. There are 16 slots, each of which can have a preset assigned, or no preset assigned. When this song is selected on your Mastermind GT, these presets will be displayed over your preset buttons. The Preset Button Index section describes how the presets are assigned to the preset buttons.
If your song has more presets than the number of preset buttons on the current button page, the extra presets will not be displayed.
Similar to the Song List, you can drag and drop presets within this list to change the order of presets within the song.
Available Presets
This is a list of all presets in the system. To put a preset into your song, select a slot in the Presets in this Song list, then select a preset from the Available Presets list. There's a None option at the top of this list you can use to create an empty slot.
For more information about songs and setlists, see Mastering the Mastermind episode 11, Songs and Setlists
Setlists Tab
The Setlists Tab is where you can edit setlists and assign songs to those setlists. See the Songs and Setlists section for more information on how songs and setlists work.
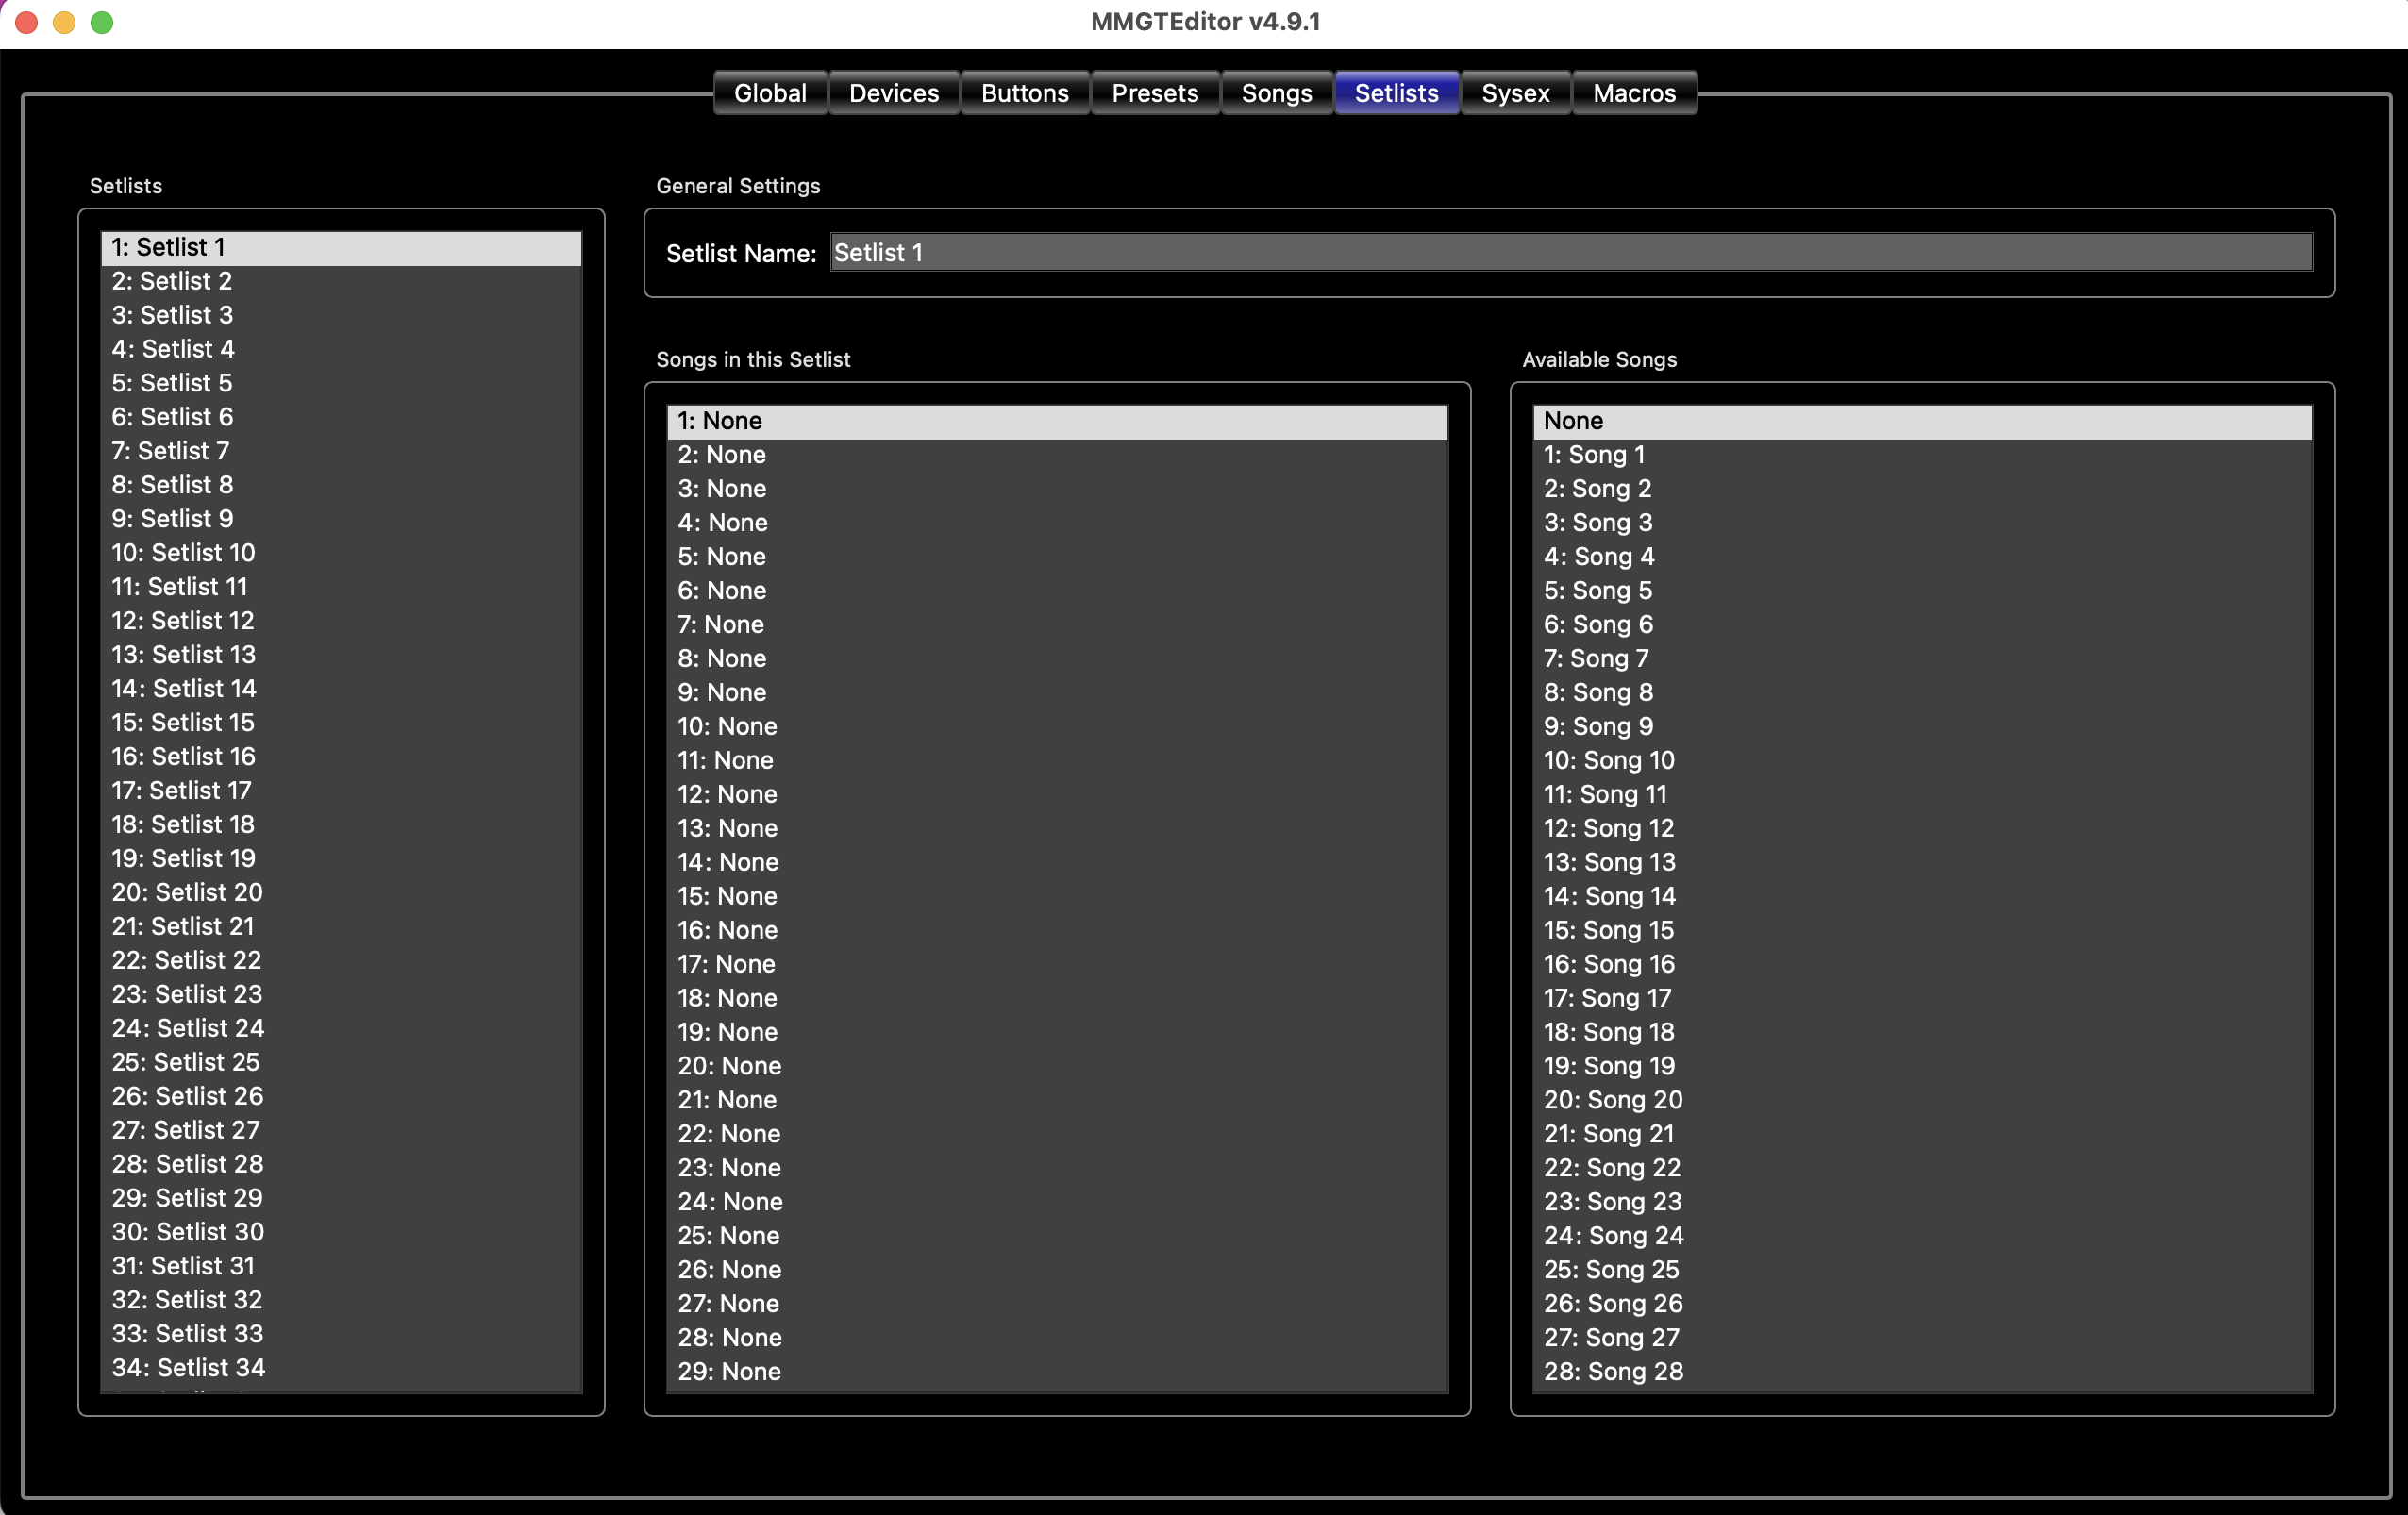
Setlist List
The leftmost column contains a list of all of the setlists in the system. Select a setlist in this list, and you can edit the setlist using the fields on the right side of the screen. You can also change the order of your setlists simply by dragging and dropping within this list.
General Settings
Name - Assigns a name to this setlist.
Songs in this Setlist
This is a list of songs that are in the currently selected setlist. There are 100 slots, each of which can have a song assigned, or no song assigned. On the Mastermind GT or PBC, pressing the Bank Up and Bank Downbuttons move through the songs within the current setlist using the order shown in this list.
Similar to the Setlist List, you can drag and drop songs within this list to change the order of songs within the setlist.
Available Songs
This is a list of all songs in the system. To put a song into your setlist, select a slot in the Songs in this Setlist list, then select a song from the Available Songs list. There's a None option at the top of this list you can use to create an empty slot.
For more information about songs and setlists, see Mastering the Mastermind episode 11, Songs and Setlists
Sysex Tab
The Sysex Tab allows you to define Sysex messages. Sysex messages are a special type of MIDI message that are specific to a particular product or manufacturer, and are usually defined as a string of hexadecimal digits (numbers where each digit can be 0-9 or A-F). These messages are often listed in a product's user manual or MIDI specification, and are usually used to access advanced features of a device that aren't available when using standard MIDI messages.
In actuality, the messages defined in this tab aren't limited to being Sysex messages - they can be any MIDI message at all. No error checking is done on these messages, so it's important to get the numbers right.
To send one of these messages, use the System / Sysex action on your button or preset. You will be able to specify up to two messages from this list to send - one to send when the button is turned on and one to send when it's turned off.
Sysex List
The leftmost column contains a list of all of the Sysex messages in the system. Select a Sysex message in this list, and you can edit the message using the fields on the right side of the screen. You can also change the order of your Sysex messages simply by dragging and dropping within this list.
General Settings
Sysex Message Name - Assigns a name to this Sysex message
Sysex Message Contents
This is where you specify the contents of your message. Enter the message as a string of hexadecimal digits separated by spaces. For example: F0 00 01 5B 00 F7
You can add as many as 16 bytes (in this case, a byte is a 2-digit number). If you need to send a longer message, you can create multiple Sysex entries and break up the message into pieces. Use multiple System / Sysex actions to send all of the pieces in a row. Using a macro is a convenient way to group multiple Sysex actions so that you can send them all at once with one System / Macro action.
Macros Tab
The Macros Tab allows you you define macros. Macros are action lists that can be called from another action lists. If there are certain sequences of MIDI messages you need to use repeatedly, a macro saves time - you only need to define your MIDI messages once and use the macro wherever you need that sequence of messages. It also makes it much easier to make changes. If you need to change a value in one of your MIDI messages, you can just edit the macro once, instead of having to edit the value every place you use it.
You can define 128 macros, each of which can have 32 actions.
To use a Macro, add a System / Macro action to your button or preset. The Mastermind will run the macro as an extension of its own action list.
Please note that you can't call a macro from another macro. System / Macro actions in a macro are ignored.
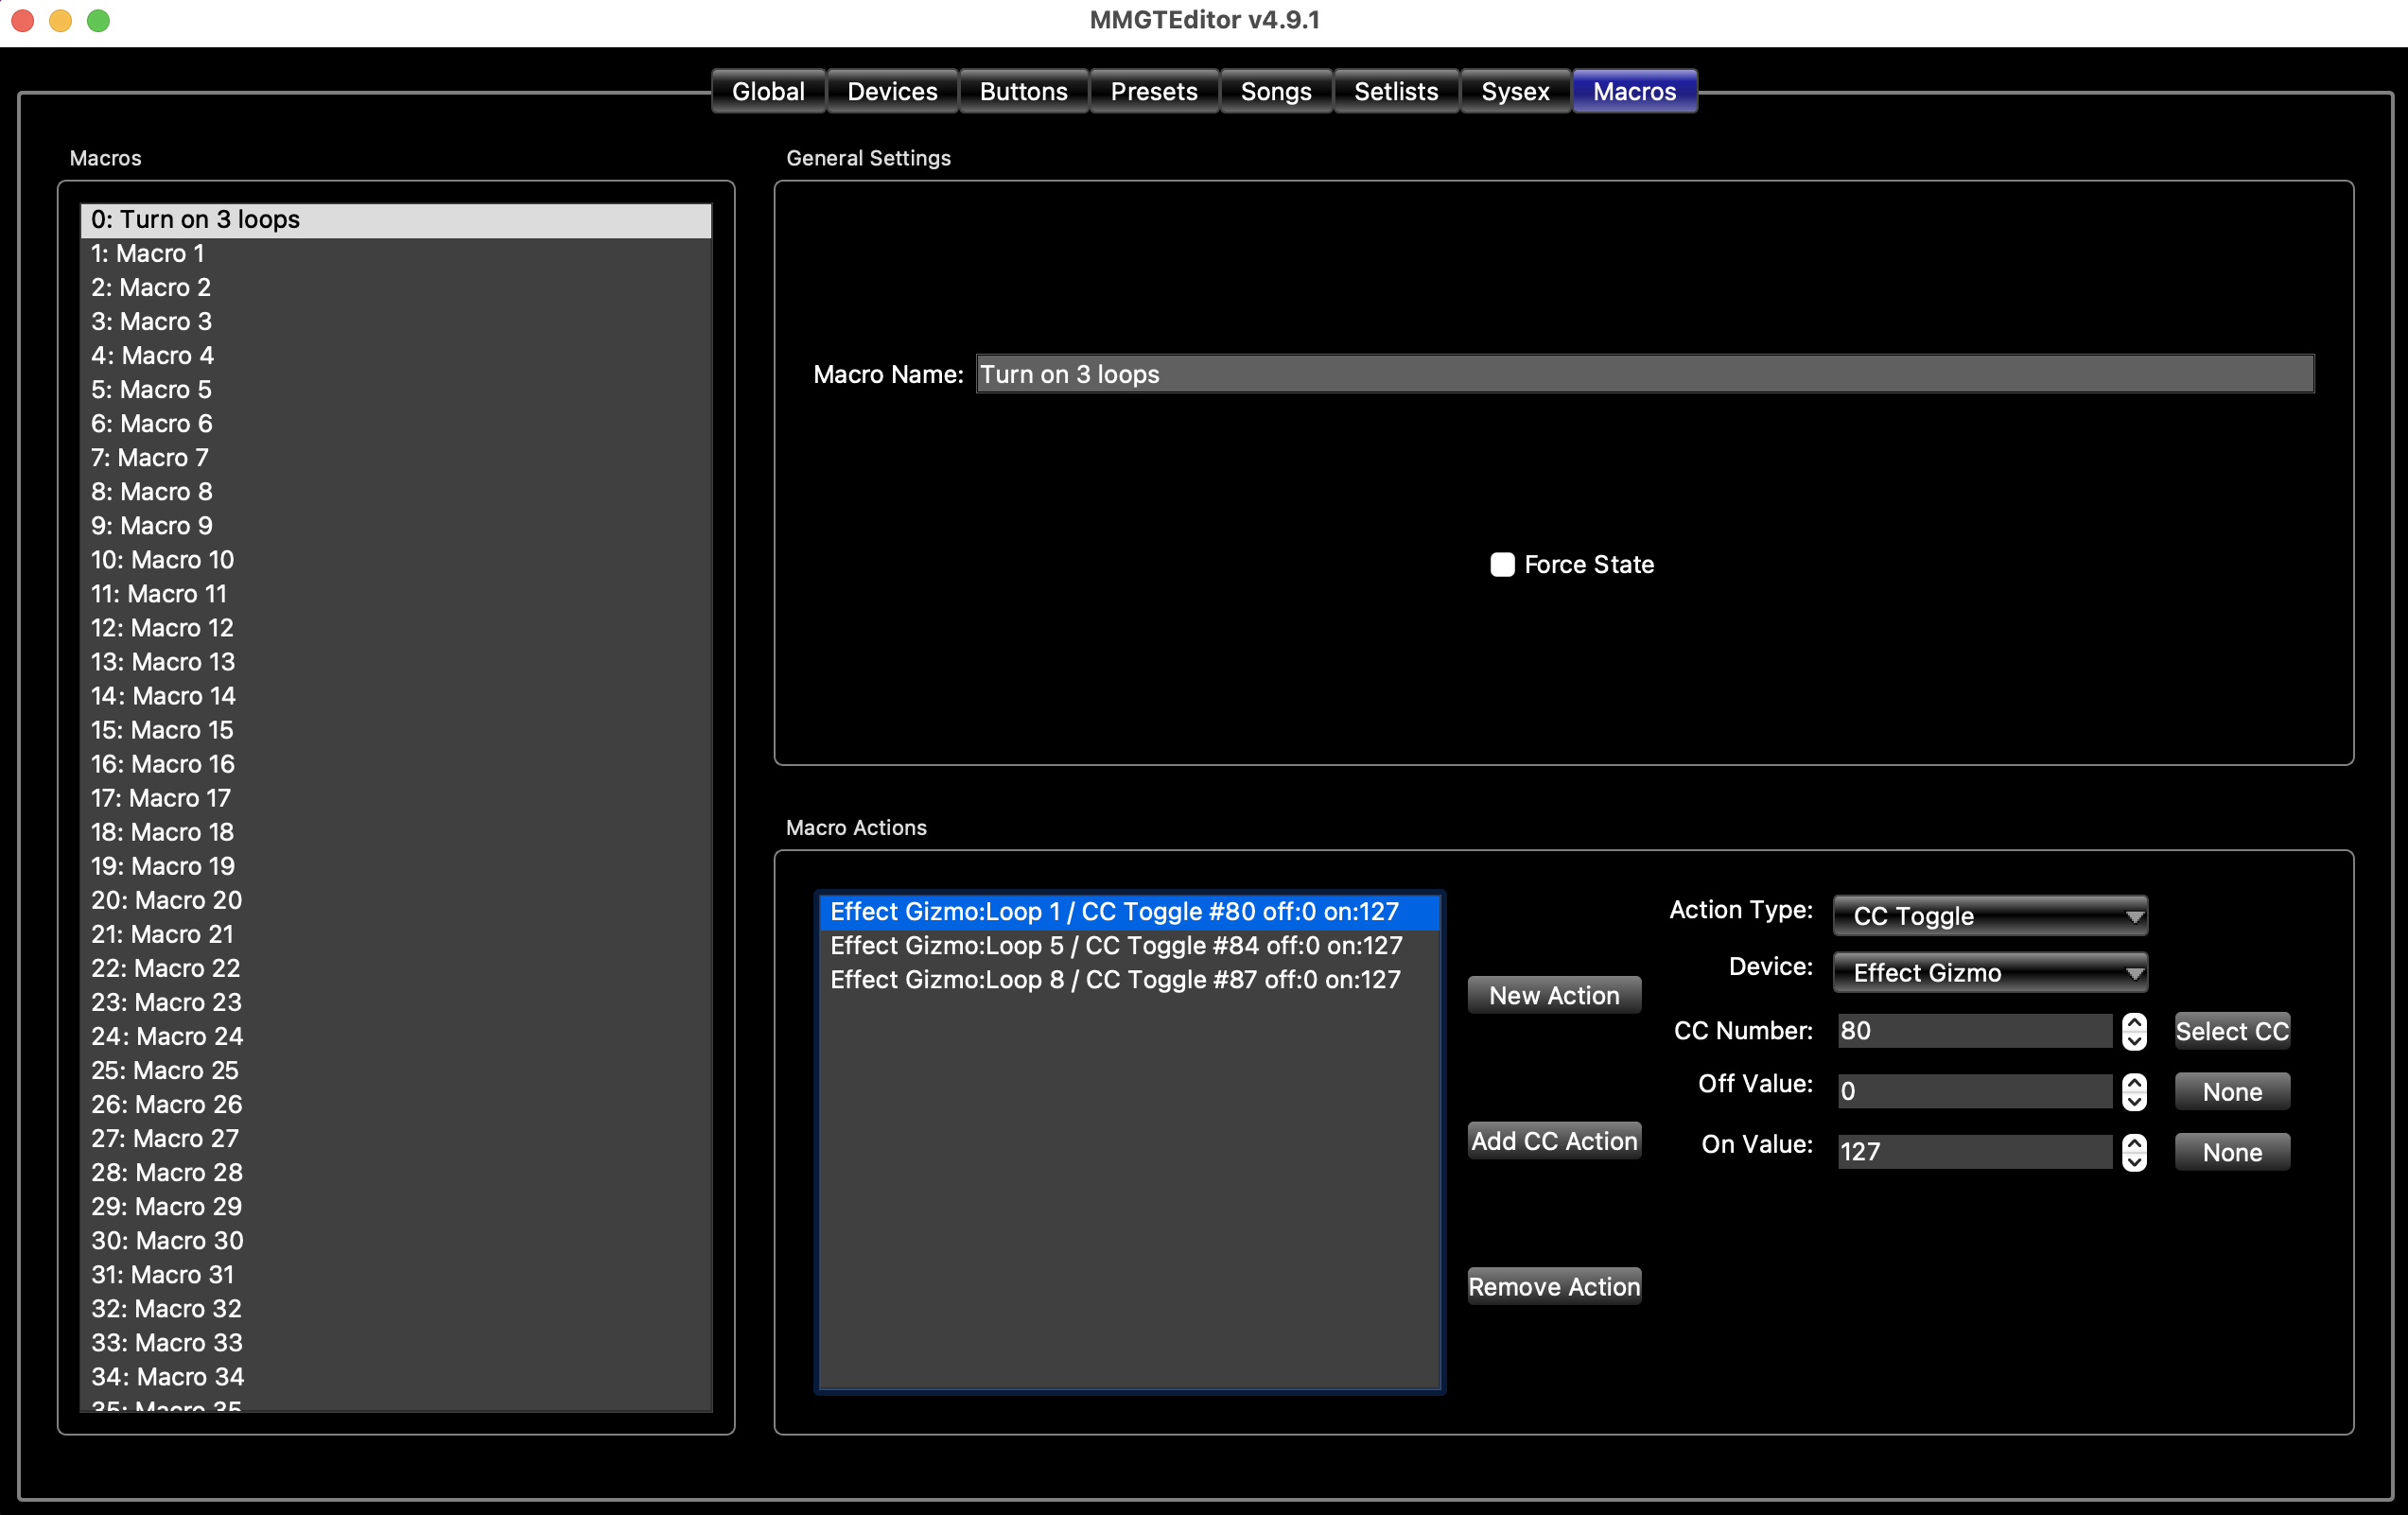
The example above shows a Macro that will turn on loops 1, 5 and 8 on an Effect Gizmo.
Macro List
The leftmost column contains a list of all of the macros in the system. Select a macro in this list, and you can edit the macro using the fields on the right side of the screen. You can also change the order of your macros simply by dragging and dropping within this list
General Settings
Macro Name - Assigns a name to this macro
Force State To - Normally, when a macro is run, the on/off state is passed from a button to the action. If the macro is activated by turning a button on, the macro will use the on values of each action. If the button was turned off, the macro will use the off value of each action. When this checkbox is checked, you can force the state to be on or off, ignoring the on/off state of the button that was pressed. When checked, a dropdown selector will appear, allowing you to select On or Off as the desired state.
Macro Actions
This is where you can edit the macro's actions. Please refer to the Editing Actions section for more details.
MIDI Tab
Note: The MIDI Tab is only available on the Mastermind LT/PBC editor. On the Mastermind GT, the MIDI settings are on the Globals Tab.
The MIDI tab is where you can edit various MIDI parameters for the Mastermind LT and PBC.
MIDI Settings
MIDI Receive Channel - selects which MIDI channel the Mastermind responds to. Incoming Program Changes and Bank messages on this channel will cause the Mastermind to switch to the indicated preset. This setting also enables incoming CC (Continuous Controller) messages, which are set in the right side of this tab. Can also be set to None which makes it ignore all incoming Program Changes and Continuous Controller messages.
This setting is typically used when controlling the Mastermind from a computer or other MIDI controller.
You should not set MIDI Receive Channel to be the same channel as one of your other MIDI devices. This includes devices with bidirectional MIDI communication such as the Axe-Fx and Kemper Profiler. When using these devices, you don't need MIDI Receive Channel to be set to anything other than None.
MIDI Clock - selects how the Mastermind PBC handles MIDI clock messages. Possible values are:
- None - does not transmit or receive MIDI clock
- Transmit - transmits a MIDI clock signal. The tempo can be set using tap tempo button, or can be programmed in any song or preset.
- Receive - receives a MIDI clock signal. It will also send the incoming clock signal out the MIDI output.
- Auto - If an incoming MIDI clock signal is detected at the MIDI input or USB port, act as if Receive was selected. If no incoming MIDI signal is detected, act as if Transmit was selected.
Clock Pulse Limit - If set to 0 (the default), MIDI clock will be sent normally - as a continuous stream of MIDI messages. If set to a number higher than 0, the Mastermind will send that many MIDI clock messages every time the tempo changes, then stop sending. This is similar to tap tempo, but is faster.
Bidirectional MIDI - when turned on, makes the MIDI Out and MIDI In ports bidirectional. Pins 1 and 3 are used for the second communication channel. This is used for Remote Mode or to communicate with bidirectional MIDI devices like the Axe-Fx.
Remote Mode - when enabled, allows you to link two or more Masterminds together and have them all operate in unison. This makes it possible to use one Mastermind as a remote controller for another. When using this mode, the MIDI Out of each device connects to the MIDI In of the next MIDI device. The last device's MIDI Out is used to connect to the rest of your MIDI devices.
Bidirectional MIDI should be turned on when using Remote Mode, and all Masterminds need to have the same exact settings on them in order for Remote Mode to work correctly.
Expander - when checked, allows you to link two Masterminds together and use them as one unit. This is different from remote mode in that you can use the audio loops in each unit independently and you can have different button configurations on both units. Remote Mode needs to be turned on for this parameter to be visible. Bidirectional MIDI needs to be on when using expander mode.
MIDI bank selects song - This setting changes how the Mastermind responds to MIDI bank messages. Refer to the External MIDI Control section for more details.
Use Song Index - This setting, along with the above setting, controls how the Mastermind responds to MIDI bank messages. Refer to the External MIDI Control section for more details.
Merge (In / Out / USB) - when one or more of these checkboxes are checked, the Mastermind takes any MIDI messages received at that port and forwards them out the MIDI Out port.
MIDI Forward - when enabled, the Mastermind takes any MIDI messages received at the USB Device port and forwards them out the MIDI Out port. And, any MIDI messages coming in to the MIDI In port are forwarded out the USB device port. This allows you to use the Mastermind as a MIDI interface for a computer.
Incoming CC Messages
This section allows you to set which incoming CC messages control each audio function of the Mastermind. Each loop, buffer, output, signal and function switch is listed here and has a space where you can select which CC number controls that function. MIDI Receive Channel needs to be set to something other than None for the Mastermind to respond to incoming CC messages.
All of the possible CC messages for the Mastermind series are displayed. When configuring a Mastermind LT, all of the CCs relating to audio features such as loops, buffers and outputs will be visible and able to be edited, but these CCs will have no effect.
Control using incoming CC messages is explained in more detail in the External MIDI Control section.
Audio Tab
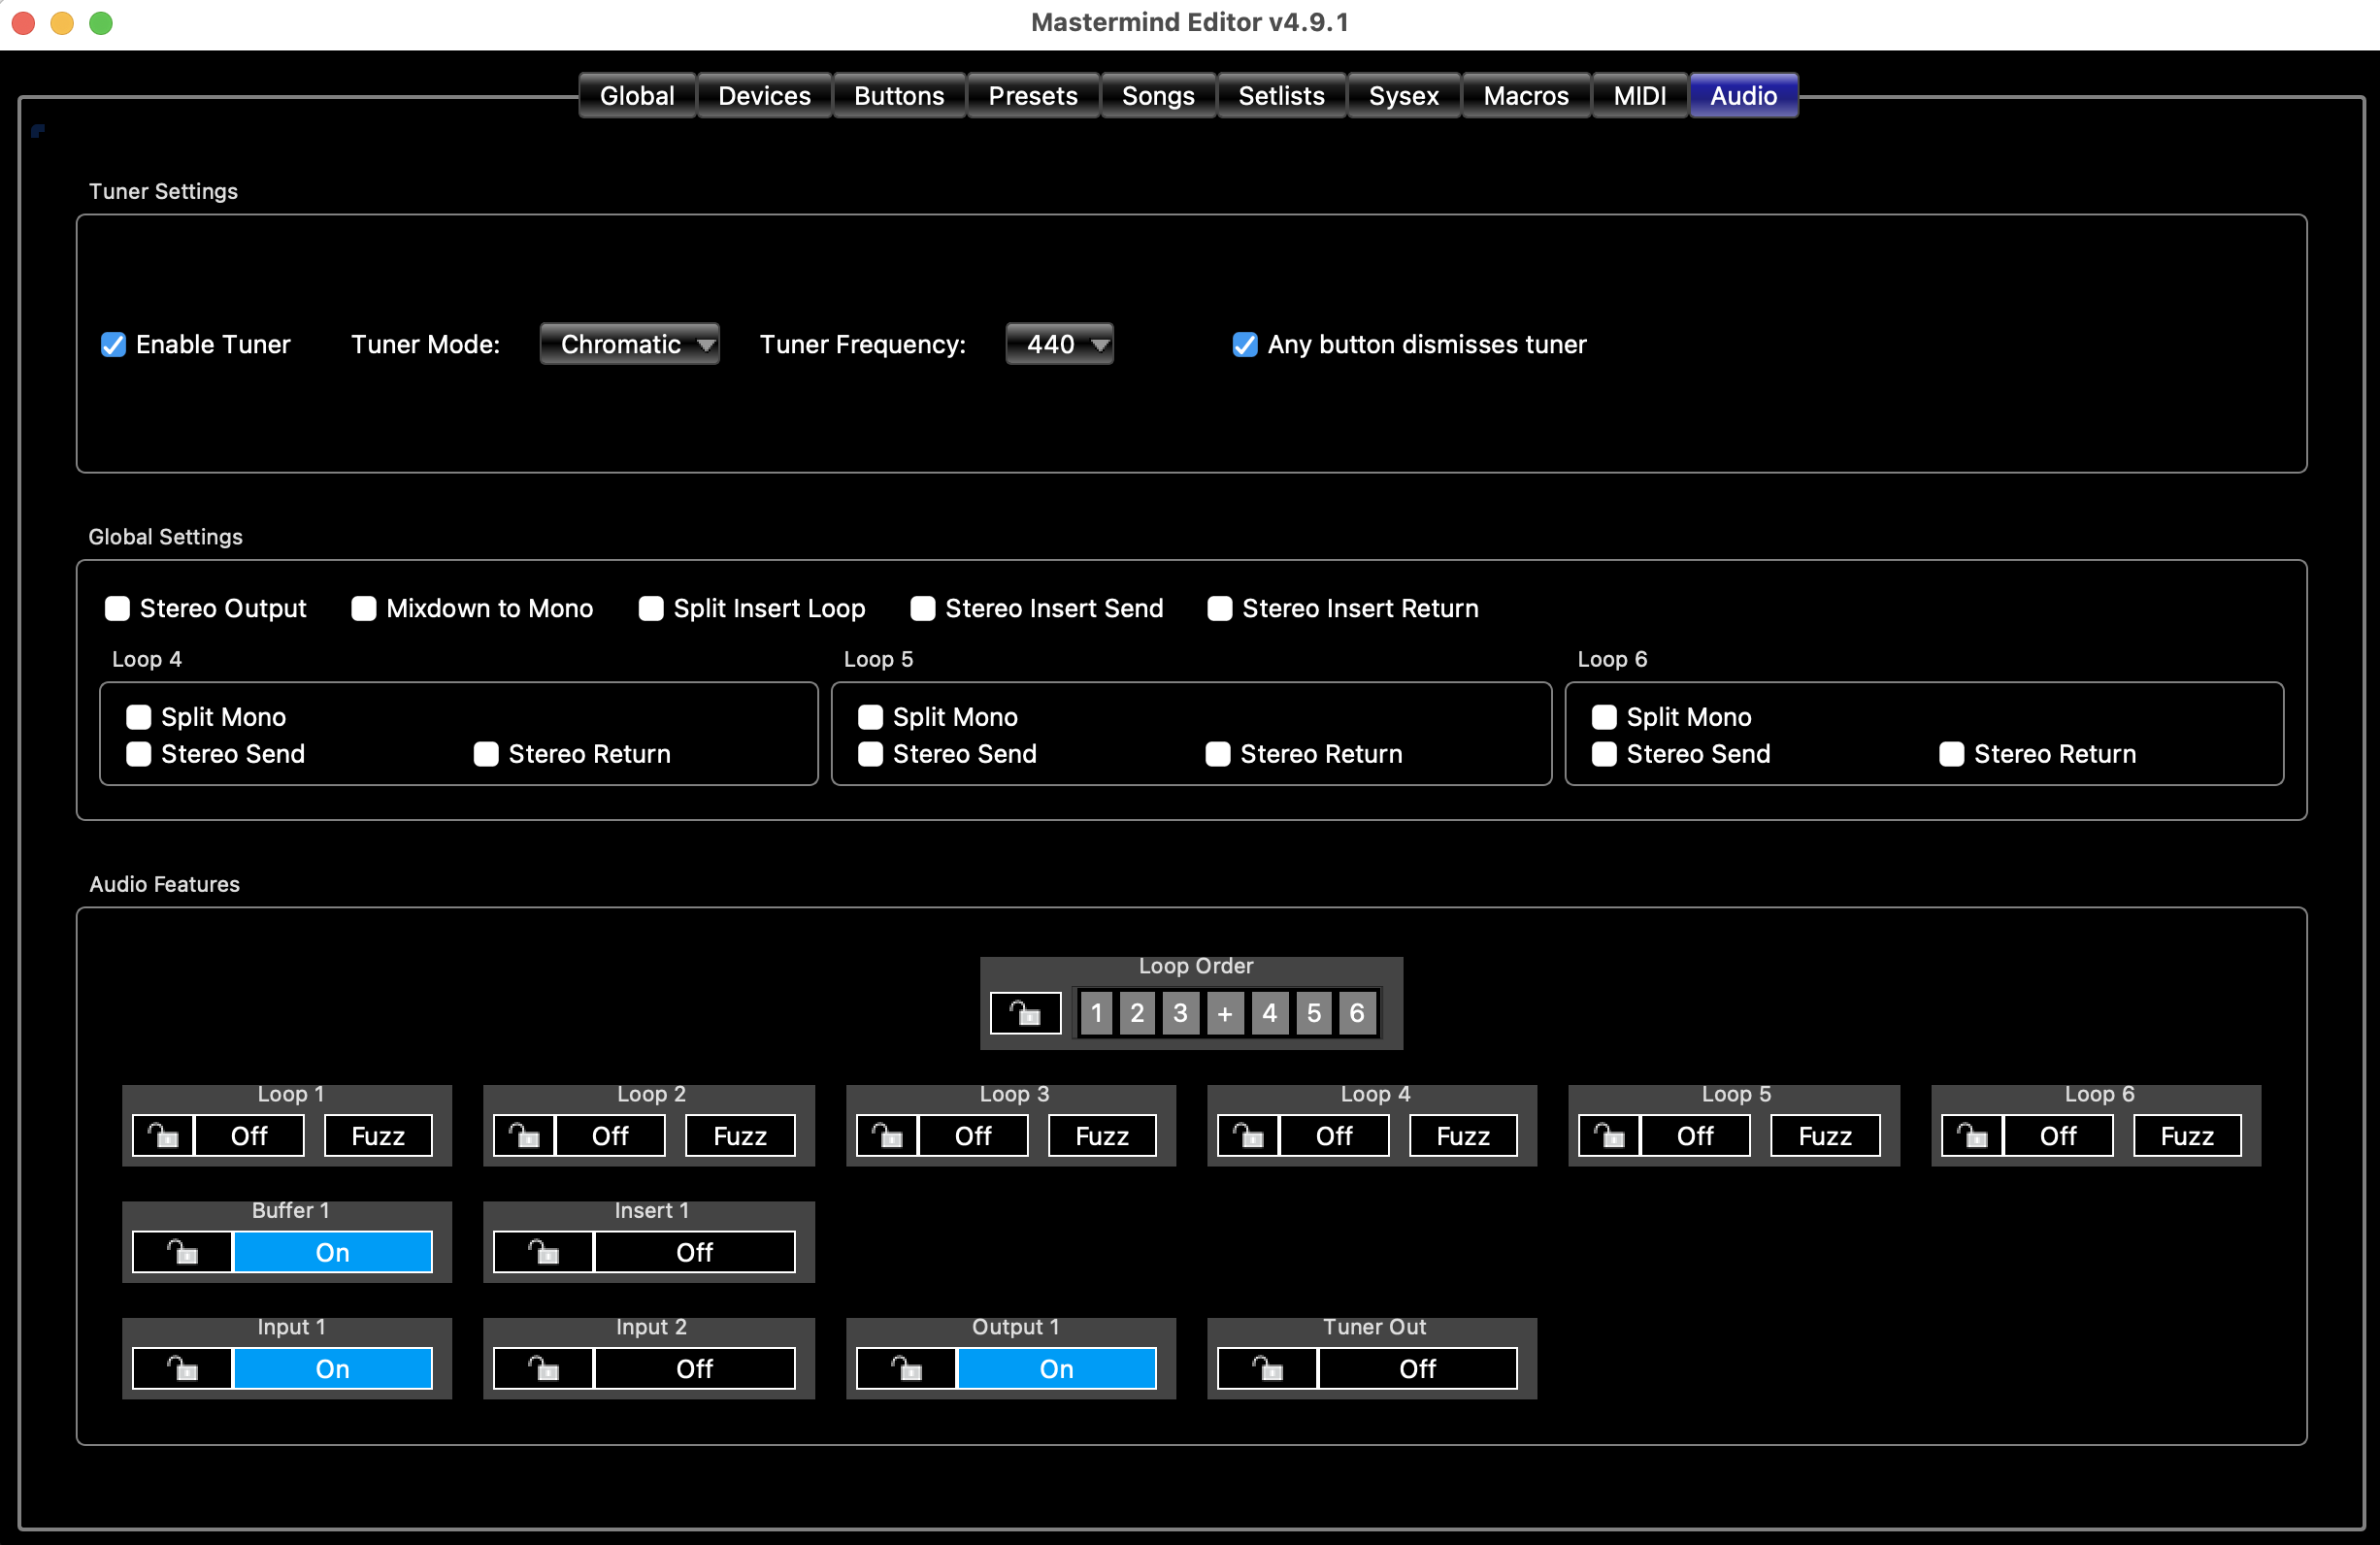
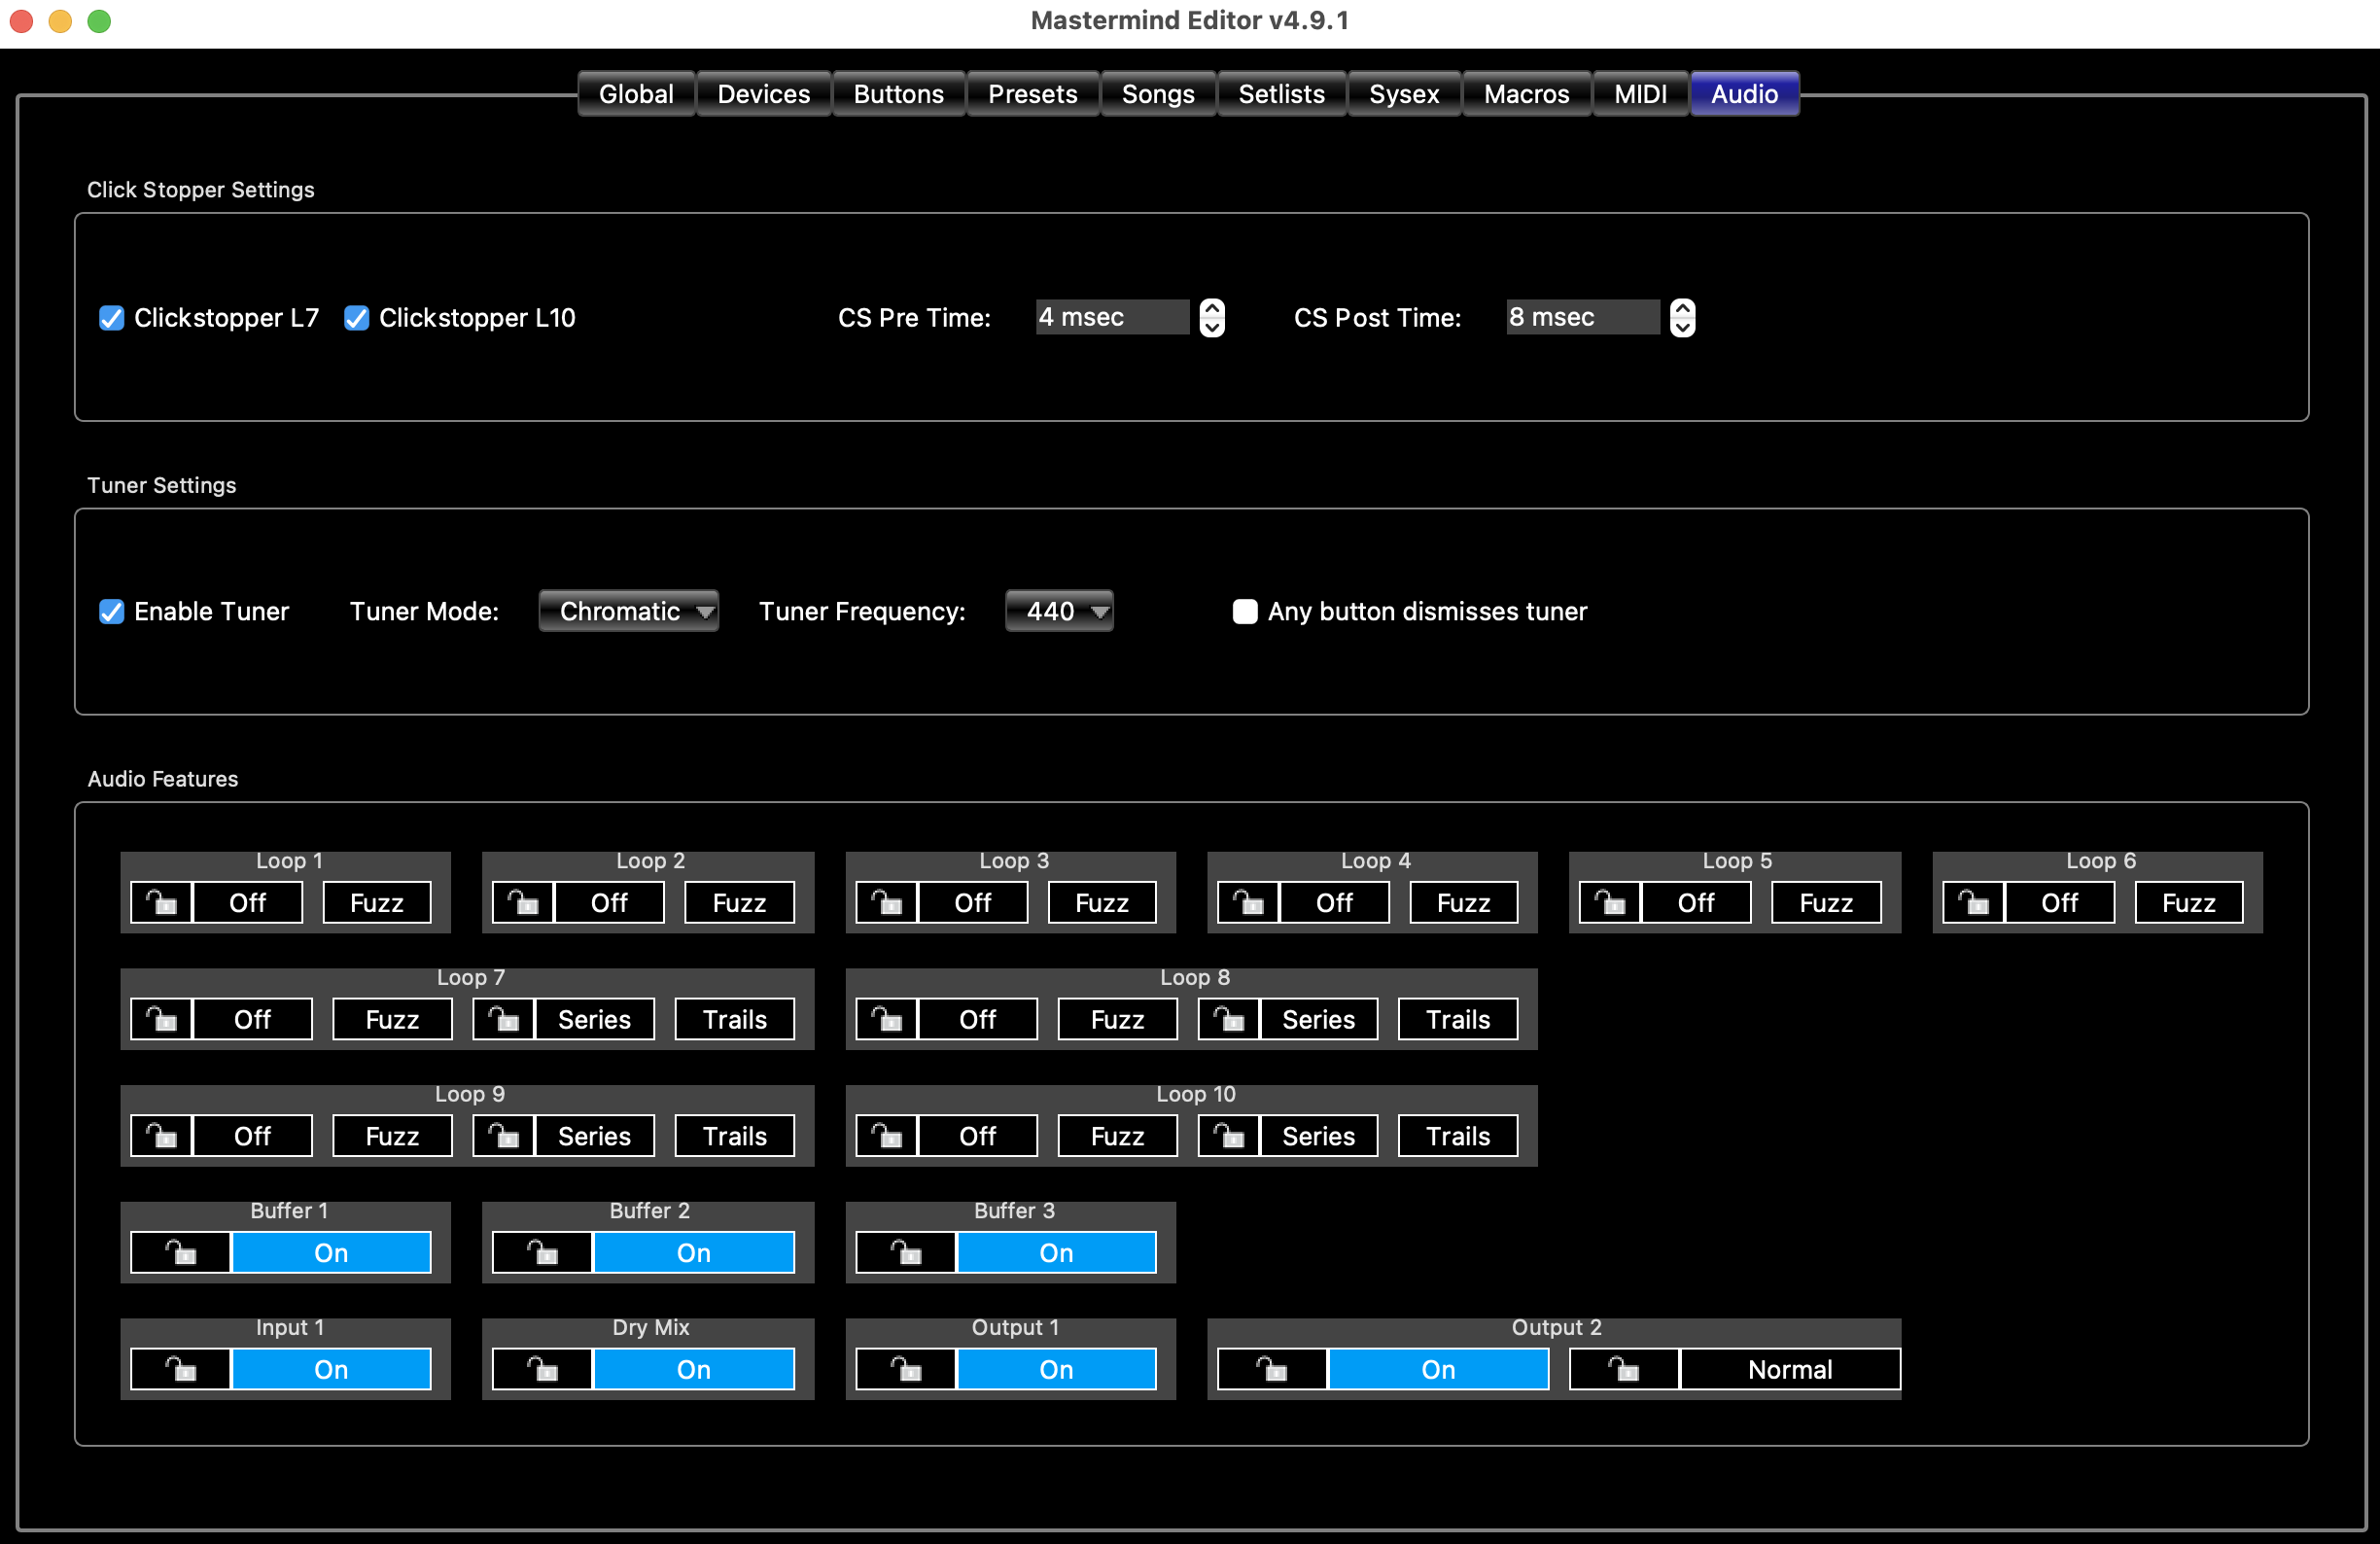
Click Stopper Settings
The Click Stopper is a mute circuit that helps to mute the click or pop that the loop relays make when they switch.
It's only found on the Mastermind PBC/10
Clickstopper L7 - enables the Click Stopper that is located before loop 7.
Clickstopper L10 - enables the Click Stopper that is located after loop 10.
CS Pre Time - sets the number of milliseconds that the Click Stopper is activated before the relays are allowed to switch. Default is 4 milliseconds.
CS Post Time - sets the number of milliseconds that the Click Stopped stays on after the relays switch. Default is 8 milliseconds.
Tuner Settings
Enable Tuner - When checked, the internal tuner is enabled, when not checked it is disabled. This is useful when using an external, MIDI capable tuner in an Axe-Fx or Kemper Profiling Amp.
Tuner Mode - Allows you to select the operation mode of the tuner. Allowable values are Chromatic and Guitar. Guitar has additional options specific to tuning a guitar.
Tuner Frequency - Sets the center frequency of the internal tuner. Allowable values are 432 to 445 Hz.
Guitar Mode Parameters
These parameters are only available when Tuner Mode is set to Guitar.
Capo - Allows you to set a tuning offset for the whole guitar. The offset is specified in semitones.
String Offsets (1-6) - Allows you to set a tuning offset for each string. The offsets are specified in cents.
Audio Features
This is where you can specify the default settings for each audio feature: loops, buffers, inputs, outputs and signals.
Each audio feature has an On/Off button and a padlock icon. The On/Off button sets the default state of the audio feature. The factory default is that all loops are off, and everything else is on, but a click on this page can change that.
Defaults
The default settings on this page affect all presets on the PBC, except those that have overrides set. You can set up an override in a few ways:
- On the PBC itself, use the buttons to turn a loop, buffer, etc. on or off and hold the Loops button to store (or the Function button on the PBC/6X). This will store the new state as an override for the current preset.
- On the "Buttons" section of the Presets Tab, click the button that controls the desired loop, buffer, etc. This changes the state of the audio feature and saves it as an override for the current preset.
- On the '"Audio" section of the Presets Tab, click the override ">" button to activate the override, then click the on/off button to set the new state of the audio feature.
You can remove overrides from a preset in two ways:
- You can remove the overrides on every preset for a specific audio feature. On the Audio Tab, hold the Shift key and click the On/Off button for the desired audio feature. The editor will ask for confirmation, then if you respond yes, will clear all overrides.
- On the '"Audio" section of the Presets Tab, click the override ">" button to turn it off. This disables the override for the current preset.
Global Lock
The padlock icon turns on the global lock for an audio feature. This sets the audio feature to ignore all preset overrides - the audio feature will stay in this state and no button press, MIDI message or anything else can change that state. Turning off the lock icon will re-enable any user specified overrides in your presets and allow the audio feature to be turned on or off once again.
Independent Loops
Loops can also be be set to be independent. Independent loops ignore preset overrides like locked loops do, but you can still change the loop manually by using Instant Access buttons. Clicking the padlock icon for a loop will cycle through three states: unlocked, locked, and independent. Independent mode is indicated by an "I" icon.
Other Settings
In addition to setting the on/off states of each feature, you can also set the series/parallel state of loops that support parallel routing, and can also select whether those loops preserve delay and reverb trails when switching the loop off. The trails setting only has an effect when the loop is set to parallel.
Output B has an Invert setting that allows you to set the phase inversion of the output.
For more information about audio settings, please see Mastering the Mastermind episode 12, PBC Audio Settings
Expression Pedal Edit Page
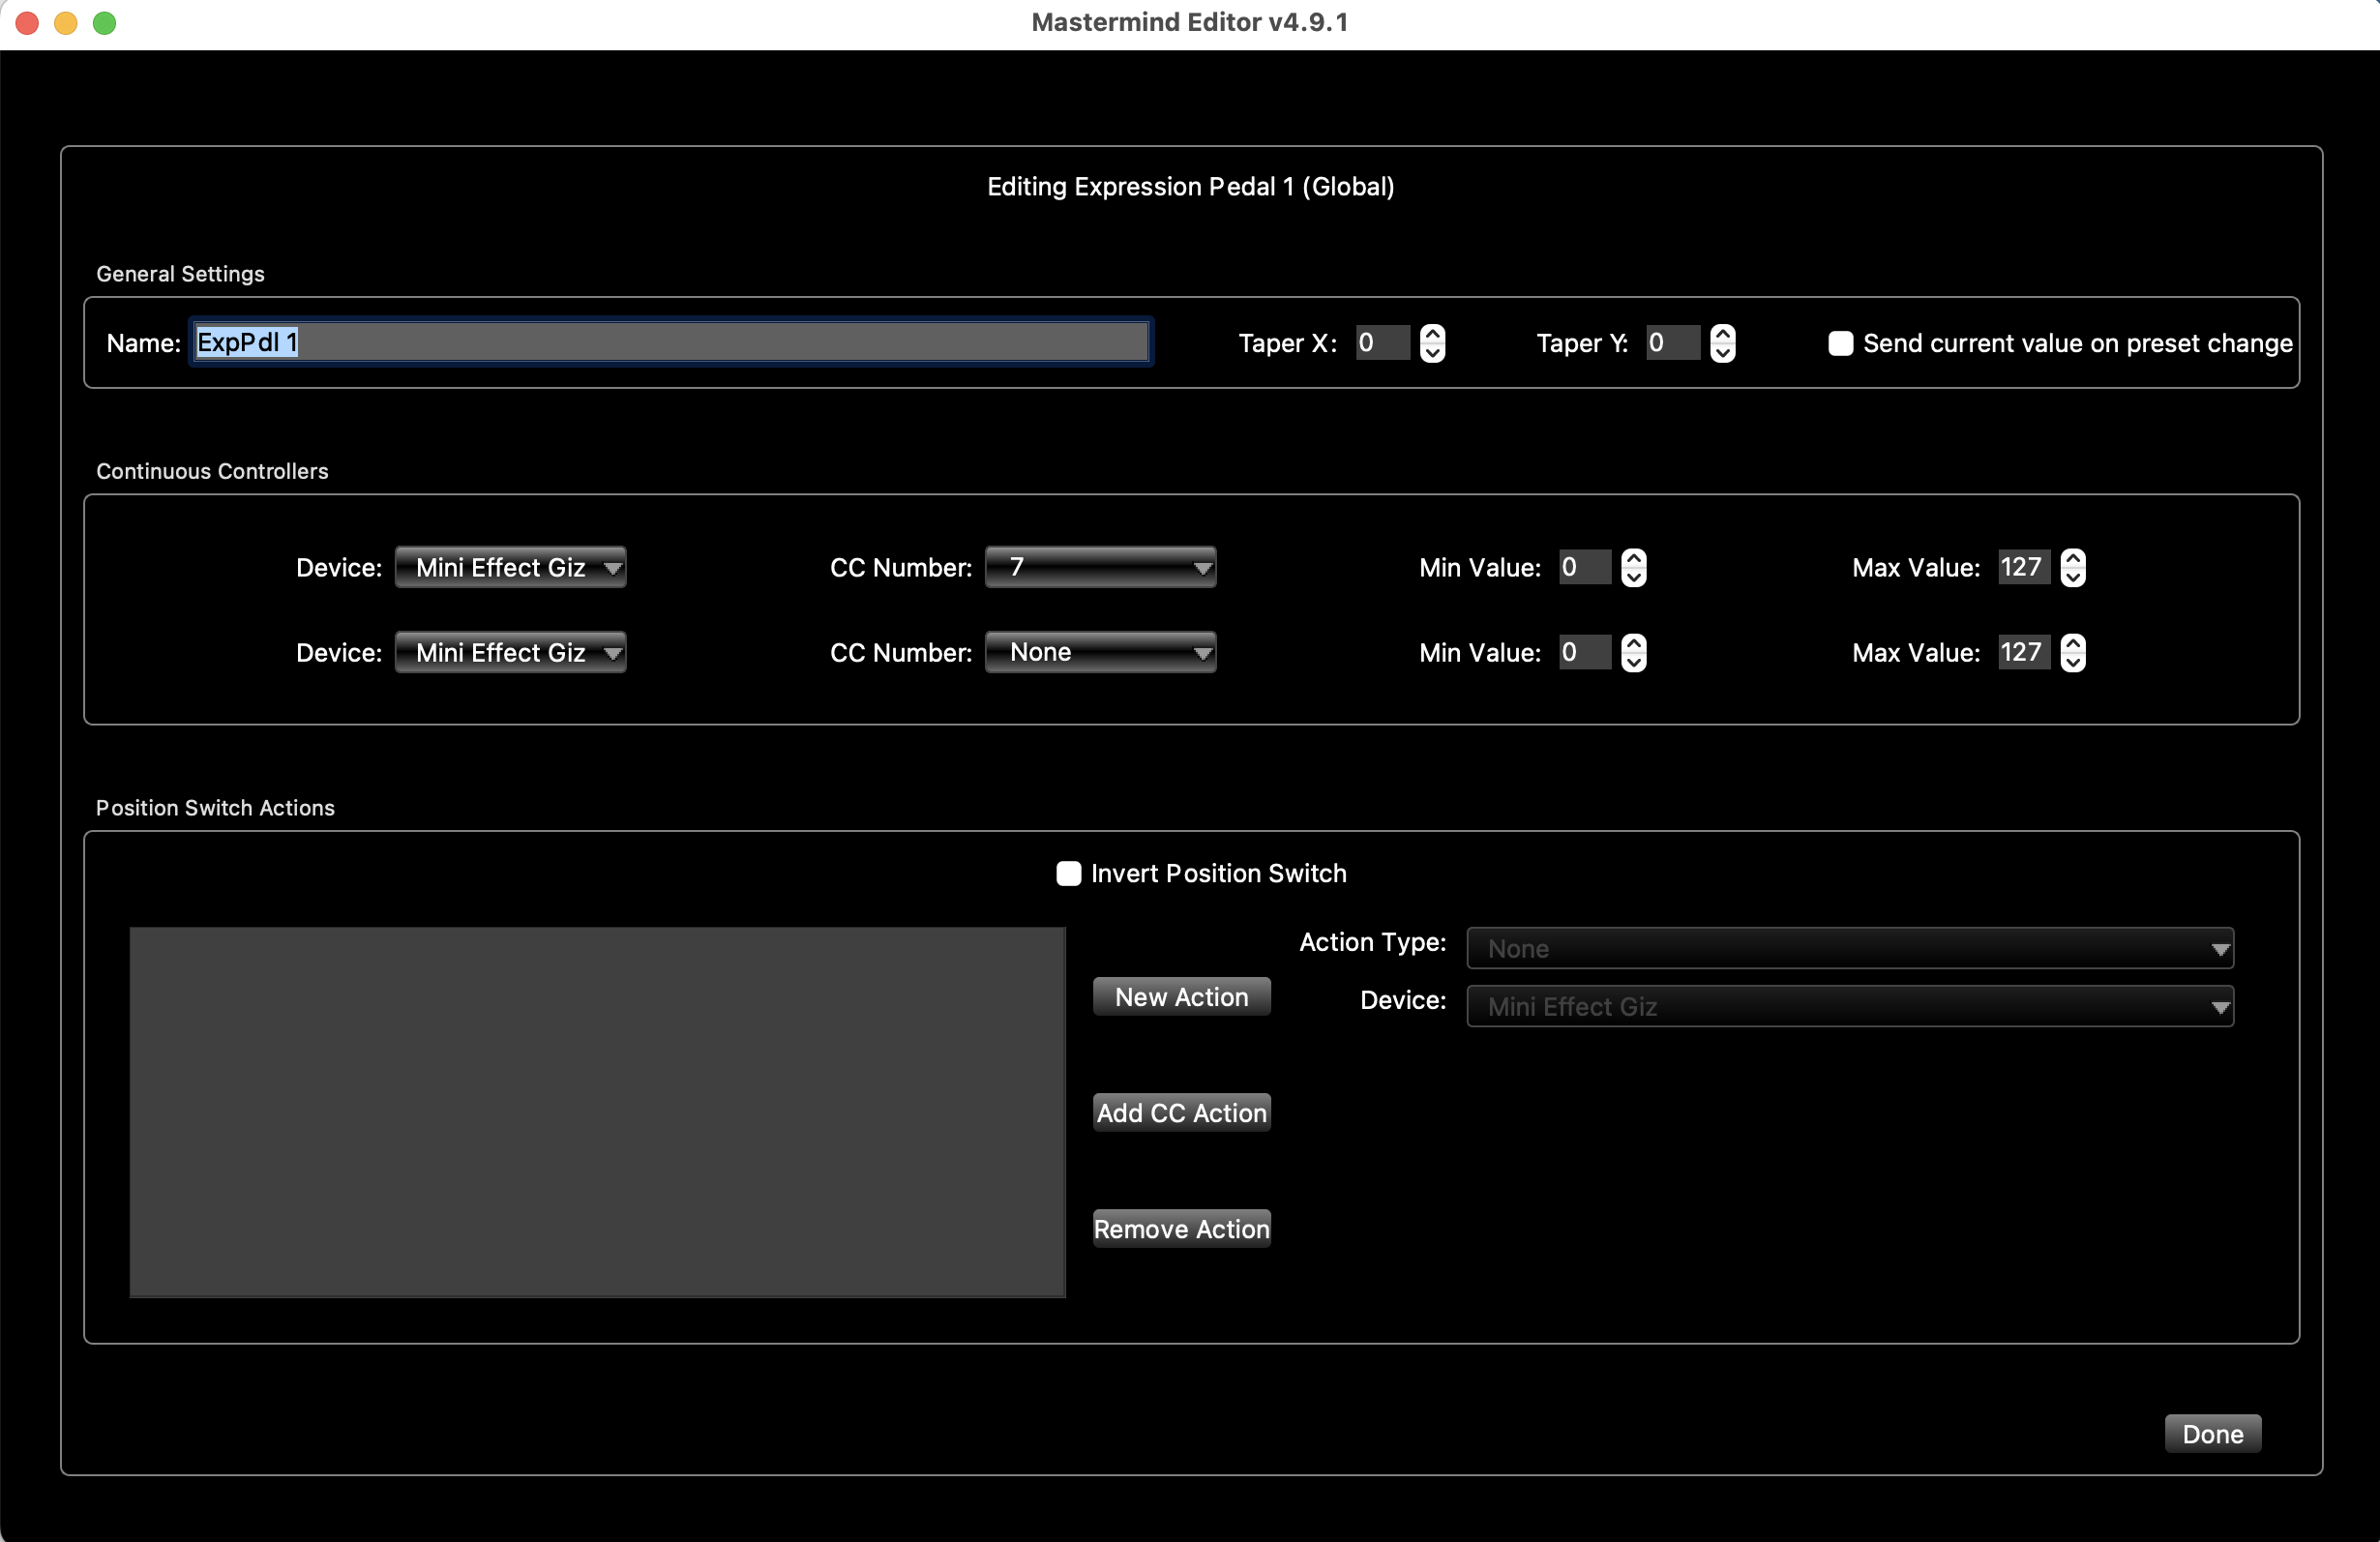
This page allows you to edit the settings of each expression pedal in the system. You can edit global settings on the Globals Tab, and can override those settings in certain presets using the Presets Tab. You can also use Expression Pedal Settings Blocks to change expression pedal settings with a button press.
General Settings
Name - Allows you to name this pedal.
Taper X, Taper Y - these settings allow you to compensate for the taper of a volume pedal. See the Expression Pedal Taper section below for all the details. The default is Taper X = 0, Taper Y = 0, which should be used for all typical expression pedals, or volume pedals that have an expression output. When connecting a volume pedal with an insert cable (connected to the pedals' input and output), you would need to set these numbers differently. X=80, Y=20 or X=65, Y=30 are good starting points.
Send Current Value On Preset Change - when this is checked, the Mastermind will send CC message(s) based on the expression pedal's current position every time you change presets. If this is not checked, the Mastermind will only send CCs when the expression pedal is moved.
Continuous Controllers
This section is where you specify which CC (continuous controller) messages are sent by this pedal. You can send CC messages to two devices simultaneously. Each device has the following parameters:
Device - Chooses which device you are sending to.
CC Number - Chooses which CC number is sent. You can type in the number manually, or if your device is listed by name in the device database, you can pull down a menu that contains the names and numbers of known CCs for the device.
Min Value - Specifies the CC value that will be sent when the pedal is in the heel down position.
Max Value - Specifies the CC value that will be sent when the pedal is in the toe down / heel up position.
Position Switch Actions
The expression pedal port has a position switch that can trigger Actions when the pedal goes above or below a certain position. This is separate from the built-in toe switch found on the Mission Engineering SP1-RJM pedal, which works as an External Switch and is edited using the Button Edit Page. You can use both the position switch and the toe switch at the same time if desired.
The actual position at which the switch happens has to be programmed on the Mastermind GT or PBC, using the Set Switch Position option in the Expression Pedal menu. The action list can be edited on this page using the standard action editor.
Invert Position Switch - When this checkbox is not checked, the position switch is considered to be on when the pedal is between the switch position you specified and the heel up position. The position switch is considered to be off when pedal is between the specified switch position and the heel down position. When this checkbox is checked, it's reversed: heel up is off and heel down is on.
Expression Pedal Taper
Volume pedals have a logarithmic taper, which means most of the change in its value happens at one end of the pedal. This sounds natural when using a volume pedal, but usually sounds wrong when used as an expression pedal.
The Mastermind can compensate for this to make the pedal's response feel more natural. A volume pedal typically has one range where the value changes slowly and another where it changes quickly.
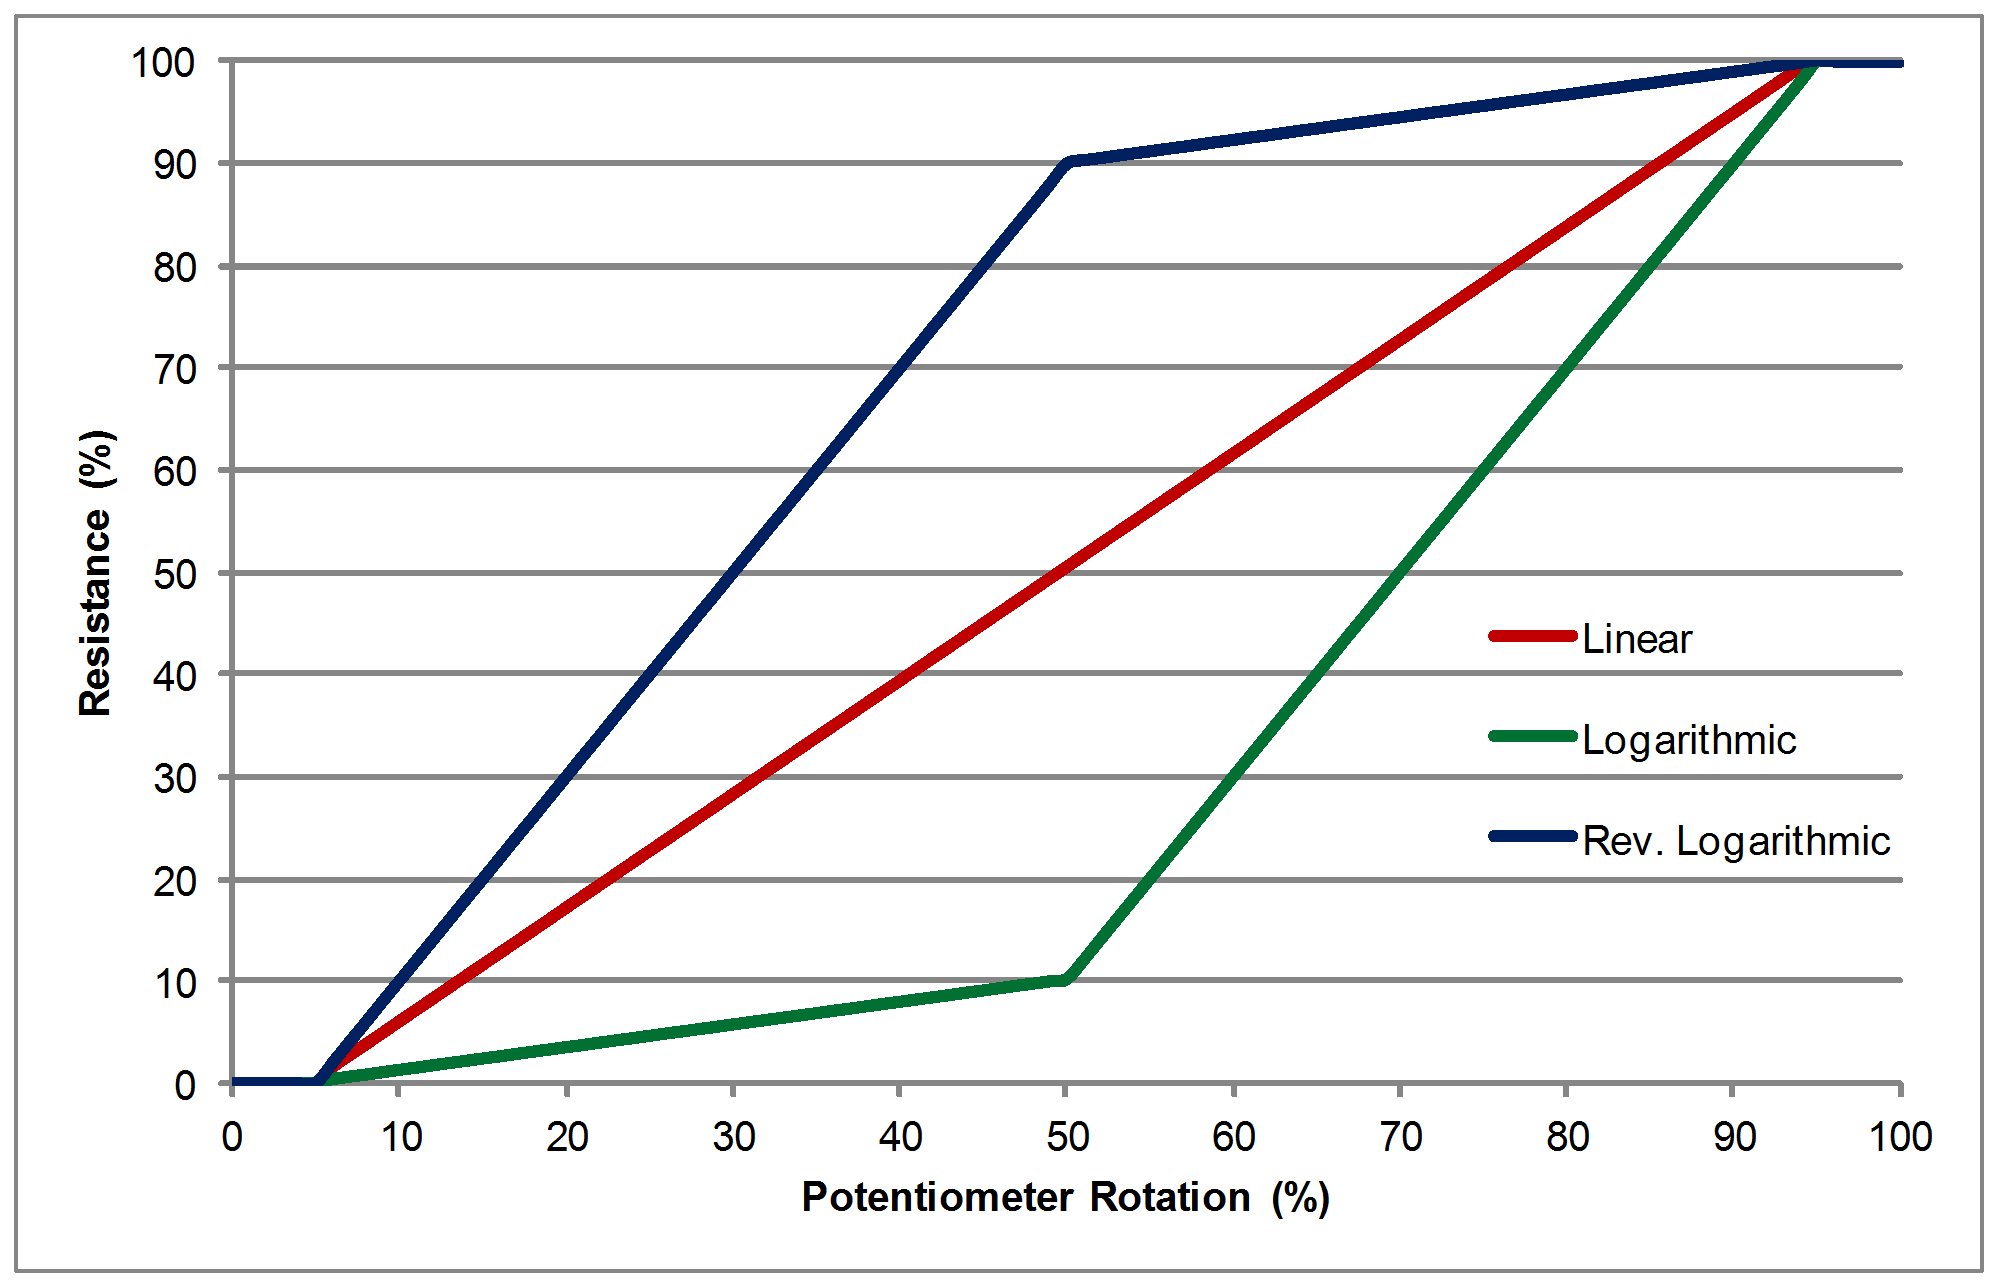
The red line indicates a linear taper - it's a straight line all the way across. The green line is a logarithmic taper. Note that it has a "knee" where the line breaks and heads upward at a steeper slope. This is where the Taper X and Taper Y values come in.
The green line's knee is at 50% across the graph, and 10% up. So, to compensate for this pedal, you would type in X=50, Y=10. Typical volume pedals have the X set to somewhere between 65 and 80 and Y set somewhere between 20 and 30.
Special Features
Expression Pedal Settings Blocks
On the Globals Tab, you can specify up to 128 Expression Pedal Settings Blocks. Each block is a separate expression pedal configuration that can be recalled at any time.
To edit a settings block, simply double click it in the Expression Pedal section of the Globals Tab. The Expression Pedal Edit Page will pop up, allowing you to configure that block. Each one can be named to help identify it.
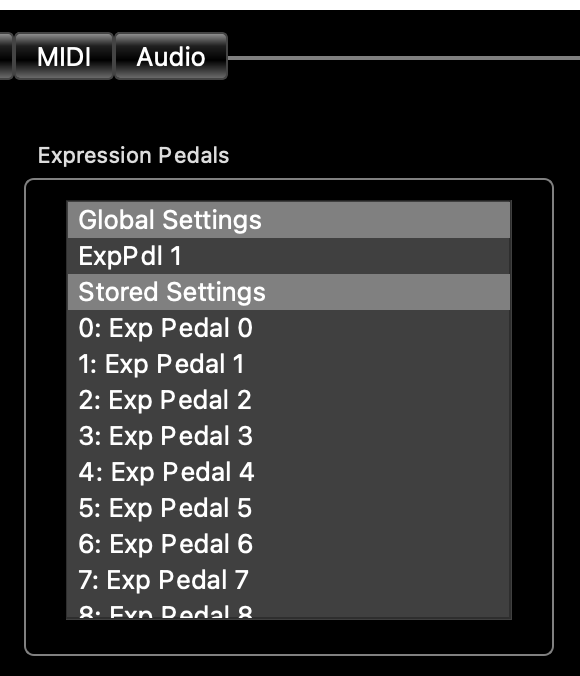
To use a settings block, execute a System / ExpPedal action. This is typically done by assigning that action to an IA button, but it can also be executed in other ways such as Preset Actions or an expression pedal position switch.
This action below, when placed on a button, will set expression pedal #1 to the settings in Exp Pedal 5 when the button is turned on. When the button is turned off, the expression pedal will return to its global settings.

External MIDI Control
Incoming PC and Bank Messages
The Mastermind can be controlled by an external MIDI device such as a computer, sequencer or other type of MIDI controller. To enable this feature, set the MIDI Receive Channel parameter to the desired MIDI channel. This setting is found in the Globals Tab on the GT or in the MIDI Tab on the LT or PBC. Any bank or Program Change messages received through the MIDI In or USB B (To PC) ports on this channel will cause a preset change on the Mastermind.
The bank and program numbers are interpreted differently based on some settings:
Setlist=None
In normal bank and preset mode (no setlist active), the bank MSB (CC#32), LSB (CC#0) and program numbers are combined to create the desired preset number. The formula is:
(Bank MSB x 16384) + (Bank LSB x 128) + PC number = preset number
There are only 768 presets within the Mastermind, so only bank numbers 0 through 5 are valid. The Bank MSB should always be set to 0 (or not sent at all), and Bank LSB should be 0 through 5.
Examples:
To select preset 200, you would send:
CC#32, value 1
PC#72
Because 128 x 1 + 72 equals 200
To return to preset 4, send
CC#32, value 0
PC#4
Because 128 x 0 + 4 is 4.
The Mastermind always remembers the last bank numbers you send it, so if you use more than one bank of presets, you should always send a bank select CC before sending a PC to the Mastermind. Otherwise, you may end up with unexpected results where the incorrect preset is selected.
Setlist active, MIDI Bank Selects Song turned on
If you are using a setlist, and the MIDI Bank Selects Song parameter (found in the Globals Tab on the GT or in the MIDI Tab on the LT or PBC) is turned on, the Bank MSB and Bank LSB are combined to select a song out of the current setlist. The number is calculated as follows:
(Bank MSB x 128) + Bank LSB = song number
The setting Use Song Index determines how the song number is interpreted:
If Use Song Index is turned on: the song number indicates the song's position in the current setlist (0 = first song in the current setlist, 1 = second song in the setlist, etc.)
If Use Song Index is not turned on: the song number indicates the actual song number to load (0 = load song #0, 1 = load song #2)
The PC number selects which preset within the song is selected (0 = first preset in song, 1 = second preset in song, etc.)
Please note: If you try to select a song that's not in the current setlist, or a preset that isn't in the selected song, the Mastermind will ignore the request and remain on the current song and preset.
Examples (Use Song Index is turned on):
To select the first preset in the third song:
CC#32, value 2
PC#0
To select the fourth preset in song number 170:
CC#0, value 1
CC#32, value 41
PC#3
Examples (Use Song Index is turned off):
To select the first preset in song #12:
CC#32, value 12
PC#0
To select the third preset in song number 260:
CC#0, value 2
CC#32, value 4
PC#2
Setlist active, MIDI Bank Selects Song turned off
If you are using a setlist, and the MIDI Bank Selects Song parameter is turned off, the bank MSB, LSB and program numbers are combined to create the desired preset number. The formula used is the same as in the Setlist=None section above.
Upon receiving bank and program change messages, the Mastermind will find the first song that contains the resulting preset and will load that song and preset.
Other settings
In MIDI settings, there is also a Swap Bank MSB/LSB setting that reverses how the Mastermind handles bank CCs. With this checked, CC#0 is now Bank LSB and CC#32 is now Bank MSB. Typically, this setting should be turned off, but may be turned on for compatibility with certain devices.
CC Link: Controlling buttons using incoming CC messages
It’s also possible to control IA buttons using CC messages sent from a computer or other MIDI controller. Each IA button has a parameter CC Link that enables this feature. When you turn CC Link on, incoming CCs are compared against the first action in each button’s action list. If the incoming CC matches the channel and CC number assigned to the first action in the action list, the button will update based on the CC’s value (0-63 = off, 64-127 = on).
For example, if the first action on a button is Device 1 / CC Toggle #14, and MIDI device 1 is set to channel 4, then incoming CCs on MIDI channel 4 with CC number 14 will control the button.
Please note that each device has an Ignore Incoming CCs setting, which when set, will disable the CC Link feature for that device.
Remote Control
The Remote Control setting works with CC Link. When Remote Control is checked, the button still sends its actions as normal, but the button's visible state doesn't change. Only incoming CCs can change the visible state of the button. This feature is used with DAW software like Ableton which allows bidirectional synchronization of Mastermind buttons and Ableton controls.
Individual Loop and Switch Control using CC Messages
On the Mastermind LT and PBC, you can also assign CC messages to control individual loops, function switches, outputs and buffers. The MIDI Rx Ch parameter is used to choose the MIDI channel these CCs are received on. The default CC numbers are as follows: 
| Function | CC Number | Values |
|---|---|---|
| Loop 1 off/on | 48 | 0-63 off, 64-127 on |
| Loop 2 off/on | 49 | 0-63 off, 64-127 on |
| Loop 3 off/on | 50 | 0-63 off, 64-127 on |
| Loop 4 off/on | 51 | 0-63 off, 64-127 on |
| Loop 5 off/on | 52 | 0-63 off, 64-127 on |
| Loop 6 off/on | 53 | 0-63 off, 64-127 on |
| Loop 7 off/on | 54 | 0-63 off, 64-127 on |
| Loop 8 off/on | 55 | 0-63 off, 64-127 on |
| Loop 9 off/on | 56 | 0-63 off, 64-127 on |
| Loop 10 off/on | 57 | 0-63 off, 64-127 on |
| Loop 7 series/parallel | 58 | 0-63 series, 64-127 parallel |
| Loop 8 series/parallel | 59 | 0-63 series, 64-127 parallel |
| Loop 9 series/parallel | 60 | 0-63 series, 64-127 parallel |
| Loop 10 series/parallel | 61 | 0-63 series, 64-127 parallel |
| Buffer 1 disable/enable | 62 | 0-63 off, 64-127 on |
| Buffer 2 disable/enable | 63 | 0-63 off, 64-127 on |
| Buffer 3 disable/enable | 64 | 0-63 off, 64-127 on |
| Function Switch 1 off/on | 65 | 0-63 off, 64-127 on |
| Function Switch 2 off/on | 66 | 0-63 off, 64-127 on |
| Function Switch 3 off/on | 67 | 0-63 off, 64-127 on |
| Function Switch 4 off/on | 68 | 0-63 off, 64-127 on |
| Output A/Left off/on | 69 | 0-63 off, 64-127 on |
| Output B/Right off/on | 70 | 0-63 off, 64-127 on |
| Output B Invert | 71 | 0-63 normal, 64-127 invert |
| Mute | 72 | 0-63 muted, 64-127 not muted |
| Dry Send to Mixer | 73 | 0-63 muted, 64-127 not muted |
| Tuner | 74 | 0-63 off, 64-127 on |
| Page | 75 | 0-15 (page number minus 1) |
These CC numbers can be changed using the settings in the MIDI Tab.
Mastermind GT Special CCs
There are a few special CC numbers that affect the Mastermind GT as well. These only function if MIDI Receive Channel is set to something other than None, and the CC is received on the channel indicated by MIDI Receive Channel.
| Function | CC Number | Values |
| Bank Down | 117 | any |
| Bank Up | 118 | any |
| Select Page Number |
119 | 0 = page 1, 1 = page 2, etc. |
IA Link
IA Linking is a feature that allows you to link two or more buttons together so that turning one on turns the other on, and turning one off turns the other off. This is especially useful if you have more than one button that controls the same function. For example, you may have a button that controls a particular pedal on more than one button page. If you turn the pedal on on the first page, you want the button on the second page also to turn on so that it accurately reflects the state of the pedal.
Enabling IA Link
To enable this feature for a button, turn on the IA Link checkbox, which is found on the Button Edit Page. Once this is enabled, any button that has the same first action in its action list as the current button does will be linked. Pressing one button will affect the state of the other. The linked button will not send its messages or execute its Actions, however.
Other IA Link Features
Turning IA Link on also does a couple of other things:
Preset Button Index
When a new bank is selected, the Mastermind has to decide which preset is assigned to each preset button. It examines the buttons in a specific order, and assigns the first preset in the bank to the first preset button it finds. The second preset button it finds gets the second preset in the bank, etc. The order in which it scans through the buttons depends on your device:
Mastermind GT - starts in the upper left corner, and goes from left to right. When it reaches the end of a row, it goes down one row and starts at the left side of the row, scanning to the right again.
Mastermind LT - starts in the lower left corner (the 1 button), then scans to the right. When it finishes that row, it goes up to the Bank Down button, and scans to the right again. Finally, the Function button is scanned.
Mastermind PBC/10 - starts in the lower left corner (the 1 button), then scans to the right. When it finishes that row, it goes up to the Switches button, and scans to the right again. Finally, the Loops button is scanned.
Mastermind PBC/6X - starts in the lower left corner (the 1 button), then scans to the right. When it finishes that row, it goes up to the Functions button, and scans to the right again.
Order Reassignment with Preset Index
If for some reason, you want to change the order of how presets are assigned to buttons, you can do this with the Preset Index setting found on Preset buttons. By default, these are all set to 0, which means that the standard order (as described above) is used. If you assign different Preset Index numbers to the buttons, the presets will be assigned in that order - number 1 will receive the first preset in the bank, number 2 will receive the second preset in the bank, etc.
If you need to assign a button that accesses a specific preset regardless of which bank you're in, you can use an IA button with a System / Preset action.
For more information on Preset buttons and the Preset Index setting, please see Mastering the Mastermind Episode 6, Button Editing part 1, and Episode 7, Advanced Button Editing
Set IA
Set IA is an action that allows you to automatically turn one or more IA buttons on or off. This makes it possible to create complex interactions between buttons. For example, you could program a button that turns on a fuzz pedal to turn off all buttons that control overdrives. Or, turn on a delay whenever you activate any overdrive (but not have the delay button affect the overdrives).
Set IA works on any button that has Type set to IA. IA buttons have an IA ID parameter - this is how you identify and refer to buttons. IA IDs can range from 0 to 255. Setting the ID to 0 means that the button will never be affected by Set IA actions. Any other value allows it to be controlled by Set IA.
Once you have IA IDs assigned, you can use a System / Set IA action to control those buttons. Here's an example:
System / Set IA #4 off:ON on:OFF
Putting this action on an IA button will make it control any IA buttons that have IA ID #4. When this button is turned on, it will turn off all buttons with IA ID #4. When this button is turned off, it will turn on all buttons with IA ID #4.
The Mastermind will only allow a button to be switched once during a Set IA action, and it won't allow a button to control itself. This prevents the Mastermind from being stuck in an infinite loop.
Tutorials
Create a Button Page that Controls a Device
If you have a device that has multiple effect blocks, effect loops or other MIDI-controllable switches, you can create a page of buttons that control this device. You don't necessarily need to devote a whole page to a device, but this tutorial will assume that you want to use a whole page.
- First, go to the Globals Tab and find the Max Button Page parameter. This shows the highest numbered page that you're using right now. Increment this number by 1. If you're replacing an existing page, you can skip this step.

- Now, go the the Buttons Tab. Use the page selector at the bottom of the tab to select the page that you wish to work on.

- Right click on a button (Ctrl-click on a Mac), and choose Assign CC, then your device name from the submenu that pops up, and the function you wish to control from the submenu that pops up.

- Repeat the above step for each button you wish to assign.


Accessing the Page
Now that you have a button page created, you need to be able to display that page when you need it. There are several ways to do this, and you can use one or more methods in the same configuration.
Page Up/Page Down Buttons
Page Up and Page Down buttons are the simplest way to access your button pages. These allow you to scroll from page to page as you tap the button. The Mastermind GT has a Page / IA Store button by default, which is a Page Up button that has a second function when held. The Mastermind PBC does not have Page Up or Down buttons by default, but you can use them if you like.
To assign a Page Up or Page Down button, do the following:
- Go the Buttons Tab
- Use the page selector at the bottom of the window to select the button page where you want to have this page button.
- Double-click the button you wish to convert to a Page button
- Set the Button Type option to Page Up, Page Down or Page/IA Store as desired.

- If desired, you can set the Min Page and Max Page limits. This controls the range of pages that the page button accesses. If you want the Page buttons to access all button pages, set the Min Page and Max Page parameters to the same number.

Usually, you will want a page button to be global. That is, the button should appear on every button page so you can always switch to the next page. To do this, turn on the Global checkbox.
Click Done when you're finished editing the button.
On the Mastermind GT, you can have a Page Menu button. When pressed, it displays a list of your available button pages which you can use to select the page to view.
To assign a Page Menu button, do the following:
- Go the Buttons Tab
- Use the page selector at the bottom of the window to select the button page where you want to have this page button.
- Double-click the button you wish to convert to a Page Menu button
- Set the Button Type option to Page Menu.


If you want this button to appear on every button page, turn on the Global checkbox.
Click Done when you're finished editing the button.
You can use an IA Button to jump to a specific button page instead of cycling through a range of pages, like the Page Up/Down buttons do.
To set up an IA button to jump to a page, follow these steps:
- Go the Buttons Tab
- Use the page selector at the bottom of the window to select the button page where you want to have this page button.
- Double-click the button you wish to convert to a IA button
- Set the Button Type option to IA
- Turn off all checkboxes except Momentary, which should be turned on. A button that selects a page should never turn on and stay on, it should only trigger when pressed. This is why Momentary is selected here.
- In the IA Actions section at the bottom of the window, select any actions that are in the gray box to the left. Select each line and click Remove Action to delete it.
- Now, click New Action, and set Action Type to System and Subtype to Page
- Set the page number to the desired page.


Set up a Group of Buttons that Recall Presets on a Device
You can set up some buttons that change presets on a specific MIDI device, without the need to change presets on your Mastermind. There are two ways to do this. The instructions assume you are putting the buttons on an existing button page. If you need to add a new button page, follow the instructions found in the Create a Button Page that Controls a Device section.
Using Device PC+ and Device PC- Buttons
The Device PC+ and Device PC- button types will let you move through the presets on a single MIDI device. Each press advances up or down one preset as appropriate, sending a MIDI PC (Program Change) message to the device.
On the Mastermind GT, the button will display the current PC number (and bank number, if appropriate) for the device.
On the Mastermind LT and PBC, the current PC and bank will be displayed briefly in the main display if you have the Show Button Names global parameter turned on.

You can repeat this, creating PC+ and PC- buttons for any devices you wish.
Saving Device PC+/PC- Settings
When you use an IA Store button, the PC number for each device will be stored to the current Mastermind preset. When you return to that preset, the devices will return to the last saved PC. In the PBC/10's factory configuration, holding the Loops button will store your IA state and PC numbers. On the LT and PBC/6X, holding the Function button will store IA state and PC numbers.
You can also set things up so that there are individual buttons that select specific presets on a device. You can do this with IA buttons.
First, go to the Buttons Tab and double click the first button you wish to have control your device. The Button Edit Page will pop up.
First, set the Button Type parameter to IA.

Next, set the Group parameter to a group number that is not being used elsewhere.

Also make sure the Send on Preset Change and Update on Preset Change checkboxes are checked. This allows you to save the on/off state of these buttons in each preset and have the device PC automatically recalled when you change presets.
Next, in the Actions section at the bottom of the window, delete any actions in the action list on the left side. Click on each action, then click Remove Action to delete it.
Now, click New Action. Set Action Type to PC. Set Device to the desired device. Set PC Number (off) to None, and set PC Number (on) to the PC number you want this button to select on the device.
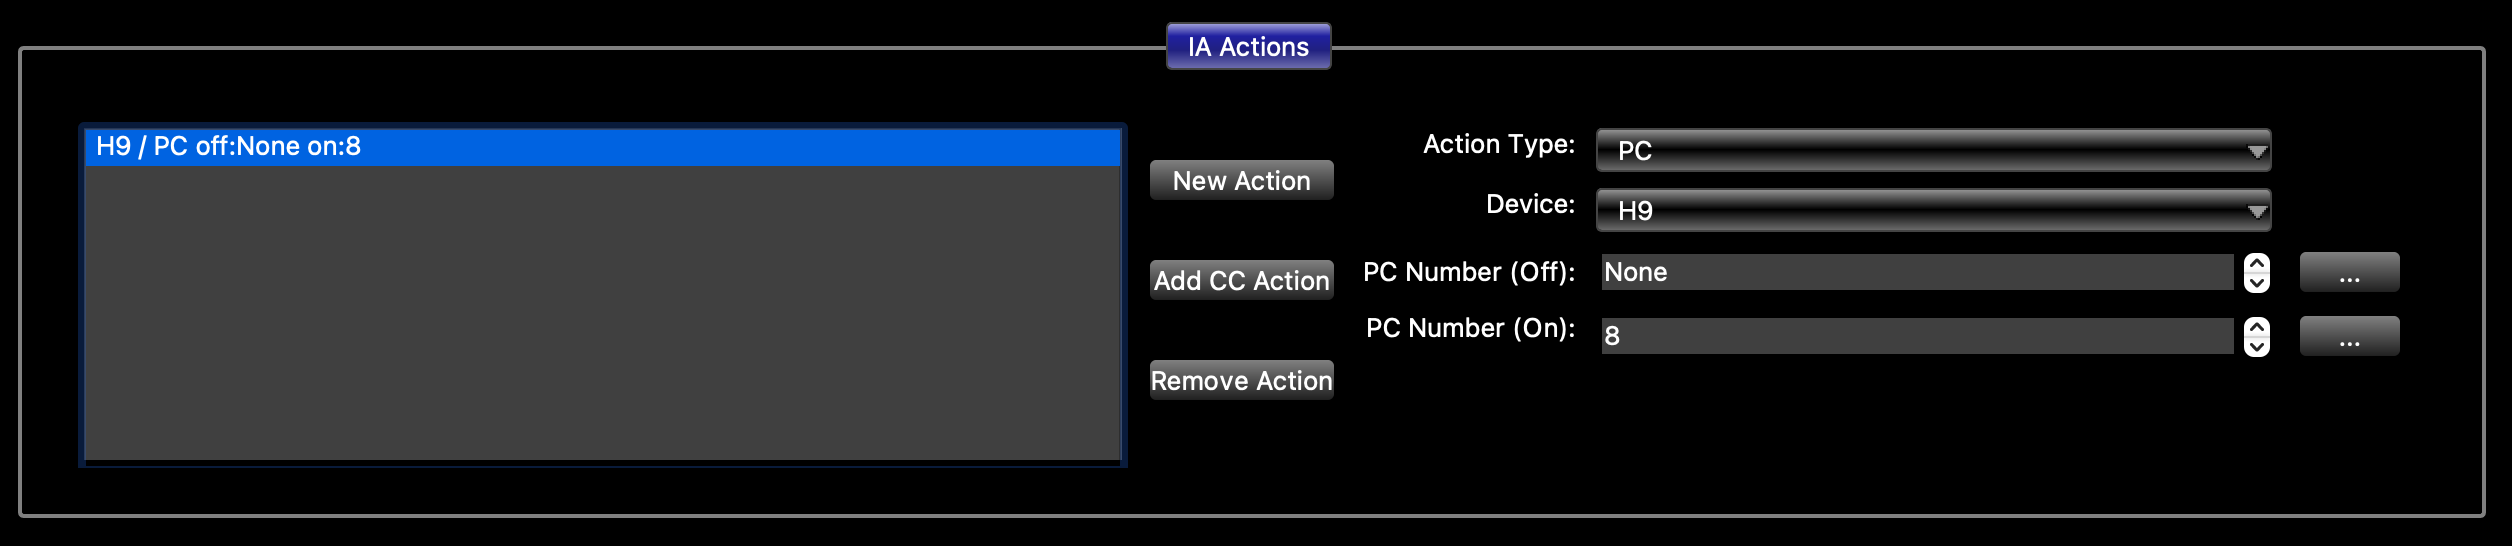
Repeat this for each button you wish to set up to send PCs to your device. Make sure that each of these buttons is assigned the same group number. This will insure that only one button in the group can be on at any time.
The last thing you need to do is set up the button group, This is done in the Globals Tab. At the bottom left of the window, select the group number you used for your buttons, then make sure that Send Off messages and Allow all buttons off are not checked for that group.
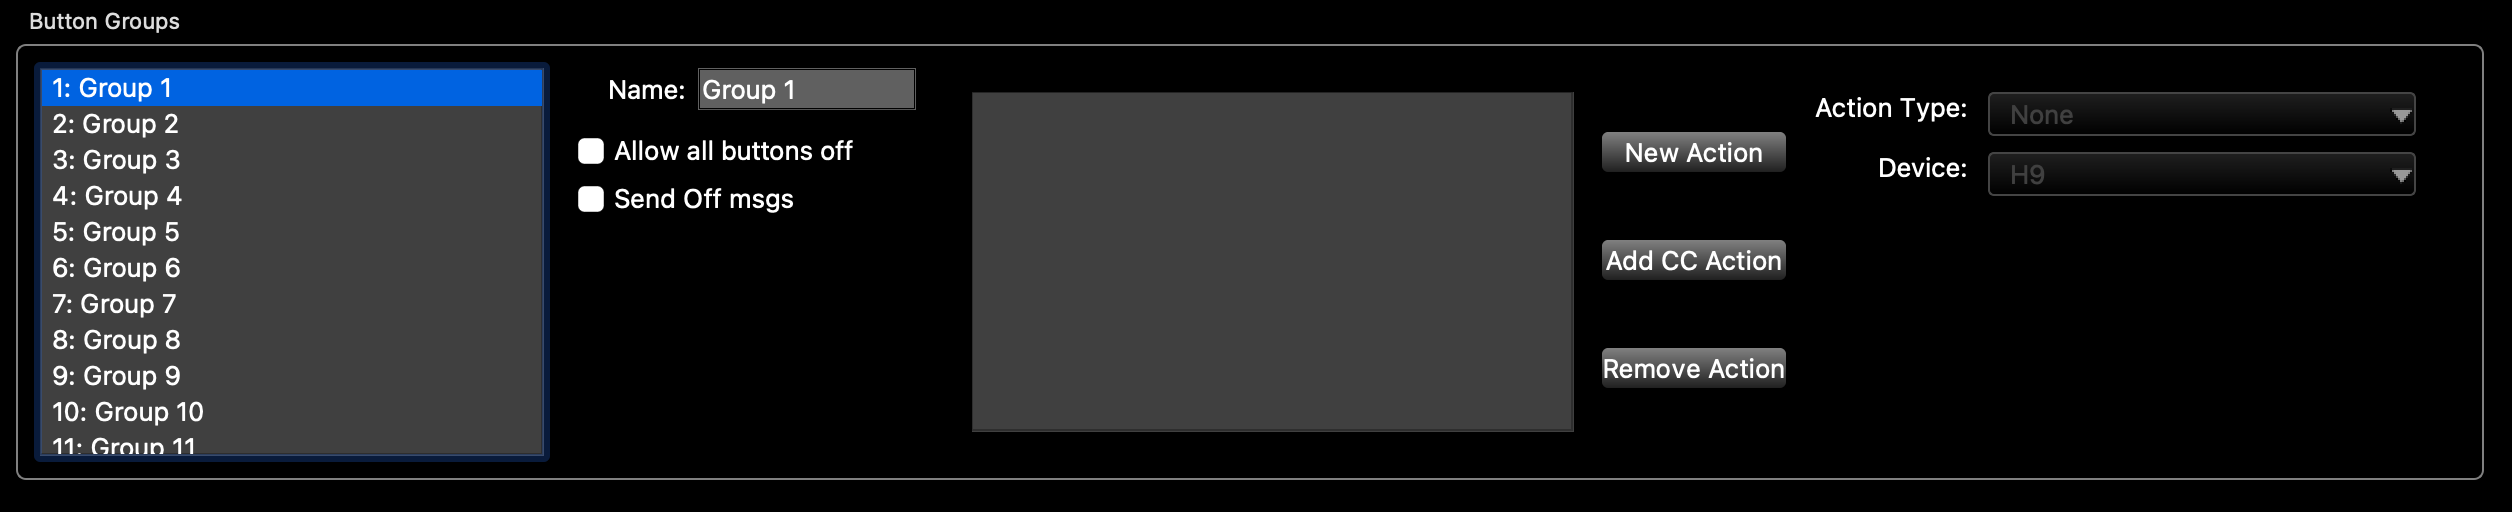
Option 1: Send a different preset when all buttons are turned off
You can set up the button group so that pressing the currently selected button again will turn the button off, switching the effect device to a certain preset. Usually, this is a preset that has no effect or is bypassed, but it can be any preset you wish.
First, in the Globals Tab, turn the Allow all buttons off checkbox ON for the group you're using. Make sure Send Off msgs is still turned off.
Next, edit each of the buttons you're using to control the device. Go the action list, select the PC action and set the PC Number (off) parameter to the number of the desired preset.
Option 2: Turn a loop off when all buttons are turned off
This option allows you to automatically control an effect loop so that it turns on when you select a preset on the device. The loop will turn off when you press the currently selected button again, turning the button off.
First, go to the Globals Tab, turn the Allow all buttons off checkbox ON for the group you're using. Make sure Send Off msgs is still turned off.
Next, you need to edit the buttons to perform the desired action:
To send a MIDI CC message to a switcher: On each button that controls your effect, add a second action that sends the desired CC number. If your switcher is in the device database, you can press Add CC Action, then select your device and CC number in the window that pops up.
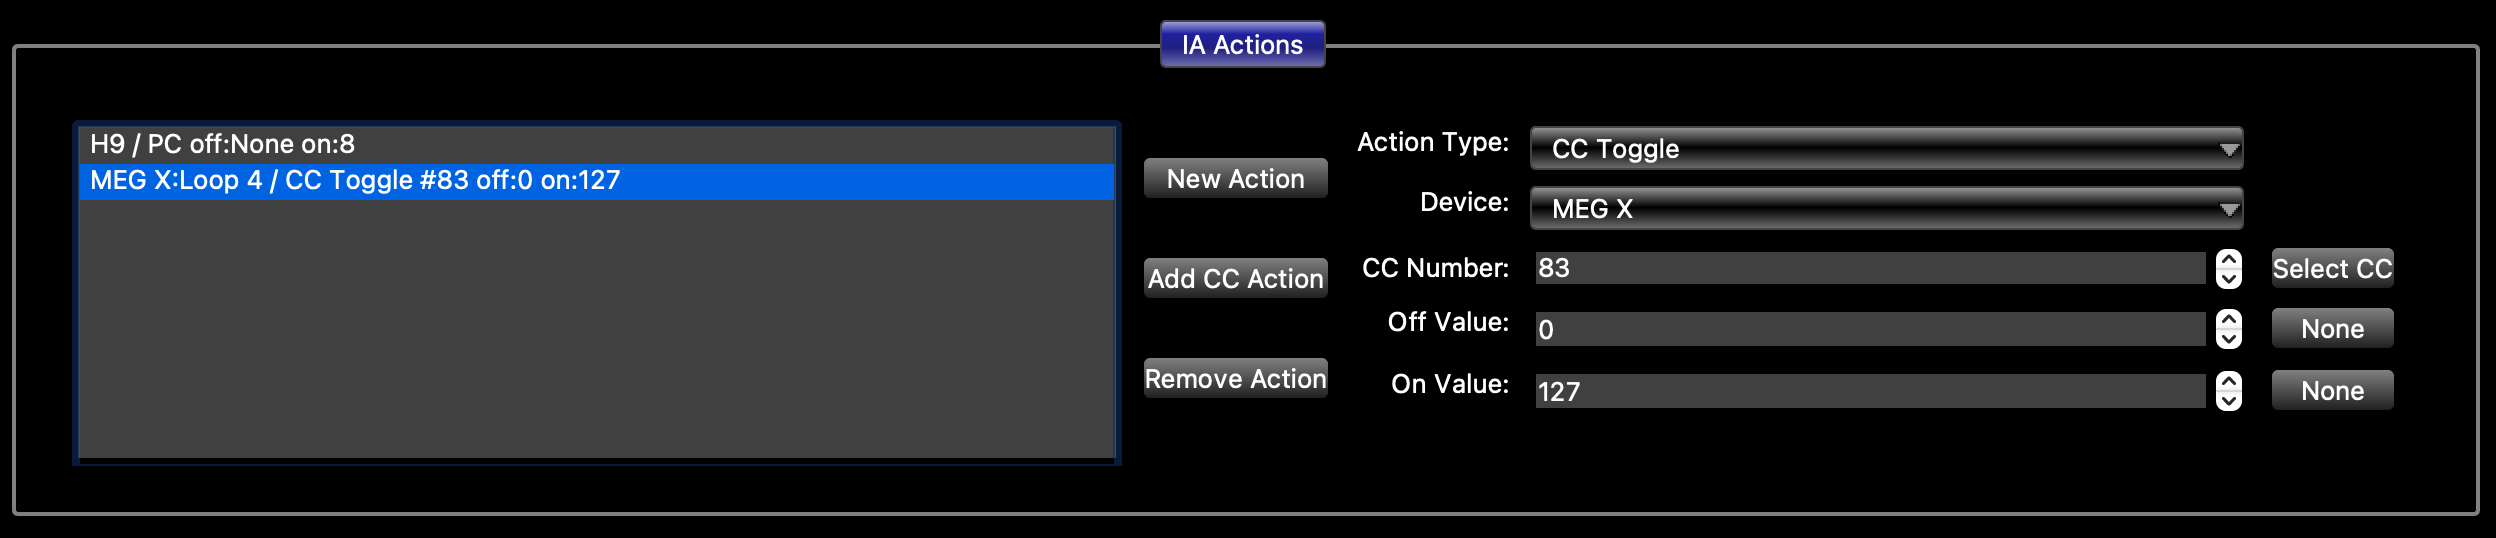
To control a Mastermind PBC loop: In each button that controls your effect, add a second action that controls the loop containing your effect. Press New Action, then set Action Type to Audio. Next, set Subtype to Loop and set your loop number. Make sure Off Value is set to OFF and On Value is set to ON.