Editing Buttons
Your device will have a default button configuration right out of the box, so you may wish to skip this step at first and get right to editing presets. However, if you're ready to start changing your buttons, this is what you need to do:
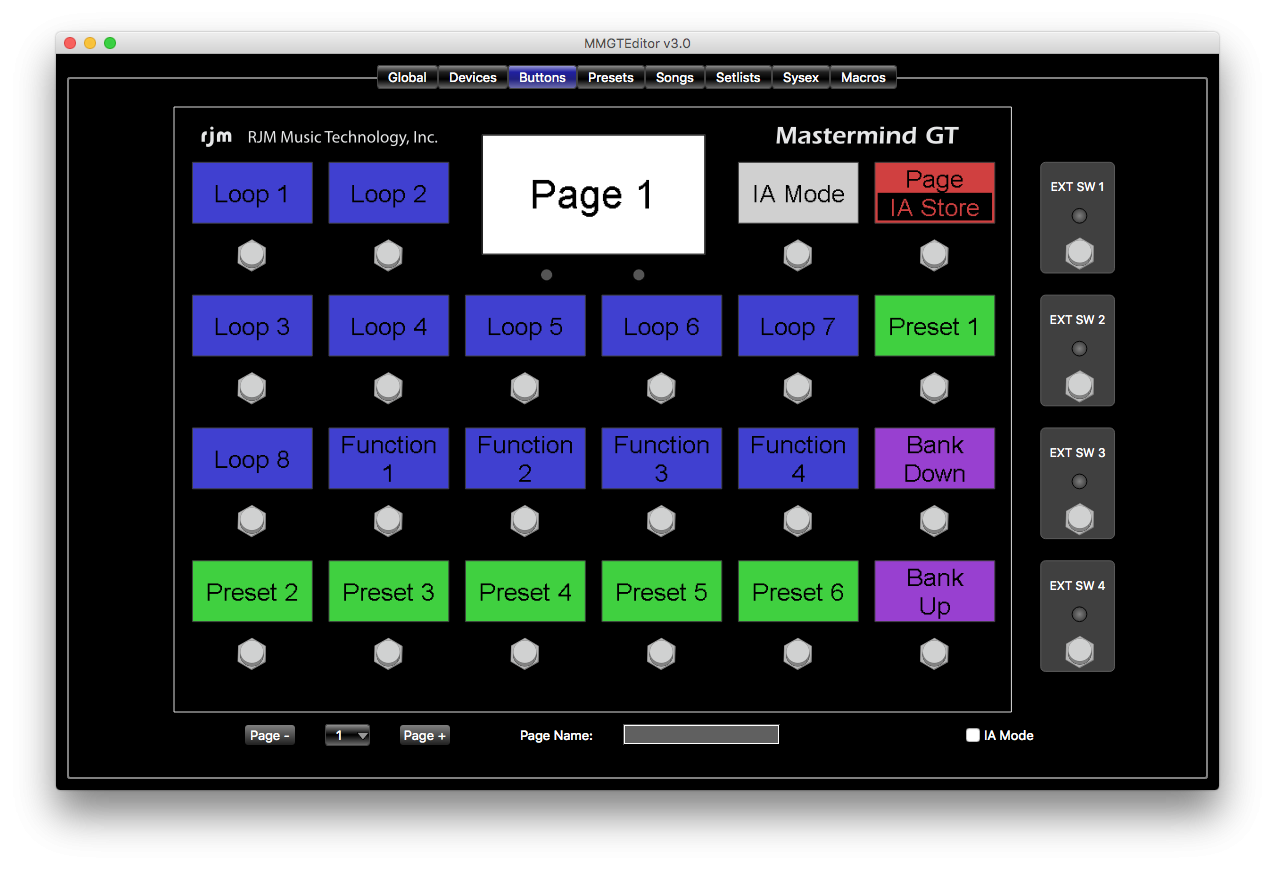
In the editor, switch to the Buttons tab to begin working with your button configuration. You'll see a virtual display of your device, showing its current configuration. At the bottom of the screen are controls that allow you to select which of the 16 button pages is currently visible. You can also name the button page here.
The most basic operation is swapping the position of two buttons. Simply click and drag a button to a new position, and the source and destination buttons will switch locations. (Note: in the Mastermind GT editor, you drag the LCD display over another display instead of the button itself).
When you right-click on a button (or Ctrl-click on a Mac), a menu pops up. This menu allows you to perform basic operations on the button, including copy and paste, and also assigning the button to control a particular function on a device.
Copy and Paste a Button
To copy and paste buttons, simply right-click on a button and select Copy. Then right-click on the button position where you wish to move the button to, and select Paste. You can copy buttons from one page to another using this method.
Assign CCs
If you're using devices that were selected by manufacturer and model on the Devices page, then you can easily assign buttons to control functions on those devices. Right-click on the button (or Ctrl-click on a Mac) , then go to Assign CC. A submenu will pop up, showing your devices. Under those device entries, you'll see a list of functions. These could be loops on a device like an Effect Gizmo, an effect block on a multi-effect processor, or anything else that can be controlled by a MIDI continuous controller message. Select the desired function and the button will now be set to control that function.
Other Options
The rest of the right-click menu options are described in the Buttons Tab section.
Double-clicking on a button opens up the full button edit page. This page allows you to edit all of a button' s parameters in detail. You can find more information in the Button Edit Page section.
External Switches
You can connect two external switches to a Mastermind LT or PBC and four to the Mastermind GT. These additional switches can perform any function the internal switches can, except that they're limited to having a single color LED indicator.
You can edit the external switch settings by double clicking on them in the Buttons Tab. They're positioned on the right side of the virtual Mastermind display. As of the 4.0 firmware, external switches can have different settings on each page just like internal buttons can, although the external switches are set to be global by default. If you'd like to have different external switch settings on different pages, edit the external switch and turn off the Global checkbox.
You can also override these global settings in any preset by editing the external switch settings in the Presets Tab.
More information can be found in Mastering the Mastermind Episode 6, Button Editing part 1 and Episode 7, Advanced Button Editing


No comments to display
No comments to display